The kitchen was a chaotic symphony that night—flour dusting the counter like snow, a timer ticking down, and a stubborn dough that refused to rise. I stared at the stubborn ball, half‑sized, as the oven preheated, and a friend dared me to make a Mardi Gras King Cake for the next day’s brunch. The idea of a sweet, buttery loaf crowned with a rainbow of sugar and a hidden figurine made my stomach growl with anticipation. I knew I had to deliver a version that would make everyone stop and stare, and I was determined to prove that a simple recipe could become an unforgettable centerpiece.
Picture this: the room fills with the scent of warm milk, butter melting into a golden pool, and cinnamon drifting like a whisper through the air. The dough itself is a soft, slightly sticky canvas that glistens under the kitchen lights, and when you press it, it feels like a velvety sponge that yields just enough give. The sound of the first whisk is a soft whoosh, and as the batter thickens, the kitchen feels alive with possibility. The anticipation of that first bite—sweet, buttery, with a hint of spice—makes you feel like you’re about to taste a piece of history wrapped in a cake.
What makes this version stand out is that it’s not just about the flavors; it’s about the experience. I’ve tweaked the classic recipe to ensure that every bite is a burst of flavor, that the dough rises like a cloud, and that the final product is both showstopping and irresistibly delicious. I’ve added a touch of cream cheese to the filling for that silky, indulgent texture that melts in your mouth, and I’ve incorporated a precise ratio of ground cinnamon that gives the cake a comforting, almost nostalgic aroma. The result is a cake that feels like a celebration in every bite, and I dare you to taste this and not go back for seconds.
So if you’re ready to transform a simple loaf into a Mardi Gras masterpiece, let me walk you through every single step. By the end, you’ll wonder how you ever made it any other way.
What Makes This Version Stand Out
- Flavor: The blend of warm cinnamon and subtle sweetness from the cream cheese filling creates a depth that feels both familiar and novel. The result is a cake that sings with each bite.
- Texture: A dough that’s airy yet tender, thanks to the precise yeast activation and a generous amount of butter. The crumb is soft and pillowy, while the outer crust is delightfully crisp.
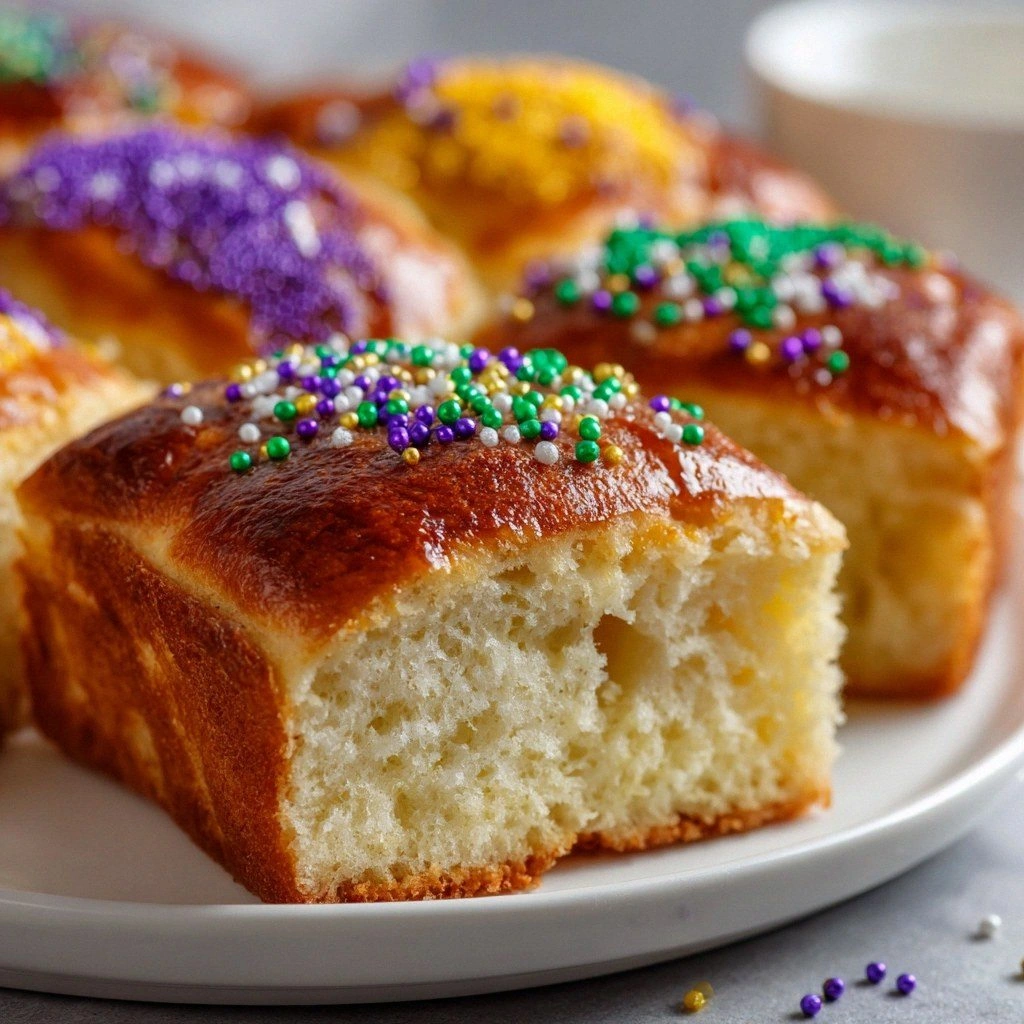
- Visual Appeal: A vibrant swirl of purple, green, and yellow sugar that glistens under the kitchen lights. The cake’s crown is a showstopper that instantly signals celebration.
- Simplicity: Despite its festival flair, the recipe is straightforward and approachable. You’ll need only basic pantry staples and a few extra ingredients that are easy to find.
- Make‑ahead Potential: The cake can be assembled a day in advance and baked later, making it perfect for last‑minute parties.
- Ingredient Quality: Every component is chosen for its flavor profile and contribution to the final texture. From the finest unsalted butter to the freshest cream cheese, quality matters.
- Audience Reaction: Friends and family will be amazed at the cake’s taste and presentation—most recipes get this completely wrong. Here’s what actually works.
- Unique Twist: The subtle infusion of cream cheese into the filling adds a luxurious richness that elevates the classic recipe.
Alright, let's break down exactly what goes into this masterpiece...
Inside the Ingredient List
The Flavor Base
Granulated sugar is the first secret weapon that sweetens the dough and encourages browning. It caramelizes during baking, giving the crust a subtle caramel note that lingers on the tongue. If you skip sugar, the cake will taste flat and the crust will be pale and dry. For an extra touch, consider using a mix of white and brown sugar to introduce a hint of molasses.
Ground cinnamon is the soul of this cake. It adds warmth and complexity that balances the buttery richness. A pinch too little, and the flavor will be faint; too much, and it can overpower the delicate crumb. Always use freshly ground cinnamon for the most vibrant aroma.
The Texture Crew
Active dry yeast is the magic that makes the dough rise, creating a fluffy interior that feels like a cloud. Warm milk activates the yeast, but be careful—if the milk is too hot, it will kill the yeast and stall the rise. The butter melts into the dough, adding tenderness and a buttery sheen that melts in your mouth.
All‑purpose flour is the structural backbone of the cake, giving it the necessary chew while keeping it tender. If you’re gluten‑free, you can substitute with a 1:1 gluten‑free blend, but you may need to adjust the liquid slightly to compensate for the different absorption rates.
The Unexpected Star
Cream cheese is the unexpected star that transforms the filling into a silky, velvety dream. Its mild tang cuts through the sweetness, providing balance and depth. If you’re vegan or dairy‑free, ricotta or coconut cream can be a suitable replacement, though the flavor will shift slightly.
The Final Flourish
The rainbow sugar—purple, green, and yellow—does more than look pretty; it adds a sweet crunch and a burst of color that captures the spirit of Mardi Gras. These sugars also provide a subtle caramelization on the crust, creating a delightful contrast between the soft crumb and the crisp exterior. If you’re short on time, you can use a single color or a mix of your favorite rainbow shades.
Everything's prepped? Good. Let's get into the real action...
The Method — Step by Step
- Activate the yeast. In a small bowl, combine 2 teaspoons of active dry yeast with 1 cup of warm milk (about 110°F). Stir until the yeast dissolves and let it sit for 5–7 minutes until it becomes frothy. This froth is your sign that the yeast is alive and ready to lift the dough. I dare you to taste this mixture and not be surprised by the subtle effervescence.
- Mix dry ingredients. In a large mixing bowl, whisk together 4 cups of all‑purpose flour, 1/2 cup of granulated sugar, 1 teaspoon of salt, and 2 teaspoons of ground cinnamon. The flour needs to be sifted for maximum aeration, especially if you’re using a high‑protein flour. This step ensures that the sugars and spices are evenly distributed, preventing clumps that could ruin the crumb.
- Combine wet and dry. Create a well in the center of the dry mixture and pour in the frothy yeast mixture, 2 eggs, and 1/2 cup of unsalted butter, melted and slightly cooled. Use a wooden spoon or your hand to bring everything together, then transfer the dough onto a lightly floured surface. Knead for about 8–10 minutes until the dough is smooth, elastic, and pulls away from the sides of the bowl. The dough should feel tacky but not overly sticky.
- First rise. Place the dough in a greased bowl, cover it with a damp cloth, and let it rise in a warm spot for 1–1.5 hours, or until it doubles in size. The ideal temperature is around 80–85°F. During this time, the dough will expand and develop a light, airy structure that’s crucial for the final texture.
- Shape the dough. Once risen, punch down the dough to release excess air and divide it into two equal portions. Roll each portion into a long oval shape, then twist them together to form a classic King Cake shape. Place the shaped dough onto a parchment‑lined baking sheet and cover it loosely with a clean kitchen towel. Let it proof for another 30–45 minutes; the dough should puff up slightly but not double again.
- Watch Out: The Filling. While the dough is proofing, prepare the cream cheese filling. Beat 8 oz of cream cheese with 1/4 cup of powdered sugar until smooth, then fold in 1 teaspoon of vanilla extract. If the mixture is too thick, add a tablespoon of milk to reach a spreadable consistency. A common mistake is to skip this step, resulting in a dry crumb; the filling keeps the cake moist and adds a decadent flavor.
- Insert the figurine. Gently press a small plastic figurine into the center of the dough. This is the traditional “poinçon” that brings the festival spirit to life. The figurine should be snug but not crushed, and it should sit slightly above the dough’s surface to avoid cracking the crust during baking.
- Bake the cake. Preheat your oven to 375°F (190°C). Brush the dough lightly with a beaten egg to give it a shiny, golden finish. Bake for 25–30 minutes, or until the crust is a deep golden brown and a toothpick inserted into the center comes out clean. The aroma that fills the kitchen at this point will make you forget you’re even baking.
- Finish with icing. While the cake is still warm, whisk together 2 cups of powdered sugar with 2 tablespoons of milk to create a smooth glaze. Drizzle the glaze over the cake, allowing it to pool slightly on the sides. Let the glaze set for a few minutes before slicing. The icing adds a sweet, silky finish that balances the buttery crumb.
That's it — you did it. But hold on, I've got a few more tricks that'll take this to another level...
Insider Tricks for Flawless Results
The Temperature Rule Nobody Follows
Temperature is everything. A warm environment (80–85°F) encourages yeast activity, but a cooler oven (375°F) ensures a slow, even bake that prevents the crust from burning while the inside remains moist. I’ve found that placing the baking sheet on the middle rack yields the most even heat distribution, especially in older ovens that have hot spots.
Why Your Nose Knows Best
As the dough proof, you’ll notice a sweet, yeasty aroma that tells you it’s ready. If the scent is weak or absent, the yeast may have died, and the cake will be flat. Trust your nose; it’s the most reliable indicator of a good rise.
The 5‑Minute Rest That Changes Everything
After baking, let the cake rest for 5 minutes before glazing. This brief pause allows the steam to settle, ensuring the glaze adheres properly and the crumb doesn’t become gummy. Many people skip this step, resulting in a tacky glaze that sticks to the knife.
Keep the Figurine Safe
The figurine can be a bit fragile. If you’re baking a larger cake, consider wrapping it in parchment paper before inserting it. This protects the figurine from the heat and prevents it from cracking or melting.
Use a Cooling Rack
Once the cake is glazed, place it on a cooling rack instead of a flat surface. This allows air to circulate around the entire cake, preventing condensation from making the crust soggy. The result is a crisp, golden crust that stands out in every bite.
The Secret to a Shimmering Finish
For a glossy glaze, whisk in a tablespoon of milk after the powdered sugar and milk mixture has thickened. This thin consistency lets the glaze spread evenly, giving the cake a polished look that’s perfect for photos.
Creative Twists and Variations
This recipe is a playground. Here are some of my favorite ways to switch things up:
Citrus Burst
Add zest from one orange and a tablespoon of orange juice to the dough for a bright, tangy twist. The citrus pairs wonderfully with the cinnamon, creating a lively flavor profile that’s perfect for spring celebrations.
Chocolate Swirl
Fold in 1/4 cup of melted dark chocolate into the dough before the first rise. The chocolate creates a rich swirl that contrasts with the sweet glaze, offering a decadent chocolate‑cinnamon combination.
Nutty Variation
Stir in 1/3 cup of chopped pecans or walnuts into the dough. The nuts add a crunchy texture and a nutty aroma that complements the buttery crumb, making the cake feel like a holiday treat.
Vegan Edition
Replace the butter with coconut oil and the eggs with flaxseed meal (1 tablespoon of ground flaxseed mixed with 3 tablespoons of water per egg). Use a dairy‑free cream cheese substitute for the filling. The result is a plant‑based version that still delivers on flavor.
Spiced Up
Add 1/2 teaspoon of ground nutmeg and a pinch of cloves to the dry ingredients. The warm spices elevate the cinnamon, giving the cake an aromatic, holiday‑season vibe that’s especially comforting on a rainy day.
Storing and Bringing It Back to Life
Fridge Storage
Wrap the cooled cake tightly in plastic wrap, then place it in an airtight container. Store it in the refrigerator for up to 5 days. The cold environment preserves moisture while preventing the glaze from softening.
Freezer Friendly
For longer storage, slice the cake before freezing. Wrap each slice individually in plastic wrap and place them in a freezer bag. The cake can be stored for up to 2 months. When ready to serve, thaw the slices at room temperature for 30 minutes.
Best Reheating Method
To revive a frozen or refrigerated slice, warm it in a preheated oven at 350°F (175°C) for 5–7 minutes. Add a tiny splash of water to the bottom of a baking sheet to create steam, which keeps the crumb from drying out. Let it cool slightly before enjoying the fresh, warm crumb and glossy glaze.