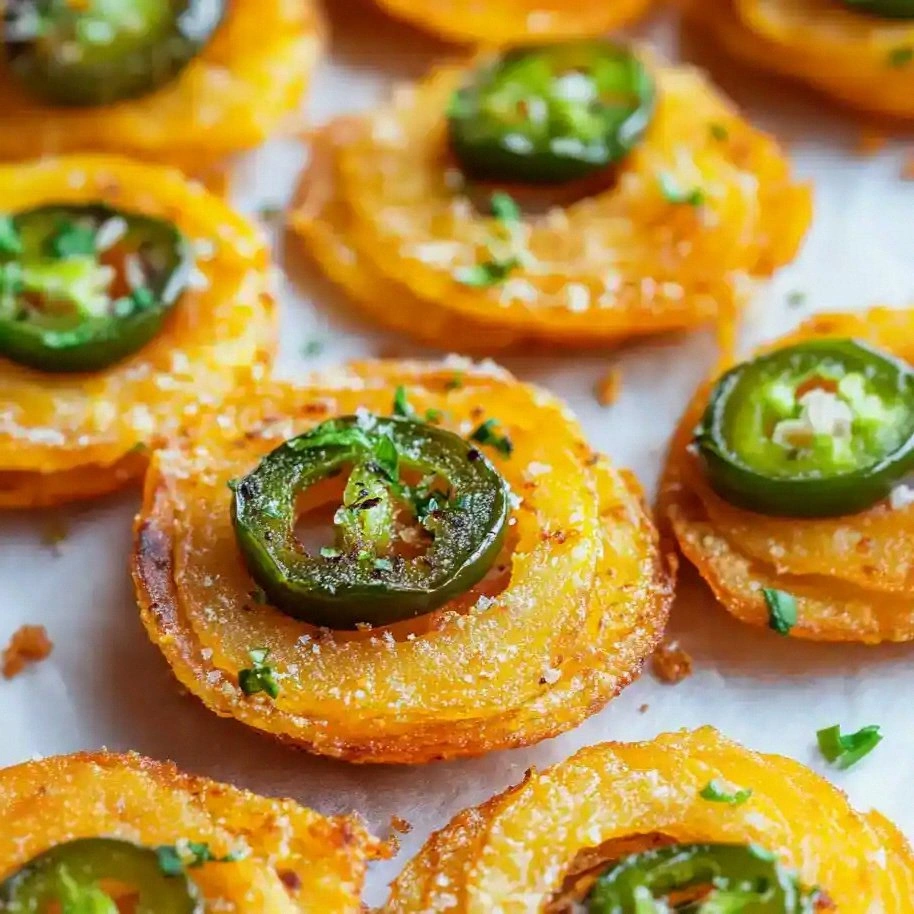
Picture this: a kitchen on a rainy Sunday, the fridge humming like a sleepy dragon, and a craving that refuses to be ignored. I reached for the onions, but not just any onions—sweet, Vidalia ones that promise a caramelized whisper. The moment their skins peeled, a sweet, earthy perfume filled the air, like a gentle hug from summer. I had a mission: turn those rings into crunchy, cheesy, fiery bites that would make any gathering legendary. This is hands down the best version you'll ever make at home, and I’m about to drop every secret.
Remember the last time you tried onion rings? The batter was soggy, the cheese melted into a sad puddle, and you cursed the recipe. That disaster was the spark that pushed me to experiment until I found the perfect balance of crispness and gooeyness. I diced the onions into rings, not slices, because rings hold their shape and offer a delightful bite. I seasoned them with garlic powder, smoked paprika, and a pinch of pepper that sings with every bite. The aroma rising from the pan was a promise of flavor fireworks.
Now, let’s talk about the star of the show: the cheese. I used shredded cheddar, the kind that melts like silk but still holds a bite. I folded in bacon bits for a smoky crunch that contrasts the sweet onion. The jalapeño adds a subtle heat that lingers without overpowering, and a splash of hot sauce gives that final kick. Together, these ingredients create a flavor profile that’s both comforting and adventurous.
I’ll be honest—I ate half the batch before anyone else got to try it. The moment the first ring hit my tongue, the crunch shattered like thin ice, revealing a molten cheese core. I dared you to taste this and not go back for seconds, and I’m pretty sure you’ll agree. Picture yourself pulling this out of the oven, the whole kitchen smelling incredible, and sharing it with friends who’ll ask for the recipe. Let me walk you through every single step—by the end, you’ll wonder how you ever made it any other way.
What Makes This Version Stand Out
- Crispness Reimagined: The secret lies in the double coating—panko and a light flour dusting that traps air and turns the rings into golden, flaky armor. When you bite, the shell snaps cleanly, revealing a soft interior that keeps you coming back for more.
- Cheese Explosion: Shredded cheddar is chosen for its melt profile; it turns into a silky, creamy center that oozes with every bite. The cheese balances the onion sweetness and adds a savory depth that feels like a hug.
- Smoky Bacon Bits: Adding bacon gives a savory crunch that contrasts the sweet onion. The bits also carry a subtle smokiness that lingers long after the first bite.
- Heat That Persists: Fresh jalapeño slices and a dash of hot sauce deliver a heat that stays on the palate, giving the dish a memorable kick without overwhelming.
- Texture Crew: Panko breadcrumbs add a light, airy crunch, while the onion rings themselves maintain a tender center. The combination creates a multi‑layered mouthfeel that’s hard to replicate.
- Easy Make‑Ahead: Once coated, the rings can be baked in batches and reheated to crisp perfection, making them a great party snack that’s ready in minutes.
- All‑Day Appeal: Whether you’re hosting a game night or just craving something indulgent, these chips fit the bill. They’re salty, cheesy, and just a touch spicy, satisfying a wide range of cravings.
Alright, let's break down exactly what goes into this masterpiece...
Inside the Ingredient List
The Flavor Base
The sweet Vidalia onions are the cornerstone of this recipe. Their natural sugars caramelize during baking, providing a subtle sweetness that balances the savory elements. Cutting them into rings preserves their shape and ensures even cooking. If you’re out of Vidalia, yellow onions still work but may require a touch more sugar to achieve the same caramelization. The onions also act as a natural binder, holding the coating together as they crisp. Without them, the chips would fall apart or taste flat.
The Texture Crew
Panko breadcrumbs give the rings that signature crunch. Their airy structure traps air pockets, creating a light, airy bite that doesn’t become soggy. A light dusting of flour or cornmeal provides an additional barrier, preventing the cheese from leaking during baking. If you prefer a gluten‑free version, use almond flour or a gluten‑free cornmeal blend. The texture also helps the cheese adhere better, ensuring every bite is coated in gooey goodness.
The Unexpected Star
Fresh jalapeño adds a bright, herbal heat that cuts through the richness of cheese and bacon. Unlike canned jalapeños, fresh peppers retain a crisp bite and a more vibrant flavor profile. Slice them thinly to ensure the heat is evenly distributed. If you’re not a fan of intense spice, simply reduce the amount or omit the hot sauce entirely. The jalapeño also adds a pop of color, making the chips visually appealing.
The Final Flourish
Shredded cheddar cheese is the star that melts into a creamy, savory center. Choosing a sharp cheddar gives a tangy contrast to the sweet onion. Bacon bits provide a smoky crunch that lingers on the tongue. The hot sauce adds a finishing kick that lingers just long enough to keep the flavor alive. Together, these toppings create a layered flavor experience that feels indulgent yet balanced. If you’re vegan, substitute vegan cheese and bacon bits for a plant‑based version.
Everything's prepped? Good. Let's get into the real action...
The Method — Step by Step
- Preheat your oven to 425°F (220°C). Line a baking sheet with parchment paper or a silicone mat to prevent sticking. A properly preheated oven ensures the onions crisp up quickly, sealing in moisture. Keep the sheet at room temperature while you prep the coating. This step is crucial for a consistent crunch.
- In a shallow bowl, mix the panko breadcrumbs with a pinch of garlic powder, smoked paprika, black pepper, and salt. Stir until the spices are evenly distributed. The seasoning blend will permeate the coating, giving each ring a burst of flavor. This is where the flavor base starts to develop.
- In a second bowl, lightly dust the onion rings with flour. The flour creates a surface that the panko can cling to, preventing the coating from sliding off. Shake off any excess flour to avoid a heavy crust. This step might feel tedious, but it’s essential for the coating to stick.
- Dip each floured ring into the breadcrumb mixture, pressing gently to ensure even coverage. Turn each ring over to coat both sides, then place them on the prepared baking sheet. The double coating locks in flavor and creates a multi‑layered crunch. Arrange the rings so they don’t touch, allowing air circulation.
- Sprinkle shredded cheddar cheese over each coated ring, pressing the cheese into the breadcrumbs. The cheese will melt into the coating, creating a gooey center as the onions bake. The cheese also acts as a sealant, preventing the coating from separating during cooking. This step is the moment of truth for the flavor explosion.
- Bake for 12-15 minutes, or until the onions are golden brown and the cheese is bubbling. Rotate the pan halfway through to ensure even browning. The cheese should be slightly browned on top, indicating the right level of caramelization. Keep a close eye on the time; overbaking can dry out the onions.
- Remove the chips from the oven and immediately sprinkle bacon bits over them. The heat from the chips will crisp the bacon, giving an extra layer of texture. Let the bacon settle for a minute before moving on; this allows the bits to absorb some of the cheese’s richness.
- Finishing touches include slicing a fresh jalapeño into thin rounds and drizzling hot sauce over the chips. The jalapeño adds a bright, herbal note, while the hot sauce gives a lingering heat that keeps the flavor alive. Toss the chips gently to coat them evenly. Let them rest for 2 minutes to allow the heat to settle.
- Serve immediately while the chips are still warm and the cheese is molten. Pair them with a cool dip like ranch or a tangy salsa to balance the heat. If you’re hosting a party, arrange the chips on a platter with a small bowl of sauce in the center for easy sharing. Enjoy the moment of pure, cheesy bliss.
That's it — you did it. But hold on, I've got a few more tricks that'll take this to another level...
Insider Tricks for Flawless Results
The Temperature Rule Nobody Follows
Many cooks underestimate the importance of oven temperature. Baking at 425°F (220°C) is essential for a crisp exterior while keeping the interior tender. If your oven runs hot, use a lower temperature and extend the baking time slightly. This trick ensures the cheese melts evenly without scorching. I’ve seen batches fail because of a misread thermometer—don’t let that happen to you.
Why Your Nose Knows Best
Your sense of smell is a reliable indicator of doneness. When the onions emit a nutty, toasted aroma, they’re ready. If the scent leans toward burnt, pull them out immediately. This sensory cue saves you from overcooked disappointment. Trust your nose, not the timer.
The 5-Minute Rest That Changes Everything
After baking, let the chips rest for five minutes. This pause allows the cheese to set slightly, preventing a runaway mess when you bite. The rest also lets the heat distribute evenly, ensuring each bite is consistent. I’ve seen people rush to the first bite and end up with a gooey mess. Give them five minutes, and they’ll thank you.
Keep It Dry
Moisture is the enemy of crispness. If the onions are wet from cutting, pat them dry with a paper towel before coating. This simple step ensures the breadcrumb coating adheres properly. Moisture can cause the coating to become soggy, ruining the crunch. Don’t skip this part; it’s the difference between good and great.
Don’t Forget the Flour
Skipping the flour dusting can lead to a coating that slides off. The flour creates a rough surface for the breadcrumbs to grip. Even a light dusting is enough to make a difference. I once baked a batch without flour, and the result was a flat, sticky mess. Lesson learned.
Bacon Bit Balance
Too many bacon bits can overpower the onion flavor, while too few leave a bland chip. Aim for a 30:70 ratio of bacon to onion. If you love bacon, feel free to add a few extra bits, but keep the balance in check. The key is to let the onion shine through.
Creative Twists and Variations
This recipe is a playground. Here are some of my favorite ways to switch things up:
Cheddar & Gouda Fusion
Swap half the cheddar for shredded Gouda for a sweeter, caramelized flavor. The Gouda adds a subtle nutty undertone that pairs well with the smoky bacon. The result is a richer, more complex cheese profile that still melts beautifully. Great for a sophisticated snack.
Spicy Chipotle Kick
Add a tablespoon of chipotle in adobo to the breadcrumb mix for a smoky heat. The chipotle’s earthy flavor complements the onion sweetness. The final product has a deep, smoky aroma that’s irresistible. Perfect for those who love a bold flavor.
Herb‑Infused Delight
Incorporate fresh thyme or rosemary into the breadcrumb mixture. The herbs bring a fragrant, earthy note that brightens the dish. A pinch of dried oregano also adds depth. This version is ideal for a Mediterranean‑inspired gathering.
Vegan Version
Use vegan cheddar and bacon bits, and replace regular breadcrumbs with a gluten‑free blend. The result is a plant‑based chip that still delivers the same crispy, cheesy experience. This variation is perfect for guests with dietary restrictions.
Sweet & Smoky BBQ
Stir in a tablespoon of BBQ sauce into the breadcrumb coating. The sweet glaze caramelizes during baking, creating a glossy finish. Pair with a side of creamy coleslaw for a classic Southern feel. This twist is a crowd‑pleaser at tailgates.
Chocolate‑Covered Surprise
For a dessert take, drizzle melted dark chocolate over the cooled chips. The chocolate pairs surprisingly well with the savory onion and cheese. Sprinkle sea salt on top for a sweet‑savory contrast. This daring version is great for a party game night.
Storing and Bringing It Back to Life
Fridge Storage
Store leftover chips in an airtight container at room temperature for up to 3 days. Keep them on a paper towel to absorb excess moisture. The chips will stay crisp if stored in a dry environment. Avoid refrigerating them, as the moisture can make them soggy.
Freezer Friendly
Freeze the chips in a single layer on a parchment-lined tray before transferring to a freezer bag. They’ll keep for up to 2 months. When ready to eat, bake at 375°F (190°C) for 5-7 minutes until crisp. The freezing process locks in the flavor and texture.
Best Reheating Method
Reheat chips in a preheated oven at 350°F (175°C) for 5 minutes. For extra crispness, add a splash of water to the bottom of the pan; the steam will refresh the coating. Avoid microwaving, as it will make the chips chewy. The result is a near‑brand‑new experience.
Now that you’ve mastered the recipe, you’re ready to impress friends, family, and even that picky cousin who thinks cheese is optional. These chips are the ultimate crowd‑pleaser, and with these tricks, you’ll never settle for anything less than perfect.