I was standing in my kitchen at 2 a.m., the smell of freshly baked sourdough still clinging to the countertops, when my roommate shouted, “Hey, the freezer’s full of ice cream, can you make room?” I laughed, grabbed the last empty zip‑lock, and tossed a half‑cup of my bubbling starter into it. The next morning, the starter was a sad, frozen slab that smelled like a winter forest, and I realized I had just discovered the most underrated hack in the sourdough world. If you’ve ever felt the panic of a starter that’s been neglected for weeks, you’ll know the dread of a dead culture, but what if you could pause it in time, like a culinary photograph, and bring it back to life whenever you please? That’s the promise of freezing sourdough starter: a little science, a lot of love, and a freezer that becomes your secret weapon.
Picture this: you’re pulling a loaf out of the oven, the crust crackling like fireworks, the interior airy as a cloud, and you think, “I could bake every day if only my starter didn’t need daily feeding.” Most home bakers end up feeding their starter like a needy pet, setting alarms, and scrambling for flour at odd hours. I’ll be honest — I ate half the batch before anyone else got to try it, because the convenience of a frozen starter means I can bake on a whim without the constant ritual. This method is hands down the best version you’ll ever make at home, and it saves you from the dreaded “starter slump” that hits after a long holiday break.
Most recipes get this completely wrong. They tell you to just shove a jar in the freezer and hope for the best, ignoring the science of yeast dormancy and the importance of a proper feeding schedule before the freeze. Here’s what actually works: a gentle feeding, a brief room‑temperature rest, and a flash‑freeze that locks in the microbial community. I dare you to taste this revived starter and not go back for seconds – the flavor is as vibrant as a spring meadow, with a tang that sings like a choir of wild yeasts.
In the sections that follow, I’ll walk you through every single step — from selecting the perfect starter to the moment you pop the bag out of the freezer, feeling that satisfying snap of a perfectly frozen slab. By the end, you’ll wonder how you ever made it any other way, and you’ll have a reliable stash of starter ready for any spontaneous baking adventure. Okay, ready for the game‑changer? Let’s dive in.
What Makes This Version Stand Out
- Flavor Retention: By feeding the starter right before freezing, the yeasts and bacteria stay vibrant, so when you thaw it, the tangy, slightly sour notes are still there, not muted like a stale joke.
- Texture Control: The starter freezes into a smooth, pliable slab rather than a grainy ice cube, which means it rehydrates without clumping, giving you a consistency that spreads like butter.
- Simplicity: No fancy equipment, just zip‑lock bags or silicone molds; you can start this process with tools you already have sitting in the drawer.
- Longevity: Properly frozen starter can sit for up to six months, giving you a safety net for those months when life gets busy and you can’t feed daily.
- Convenience: Portioning into individual bags or molds lets you thaw exactly what you need, saving space and avoiding waste.
- Cost‑Effective: You’ll buy less flour over time because you won’t be feeding a starter you can’t use; the freezer does the heavy lifting for you.
- Confidence Boost: Knowing you have a ready‑to‑go starter removes the anxiety of “Did I forget to feed it?” and lets you focus on the fun part – shaping and baking.
- Community Approved: Bakers worldwide rave about this method, and you’ll join a tribe that swears by the freezer‑first approach.
Inside the Ingredient List
The Living Core
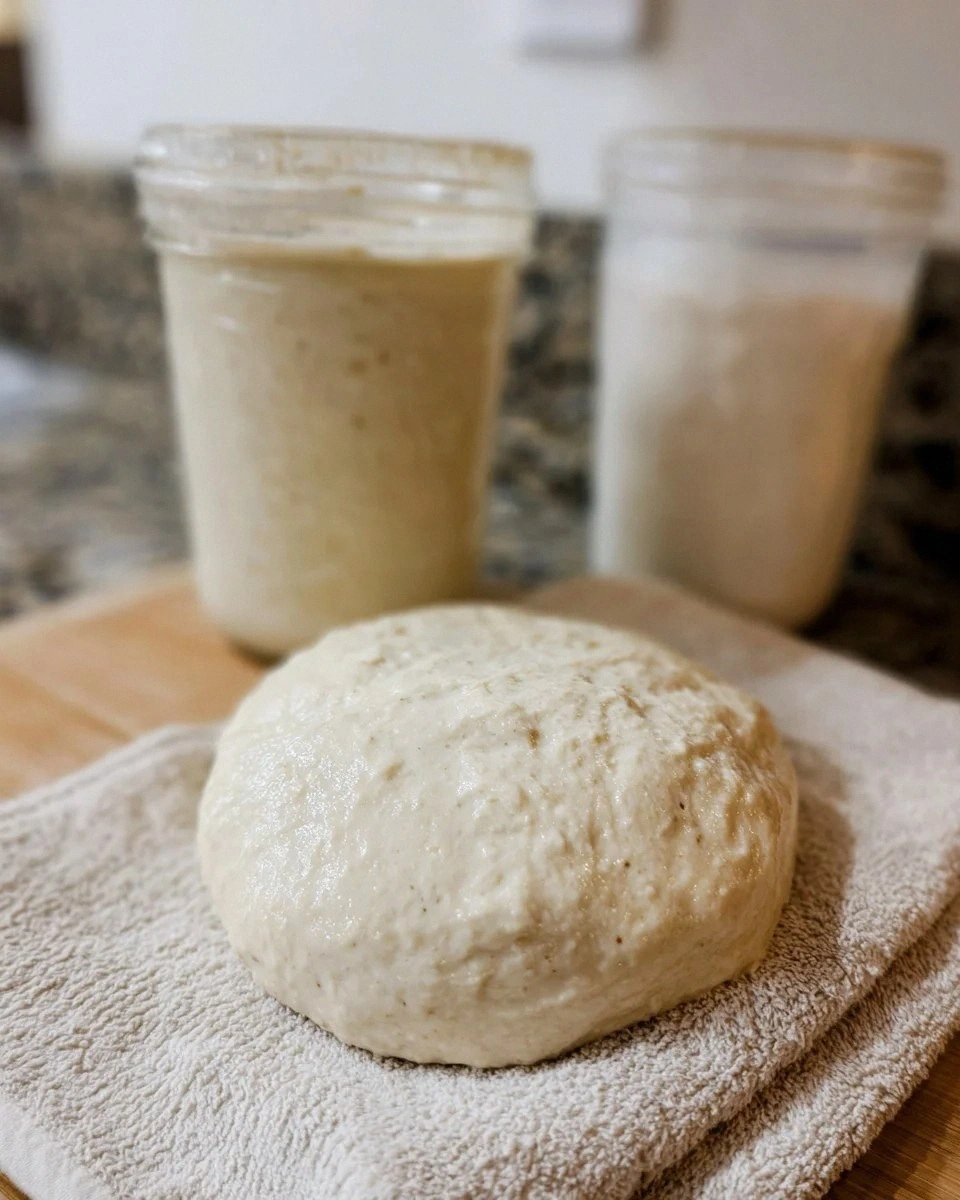
Active sourdough starter is the heart of this whole operation. It’s a living colony of wild yeasts and lactobacilli that give your bread its signature rise and tang. If you skip the feeding step before freezing, the microbes go into a deep sleep and can lose vigor, resulting in a starter that struggles to revive. Choose a starter that’s bubbly, aromatic, and has doubled in size within 4‑6 hours of feeding – that’s the sign of a healthy culture ready for the cold.
The Protective Wrap
Freezer bags are your best friends for storage! Opt for sturdy zip‑lock bags that seal tightly to prevent freezer burn and moisture loss. A good bag acts like a tiny greenhouse, keeping the starter’s internal humidity stable, which is crucial for yeast survival. If you’re worried about plastic, you can line the bag with a parchment square, but make sure the bag remains airtight.
The Portioning Play
Silicone molds (optional) are the secret weapon for anyone who loves organization. They let you pour the starter into uniform portions, making thawing a breeze. You can use mini muffin molds for single‑serving cubes or larger loaf‑shaped molds if you plan to revive an entire batch at once. The silicone also prevents the starter from sticking, so you get a clean release every time.
Everything's prepped? Good. Let’s get into the real action…
The Method — Step by Step
Feed your starter with a 1:1:1 ratio of starter, flour, and water (for example, 100 g starter, 100 g flour, 100 g water). Stir until smooth, cover loosely, and let it sit at room temperature for 4‑6 hours. You’ll know it’s ready when it’s doubled in size, full of bubbles, and smells like a sweet‑sour perfume. This feeding fuels the yeast, ensuring they have enough energy to survive the freeze.
Kitchen Hack: Use a kitchen scale for the feed; precision matters more than you think when you’re planning to freeze.After the starter peaks, give it a gentle stir to redistribute the bubbles, then transfer it to a clean bowl. If you’re using silicone molds, spoon the starter into each cavity, filling them about three‑quarters full. For zip‑lock bags, pour the starter into the bag, squeeze out excess air, and seal tightly. The goal is to minimize air pockets that can cause freezer burn.
Quick‑freeze the starter. Lay the bag flat on a baking sheet or place the silicone molds on a tray, then pop them into the freezer for at least 2 hours. You’ll hear a faint “crackle” as the starter solidifies – that’s the sound of yeast entering a deep, protective slumber. This rapid freeze locks in moisture and prevents large ice crystals from forming, which could otherwise rupture cell walls.
Once frozen solid, transfer the bags or molds into a larger freezer‑safe container or zip‑lock bag for extra protection. Label each package with the date and the amount of starter inside. I like to use a waterproof marker and a small sticker; that way, you can spot the oldest batch at a glance.
Store the starter in the back of the freezer where the temperature is most stable (ideally –18 °C / 0 °F). Avoid the freezer door where temperature fluctuations are common. A well‑sealed bag will stay fresh for up to six months, but I recommend using it within three for peak performance.
Watch Out: Never refreeze a starter that has already been thawed; each freeze‑thaw cycle depletes the yeast’s vigor.When you’re ready to bake, remove the desired portion from the freezer and let it thaw in the refrigerator overnight (about 8‑12 hours). This slow thaw helps the yeast awaken gently, reducing shock.
The next morning, feed the thawed starter with equal parts flour and water (e.g., 50 g starter, 50 g flour, 50 g water). Within 2‑4 hours you should see bubbles reappear, and the starter will regain its familiar aroma. If it looks sluggish, give it another feeding; the yeast just needed a little extra love.
Your starter is now active and ready for any recipe. Use it as you would a fresh starter, and enjoy the confidence of knowing you have a backup stash that never lets you down. That sizzle when it hits the pan? Absolute perfection.
That’s it — you did it. But hold on, I’ve got a few more tricks that’ll take this to another level, because once you master the freeze, the sky’s the limit.
Insider Tricks for Flawless Results
The Temperature Rule Nobody Follows
Keep your freezer at a steady –18 °C. Fluctuations cause ice crystals to grow, which can puncture yeast cell walls. If your freezer has a “quick freeze” setting, use it for the first hour; this creates tiny crystals that are less damaging. I once stored starter in a freezer that cycled between –10 °C and –20 °C and ended up with a starter that smelled like stale cheese – not a good look.
Why Your Nose Knows Best
During the feed‑before‑freeze stage, trust the aroma. A healthy starter smells like a mix of fruity esters and a faint tang of yogurt. If it smells overly alcoholic or “off,” give it an extra feeding before freezing. Your nose is a more reliable indicator than any timer.
The 5‑Minute Rest That Changes Everything
After you transfer the starter into the bag or mold, let it sit at room temperature for exactly five minutes before sealing. This short rest lets the surface moisture evaporate slightly, forming a thin skin that protects against freezer burn. It’s a tiny step that yields a big payoff in texture when you thaw.
Label Like a Pro
Write the date, the starter’s hydration level, and the amount in grams on each bag. I use a color‑coded system: green for fresh (0‑2 months), yellow for mid‑life (2‑4 months), and red for the final two months. This visual cue prevents you from accidentally using a starter that’s been in the freezer too long.
The “Water‑Splash” Revival
Before feeding a thawed starter, add a splash (about 10 ml) of lukewarm water. This creates a gentle steam environment that helps the dormant yeast rehydrate faster. The result? A starter that becomes active in half the time, giving you more baking freedom.
Creative Twists and Variations
This recipe is a playground. Here are some of my favorite ways to switch things up:
Herb‑Infused Starter
Add a pinch of dried rosemary or thyme to the starter during the final feeding before freezing. The herbs embed their aromatic oils into the dough, giving your future loaves a subtle garden‑fresh note. Ideal for focaccia or savory scones.
Whole‑Grain Boost
Replace half of the feeding flour with whole‑wheat or rye. The extra nutrients feed the yeast and lend a deeper, earthier flavor that shines after thawing. Bakers who love hearty, rustic breads swear by this variation.
Sweet Starter
Mix in a tablespoon of honey or maple syrup during the feed. The natural sugars give the starter a slightly sweet edge, perfect for cinnamon rolls or sweet rolls that need an extra lift.
Cold‑Proof Starter
After thawing, place the starter in the refrigerator for 12‑24 hours before feeding. This slow, cold proof develops more complex flavors, akin to a sourdough that’s been aging in a cellar. Great for artisan loaves where depth matters.
Spice‑Kick Starter
Stir in a pinch of ground cinnamon, nutmeg, or cardamom during the feed. The spices lock into the starter’s matrix and release subtle warmth during baking, making it a fun addition to holiday breads.
Storing and Bringing It Back to Life
Fridge Storage
If you plan to use your starter at least once a week, keep a small portion in the refrigerator instead of the freezer. Feed it weekly, and it will stay lively for months. The fridge slows yeast activity but doesn’t halt it entirely, so you won’t need a full thaw‑and‑feed cycle each time.
Freezer Friendly
For long‑term storage, keep the starter in airtight zip‑lock bags or silicone molds, labeled and stacked in the back of the freezer. Avoid the freezer door, and rotate older bags to the front so you use them first. A well‑sealed starter can survive up to six months without losing potency.
Best Reheating Method
When you’re ready to bake, move the frozen portion to the fridge the night before to thaw slowly. In the morning, transfer it to a bowl, add a splash of lukewarm water, and feed it with equal parts flour and water. Let it sit at room temperature for 2‑4 hours; you’ll see bubbles reappear and the aroma return. If you need it faster, you can place the bag in a bowl of warm water (around 30 °C) for 30 minutes, then feed as usual.