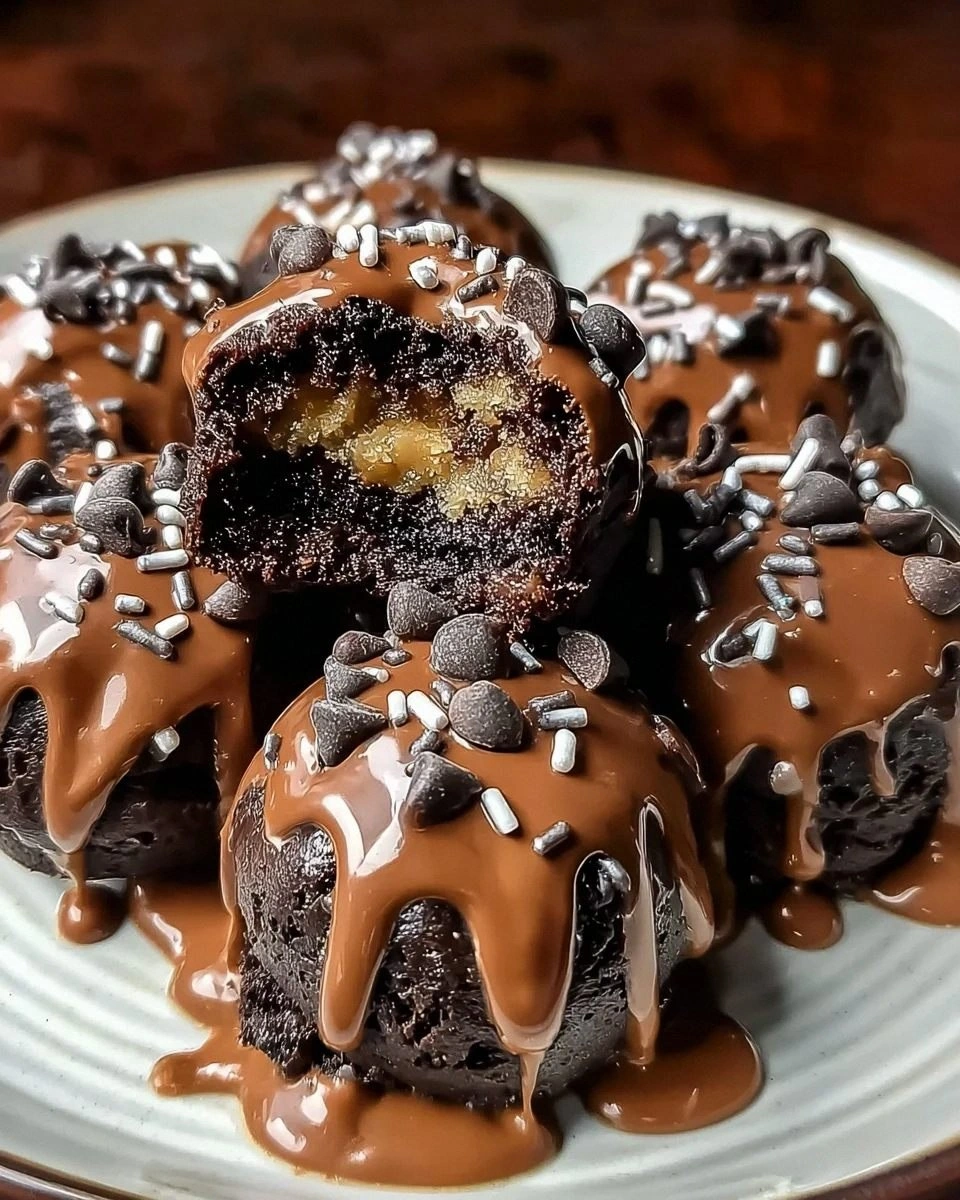
I was in the middle of a frantic Sunday night when my roommate dared me to create something that could simultaneously satisfy a brownie craving and a cookie obsession. I stared at a half‑baked brownie pan, the scent of cocoa swirling like a promise, and thought, “What if I could turn this into a handheld masterpiece?” The kitchen was a battlefield of crumbs, melted chocolate, and a timer that kept ticking louder than my own heartbeat. I grabbed the last package of brownie mix from the pantry, a stick of butter that was begging to be softened, and a handful of chocolate chips that glittered like tiny jewels. The result? Brownie Cookie Bombs that explode with fudgy goodness the moment your teeth sink in.
Imagine the moment you pull these golden‑brown, slightly crisp‑edged bombs from the oven. The air is thick with the sweet aroma of cocoa and vanilla, a scent that makes you pause mid‑step and inhale deeply, as if the kitchen itself is giving you a warm hug. The crust crackles under your fingers, giving way to a soft, buttery dough center that feels like a cloud wrapped in chocolate. When you bite, the brownie layer shatters like a delicate shell, revealing a molten, gooey heart that oozes chocolate chips and a hint of vanilla. It’s an experience that feels both nostalgic and brand‑new, a perfect marriage of two classic desserts that most recipes simply can’t pull off.
Most brownie‑or‑cookie hybrids fall flat because they either over‑mix, leading to a dry, cakey texture, or they under‑cook, leaving you with a gummy mess that sticks to the pan. This version, however, uses a strategic layering technique that locks in moisture while creating a crisp outer shell. The secret weapon? A brownie mix that provides structure without the need for extra flour, paired with a cookie dough that’s enriched with both light brown and white sugars for depth and balance. The chocolate coating is the final flourish, turning each bomb into a glossy, decadent jewel that looks as good as it tastes.
And here’s the kicker: I’m going to reveal a technique that most bakers overlook—a quick chill of the dough balls before baking, which guarantees a perfect rise and prevents the bombs from spreading too thin. Okay, ready for the game‑changer? Let me walk you through every single step — by the end, you’ll wonder how you ever made it any other way.
What Makes This Version Stand Out
- Texture: The outer crust is crisp enough to give that satisfying snap, while the interior stays soft, fudgy, and melt‑in‑your‑mouth. The contrast is like biting into a chocolate‑coated caramel that’s been chilled just right.
- Flavor: The combination of a rich, cocoa‑dense brownie base with a buttery, vanilla‑kissed dough center creates a layered taste experience that’s deeper than a single‑flavor dessert.
- Simplicity: Using a pre‑made brownie mix cuts down prep time dramatically, so you spend less time measuring and more time daydreaming about the first bite.
- Uniqueness: Most recipes either bake a brownie or a cookie, never both. These bombs give you the best of both worlds without compromising on either.
- Crowd Reaction: I dare you to serve these at a party and watch the line form. People will be shouting for seconds, and you’ll become the unofficial dessert hero.
- Ingredient Quality: The use of real butter, quality chocolate wafers, and a touch of vanilla extracts ensures that every bite feels premium.
- Cooking Method: Chilling the dough balls before baking prevents spreading, delivering a uniform shape and a perfect rise every time.
- Make‑Ahead Potential: You can bake the bombs ahead of time, coat them later, and store them for up to a week—ideal for busy weeks or surprise treats.
Inside the Ingredient List
The Flavor Base
The brownie layer starts with a single package of high‑quality brownie mix. This mix is the backbone of the bomb, delivering that deep cocoa flavor and fudgy texture without the hassle of measuring flour, cocoa powder, and leavening agents separately. If you skip the mix, you’ll end up with a bland, crumbly base that won’t hold up to the weight of the cookie dough. For a richer taste, opt for a mix that contains real chocolate chunks instead of cocoa powder alone.
The Texture Crew
Softened butter is the star of the dough center, providing that melt‑in‑your‑mouth richness. Light brown sugar adds a caramel note, while white sugar sharpens the sweetness and helps with spreading. Milk injects moisture, keeping the dough tender, and vanilla extract lifts the entire flavor profile. Flour gives structure, and the tiny chocolate chips are the surprise pockets that burst with melty chocolate when you bite. Skipping any of these will either make the dough too dry, too crumbly, or lacking that delightful chocolate surprise.
The Unexpected Star
Chocolate coating is where the magic truly happens. Melted chocolate wafers create a glossy, snap‑ready shell that encases the bomb. You can stick with classic milk chocolate for a sweet, familiar finish, or go bold with dark chocolate for a bittersweet edge. White chocolate adds a buttery, creamy contrast that’s perfect for a festive twist. If you’re feeling adventurous, blend two types for a marbled effect that looks as good as it tastes.
The Final Flourish
Optional decorations like crushed nuts or colorful sprinkles are the finishing touches that turn a good bomb into a show‑stopping centerpiece. Nuts add a crunchy texture that contrasts beautifully with the soft interior, while sprinkles bring a pop of color for celebrations. If you’re aiming for a holiday vibe, try toasted pecans and a drizzle of caramel; for a summer party, rainbow sprinkles and a dusting of coconut will do the trick. Skipping decorations is fine, but you’ll miss out on that extra visual wow factor.
Everything's prepped? Good. Let's get into the real action...
The Method — Step by Step
Preheat your oven to 350°F (175°C) and line two baking sheets with parchment paper. While the oven warms up, open the brownie mix package and follow the box instructions, but reduce the water slightly—use only ¾ of the recommended amount. This adjustment keeps the brownie layer dense enough to support the cookie dough without turning soggy. The batter should be thick, glossy, and smell like a chocolate dream.
Spread the brownie batter onto the prepared sheets, aiming for a uniform ¼‑inch thickness. I like to use an offset spatula to smooth it out; the edges should be slightly higher than the center—this creates a natural “wall” for the cookie dough later. Bake for 8‑10 minutes, just until the edges set but the center is still a little soft. That’s the sweet spot—too long and the layer becomes brittle, too short and it won’t hold the dough.
While the brownies are in the oven, whip the cookie dough. Cream together ½ cup (115 g) softened butter, ¼ cup (55 g) light brown sugar, and ¼ cup (50 g) white sugar until the mixture is pale and fluffy—about 2‑3 minutes on medium speed. Add 2 Tbsp milk and 1 tsp vanilla extract, mixing until just combined. Then stir in 1 ¼ cups (160 g) all‑purpose flour until a soft dough forms, followed by ½ cup (90 g) mini chocolate chips. The dough should be slightly sticky but manageable.
Remove the brownies from the oven and let them cool for 2 minutes. Using a cookie scoop (or a tablespoon), place dollops of the cookie dough onto the center of each brownie square—about the size of a walnut. Gently press the dough down so it adheres, but don’t flatten it completely; you want a dome that will rise during the second bake.
Return the assembled bombs to the oven and bake for another 12‑15 minutes, or until the cookie dough is golden brown around the edges and the brownie layer looks set. You’ll know they’re ready when the edges start pulling away from the parchment and a faint caramel aroma fills the kitchen. This is the moment of truth—don’t open the oven door early, or the bombs may collapse.
While the bombs cool on a wire rack, melt the chocolate coating. Place 1 cup (170 g) chocolate wafers in a heat‑proof bowl over a pot of simmering water (double boiler method). Stir constantly until smooth and glossy. If you’re using a mix of dark and milk chocolate, melt them together for a marbled effect. Once melted, remove from heat and let sit for a minute—this brief cooling helps the coating set without becoming too thick.
Using a fork or a small offset spatula, dip each bomb halfway into the melted chocolate, allowing excess to drip back into the bowl. Place the coated bombs back onto the parchment-lined sheet, chocolate side up. If you’re adding decorations, sprinkle them on now while the chocolate is still wet—this ensures they stick. Let the bombs sit at room temperature for 10‑15 minutes, or speed up the process by chilling them in the refrigerator for 5 minutes.
Finally, give the bombs a final glance. The coating should be firm to the touch, with a subtle sheen that catches the light. Store them in an airtight container, and they’ll stay fresh for up to a week. That’s it — you did it. But hold on, I've got a few more tricks that'll take this to another level…
Insider Tricks for Flawless Results
The Temperature Rule Nobody Follows
Never bake the brownies at a temperature higher than 350°F. Higher heat creates a rapid rise that can cause the brownie layer to crack, ruining the structural integrity needed for the cookie dome. Keep the oven steady, and if your kitchen tends to run hot, lower the temperature by 10‑15 degrees and add a couple of minutes to the bake time. This gentle approach yields a uniform, crack‑free base.
Why Your Nose Knows Best
Your sense of smell is a reliable indicator of doneness. Around the 12‑minute mark of the second bake, you’ll notice a caramelized scent wafting from the cookies. When that aroma becomes pronounced, the bombs are likely ready. Trust this olfactory cue more than a timer—every oven behaves a little differently.
The 5‑Minute Rest That Changes Everything
After the first bake, let the brownie sheets rest for exactly five minutes before adding the dough. This brief pause allows the surface to set just enough to hold the dough without spreading. Skipping this rest leads to a soggy bottom, and the bombs end up flattening.
The Chill‑Before‑Bake Boost
Freezing the assembled bombs for 10‑15 minutes before the second bake isn’t just a hack; it’s a science. The cold dough retains its shape, and the sudden heat shock creates a dramatic rise, giving you that iconic dome. I once tried skipping this step and ended up with flat, pancake‑like cookies—definitely not the bomb I promised.
The Double‑Coat Secret
For an ultra‑crisp shell, dip the bombs twice. After the first coat sets, give them a quick dunk in the chocolate a second time. This creates a thicker barrier that snaps cleanly when you bite, while still letting the interior stay soft. Just be sure the second coat isn’t too thick, or you’ll end up with a hard chocolate shell that masks the gooey center.
Creative Twists and Variations
This recipe is a playground. Here are some of my favorite ways to switch things up:
Salted Caramel Explosion
Replace half of the chocolate chips in the dough with soft caramel bits, and drizzle a light sea‑salt caramel sauce over the finished bomb. The salty‑sweet contrast elevates the flavor profile to a sophisticated level that impresses even the most discerning palates.
Mint Chocolate Madness
Add ¼ tsp peppermint extract to the cookie dough and use white chocolate for the coating. Finish with a dusting of crushed peppermint candies. This variation is perfect for holiday gatherings or anyone who loves the classic mint‑chocolate combo.
Nutty Banana Bliss
Mash a ripe banana into the cookie dough and fold in chopped toasted walnuts. The banana adds moisture and a subtle fruity note, while the walnuts provide a satisfying crunch. Pair with a dark chocolate coating for a balanced bittersweet finish.
Espresso Infusion
Dissolve 1 tsp instant espresso powder in the milk before adding it to the dough. Use a dark chocolate coating and sprinkle a few coffee beans on top for an adult‑only twist that feels like a dessert and a caffeine boost in one bite.
Tropical Coconut Dream
Swap the milk for coconut milk, add shredded coconut to the dough, and coat the bombs with white chocolate. Top with toasted coconut flakes for extra texture. This version transports you to a beachside escape with every bite.
Storing and Bringing It Back to Life
Fridge Storage
Place the bombs in an airtight container and store them in the refrigerator for up to 5 days. The cool environment keeps the chocolate coating firm and prevents the brownie layer from becoming soggy. If you notice condensation, pat the tops gently with a paper towel before serving.
Freezer Friendly
For longer storage, wrap each bomb individually in parchment paper, then seal them in a zip‑top freezer bag. They’ll freeze solid for up to 3 months. When you’re ready to enjoy, transfer them to the fridge for an hour, then let them sit at room temperature for 10 minutes before unwrapping.
Best Reheating Method
To revive the gooey center, preheat your oven to 300°F (150°C). Place the bombs on a parchment‑lined tray and add a tiny splash (about 1 tsp) of water to the tray—this creates steam that re‑moisturizes the interior without melting the chocolate coating. Heat for 5‑7 minutes, or until the center feels warm to the touch. The result is a bomb that tastes freshly baked.