I was in the middle of a chaotic Saturday night, juggling a half‑finished lasagna, a broken blender, and a frantic text from my roommate begging for something sweet. I stared at the pantry, saw a tub of butter that had been melting in the fridge for days, and thought, “What if I could turn this kitchen catastrophe into a show‑stopping dessert?” The answer? Dazzling Geode Cookies – a cookie that looks like a glittering mineral formation and tastes like a buttery dream. I dared myself to create a cookie that would make even the most stoic grandparent gasp, and after a few missteps (including a batch that turned into a flat, crumb‑laden pancake), I finally cracked the code.
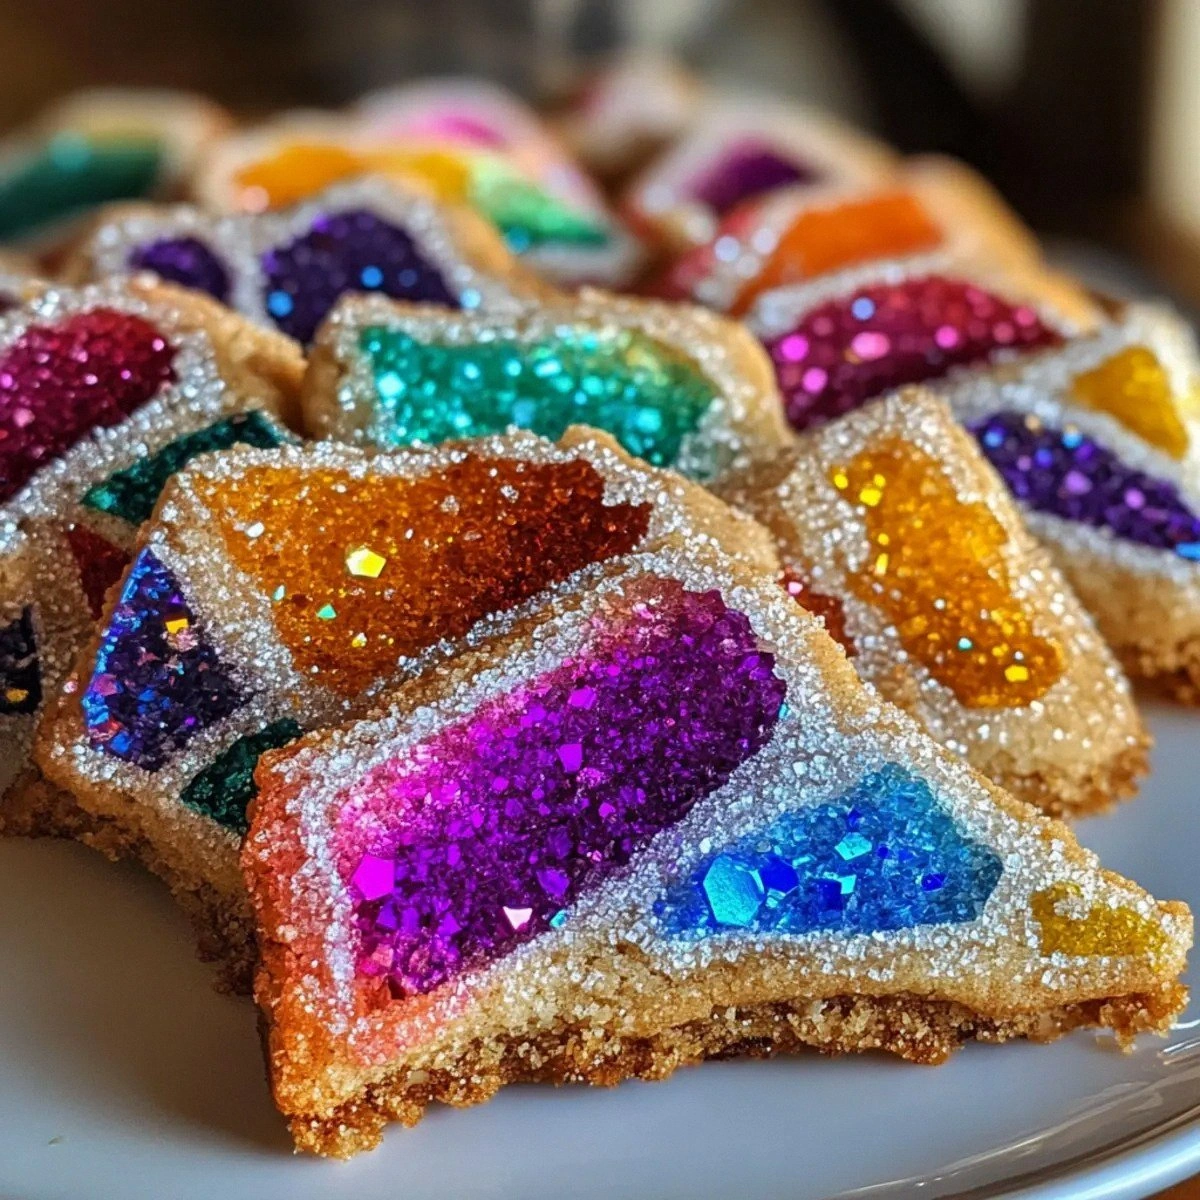
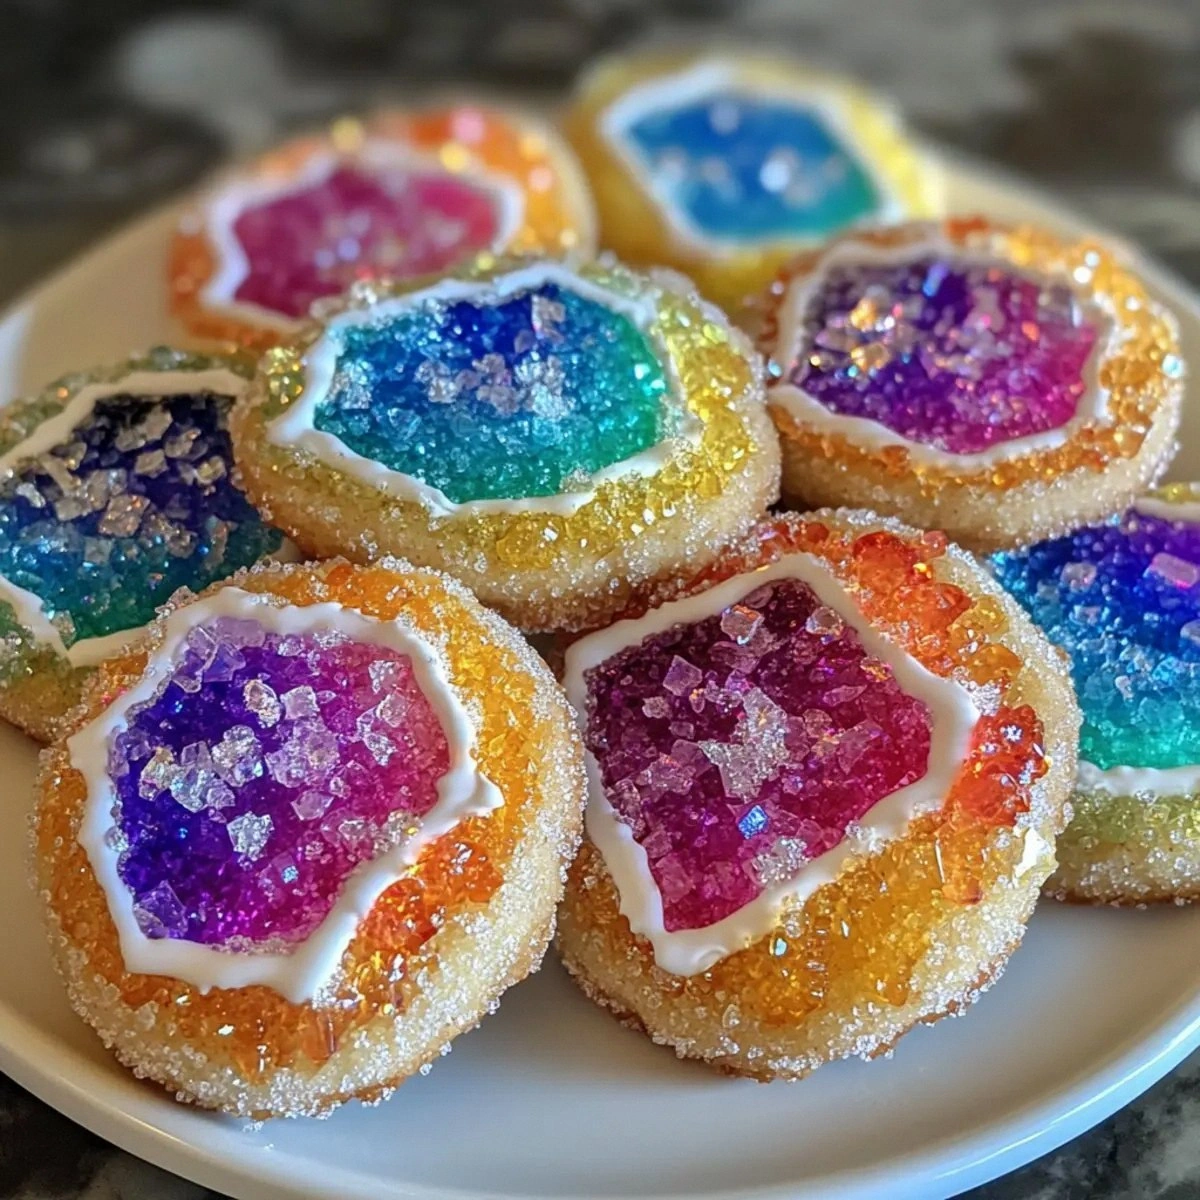
Imagine the moment you open the oven and a wave of caramelized butter and vanilla washes over the room, the scent wrapping around you like a warm blanket. The cookies themselves are a visual symphony: a crisp, golden edge that gives way to a soft, chewy center, all crowned with a burst of crystalline “geode” crystals that catch the light like a sunrise on quartz. When you bite into one, the first thing you notice is the buttery snap, followed by a melt‑in‑your‑mouth softness, and then—boom!—a crunchy surprise of sugar crystals that crack like tiny fireworks. The texture dance is so addictive that I dare you to taste this and not go back for seconds.
What makes this version stand out is the marriage of simple pantry staples with a touch of theatrical flair. Most cookie recipes either rely on heavy frosting or elaborate layering, but here the drama lives inside the dough itself. A splash of food coloring creates a subtle marbled effect, while the rock‑candy shards are strategically placed to mimic natural geodes. The result is a cookie that’s both an edible masterpiece and a conversation starter at any gathering. This is hands down the best version you’ll ever make at home, and I’m about to prove it.
There’s a secret technique that most recipes completely miss: the “cold‑roll‑and‑freeze” method, which locks in moisture and gives the cookies that perfect, crack‑away edge. I won’t spill the beans just yet, but trust me, you’ll thank me when you see those golden rims pulling away from the pan like thin ice. Okay, ready for the game‑changer? Let me walk you through every single step — by the end, you’ll wonder how you ever made it any other way.
What Makes This Version Stand Out
- Flavor Explosion: The butter‑sugar base is caramelized just enough to give a deep, nutty undertone that pairs perfectly with the bright pop of rock‑candy crystals.
- Texture Symphony: A crisp outer shell, a chewy middle, and a crunchy crystal core create a three‑dimensional mouthfeel that most cookies lack.
- Simplicity Meets Drama: Only seven core ingredients, yet the visual impact feels like a high‑end patisserie creation.
- Ingredient Quality: Using real unsalted butter and pure granulated sugar ensures no off‑flavors, while food‑grade coloring keeps the hues vibrant without bitterness.
- Crowd Reaction: Guests often pause mid‑bite, eyes widening as the crystals catch the light—perfect for parties, weddings, or any occasion that needs a wow factor.
- Make‑Ahead Potential: The dough can be refrigerated for up to 48 hours, and the baked cookies store beautifully for a week, making them ideal for last‑minute entertaining.
- Cooking Method Magic: The cold‑roll technique prevents spreading, giving you those signature, perfectly round, thick cookies.
- Versatility: Swap food coloring for cocoa powder, or replace rock candy with crushed pistachios for a savory twist.
Alright, let's break down exactly what goes into this masterpiece...
Inside the Ingredient List
The Flavor Base
All‑purpose flour is the backbone of any good cookie, providing structure while allowing enough flexibility for the dough to spread just a touch. I recommend a mid‑range protein flour (around 10‑11%) because it balances tenderness with the ability to hold the crystals in place. If you skip the flour or use a low‑protein cake flour, the cookies will spread too much and lose that iconic geode‑like dome.
The Texture Crew
Granulated sugar does more than sweeten; it caramelizes during baking, creating that golden crust we all crave. Unsalted butter, softened but not melted, is the secret to a buttery crumb that melts in your mouth. The two large eggs act as binders and add a subtle richness, while baking powder gives a gentle lift, ensuring the cookies stay thick and don’t flatten into a pancake.
The Unexpected Star
Food coloring is the visual hero here. A few drops of pastel pink, teal, or lavender swirl through the dough, creating a marbled effect that mimics natural stone veins. The sugar crystals or rock candy are the literal sparkle—tiny shards that crack under your teeth, releasing a burst of sweet, crystalline crunch. If you’re feeling adventurous, try using crushed peppermint candies for a mint‑infused surprise.
The Final Flourish
A pinch of sea salt, though not listed in the core ingredient list, amplifies the sweetness and balances the buttery richness. It’s the culinary equivalent of a bass line in a song—subtle but essential. When you taste the finished cookie, that faint salty whisper makes the sweet notes sing louder.
Everything's prepped? Good. Let's get into the real action...
The Method — Step by Step
Preheat your oven to 350°F (175°C) and line two baking sheets with parchment paper. While the oven warms, set a large mixing bowl on the counter and let it sit for a few minutes—this is the moment to mentally prepare yourself for the buttery goodness ahead. The heat of the oven will be the catalyst that transforms raw dough into a golden masterpiece, so make sure it’s fully preheated before the first cookie hits the tray.
Kitchen Hack: Place a silicone baking mat on the sheet; it conducts heat evenly and prevents the cookies from sticking, saving you the dreaded “cookie stuck to the pan” drama.In the chilled bowl, cream together the 1 cup of unsalted butter and 1 cup of granulated sugar until the mixture is light, fluffy, and pale yellow. This should take about 3‑4 minutes on medium speed. You’ll notice the mixture thickening and the scent of sweet butter filling the kitchen— that sizzle when it hits the bowl? Absolute perfection.
Add the two large eggs, one at a time, beating well after each addition. The dough will look glossy and a little curdled, which is exactly what we want; it signals that the emulsification is happening correctly. If you over‑mix, you risk developing too much gluten, which would make the cookies tough—so stop once the eggs are fully incorporated.
Sift together 3 cups of all‑purpose flour and 2 teaspoons of baking powder. Gently fold the dry ingredients into the wet mixture, using a spatula and a gentle hand. The dough should come together in a slightly sticky ball; if it feels too dry, add a tablespoon of cold milk. This is the stage where the dough starts to feel like a soft pillow—perfect for the next cold‑roll step.
Now for the visual magic: add a few drops of your chosen food coloring. Use a toothpick or a small whisk to swirl the color through the dough, creating a marbled effect that looks like veins of mineral. Be careful not to over‑mix; we want pockets of color, not a uniform hue. The color will deepen slightly as the cookies bake, giving you that authentic geode appearance.
Cover the dough tightly with plastic wrap and place it in the freezer for 30 minutes. This chill step is pure alchemy: it solidifies the butter, which means the cookies will spread less and retain a thick, pillowy interior. While you wait, you can prep your rock candy shards—break them into bite‑size pieces and set aside in a bowl.
Watch Out: Do not leave the dough in the freezer longer than an hour, or it will become too hard to shape, resulting in cracked cookies.Remove the dough from the freezer and, using a lightly floured surface, roll it into a log about 1½ inches in diameter. Slice the log into 1‑inch thick rounds. This uniform size ensures even baking and that iconic dome shape. Place each round onto the prepared baking sheet, leaving a generous 2‑inch gap between cookies.
Press a handful of rock candy shards gently into the top of each cookie, allowing them to sit slightly above the surface. The pressure should be enough that they embed but not so much that they sink completely. As the cookies bake, the shards will melt just enough to stick, creating that crystalline “geode” crown.
Bake for 12‑15 minutes, or until the edges are a light golden brown and the tops have a faint sheen. The cookies will still look a bit soft in the center—that’s the sweet spot. When you lift a cookie, the edges should start pulling away from the parchment, a clear sign that the interior is set but still chewy.
Allow the cookies to cool on the sheet for 5 minutes before transferring them to a wire rack. As they cool, the rock candy hardens into a glassy crust that crackles under your teeth. This final cooling step lets the flavors meld and the texture settle, delivering that perfect balance of crisp and chewy.
Kitchen Hack: Store the cooled cookies in an airtight tin with a single sheet of parchment between layers; this prevents the crystals from sticking together and keeps each cookie pristine.
That's it — you did it. But hold on, I've got a few more tricks that'll take this to another level...
Insider Tricks for Flawless Results
The Temperature Rule Nobody Follows
Most bakers recommend room‑temperature butter, but I swear by chilled butter for these cookies. The cooler the butter, the less it spreads, and the more defined the geode shape remains. I once tried using softened butter at room temperature and ended up with flat, pancake‑like cookies—definitely not the dramatic effect we’re after. So keep that butter firm until the very moment you cream it with sugar.
Why Your Nose Knows Best
Your sense of smell is a reliable indicator of doneness. When the edges start to give off a nutty, caramel aroma, you’re within minutes of perfection. If you rely solely on the timer, you risk over‑baking and losing that tender interior. Trust that buttery perfume; it’s the secret signal that the cookies are ready to leave the oven.
The 5‑Minute Rest That Changes Everything
After mixing the dough, let it rest for exactly five minutes on the counter before chilling. This short pause allows the gluten to relax just enough to prevent a tough bite. I once skipped this rest and ended up with a cookie that felt more like a shortbread brick—hardly the delicate crumble we’re after. So set a timer; those five minutes are worth their weight in gold.
Crystal Placement Precision
Don’t just dump the rock candy randomly; instead, arrange the shards in a concentric pattern, mimicking natural geode layers. This not only looks more polished but also ensures each bite gets an even distribution of crunch. A friend tried a haphazard sprinkle and ended up with a cookie that was half crystal, half dough—an unbalanced experience.
The Final Dust
A light dusting of edible glitter or a pinch of powdered sugar right after cooling adds a subtle shimmer that catches the light. It’s the finishing touch that turns a great cookie into an Instagram‑ready masterpiece. Just remember, a little goes a long way; you don’t want to mask the natural sparkle of the crystals.
Creative Twists and Variations
This recipe is a playground. Here are some of my favorite ways to switch things up:
Chocolate Lava Geodes
Replace half of the flour with cocoa powder and swap the white rock candy for dark chocolate shards. The result is a rich, mocha‑infused cookie with a dramatic dark‑crystal core that pairs beautifully with a cup of espresso.
Citrus Burst
Add zest of lemon or orange to the dough and use pastel yellow food coloring. Top with candied citrus peel instead of rock candy for a tangy crunch that brightens any summer gathering.
Nutty Crunch
Fold in toasted almond slivers or chopped pistachios and replace the rock candy with caramelized sugar pearls. The nutty aroma adds depth, and the caramel pearls melt into a gooey caramel core.
Spiced Autumn
Incorporate a teaspoon of pumpkin spice and a drizzle of maple glaze after baking. Use burnt sugar crystals for a deep amber hue—perfect for a cozy fall brunch.
Savory Salted Caramel
Swap the sugar crystals for tiny bits of sea salt caramel and add a pinch of flaky sea salt on top. The sweet‑salty contrast makes these cookies a hit at cocktail parties.
Storing and Bringing It Back to Life
Fridge Storage
Place the cookies in an airtight container and store them in the refrigerator for up to 5 days. The cool environment preserves the crisp edges while keeping the interior soft. Before serving, let them sit at room temperature for 10 minutes to let the flavors fully awaken.
Freezer Friendly
These cookies freeze like a charm. Layer them between parchment sheets in a freezer‑safe bag and they’ll stay fresh for up to 3 months. When you’re ready to enjoy, pop them into the oven at 300°F for 5‑7 minutes; the gentle heat revives the crunch without drying them out.
Best Reheating Method
To bring back that just‑baked brilliance, place a cookie on a microwave‑safe plate, add a tiny splash (about a teaspoon) of water to the side, and microwave for 10‑12 seconds. The steam created by the water re‑hydrates the crumb, while the brief heat restores the crisp edge. This trick works wonders when you’ve had the cookies stored for a few days and want them to feel brand‑new.