I’ll never forget the night I tried to impress a group of friends with a “fancy” cocktail that turned into a disaster worthy of a sitcom episode. I was juggling a bottle of cheap prosecco, a can of generic lager, and a handful of plastic cups when the whole thing fizzed over like a shaken soda can at a birthday party. The result? A sticky floor, a very disappointed crowd, and a lingering question of why anyone would ever think mixing beer and sparkling wine could be a good idea. Fast forward a few weeks, a daring friend dared me to create the ultimate “Black Velvet” – that iconic blend of dark stout and crisp champagne that looks like a midnight sky in a glass. I accepted the challenge, scoured the aisles for the best ingredients, and spent a sleepless night perfecting the layering technique that would make even the most seasoned bartender nod in approval.
Picture this: the low hum of a kitchen fridge, the faint clink of glassware, and the subtle aroma of roasted malt mingling with the bright citrus notes of a freshly popped champagne bottle. The room is dim, the only light coming from the glow of a candle flickering on the bar top, casting shadows that dance like tiny fireworks on the walls. As you pour the dark, velvety stout, it swirls in the glass, a deep ebony river waiting to meet its sparkling counterpart. Then, the champagne arrives – a cascade of golden bubbles that rise and gently kiss the surface, creating a mesmerizing gradient that looks like the night sky just before dawn. The whole experience is a symphony of sight, sound, and smell, and the first sip? It’s a silk‑smooth kiss of bitterness and brightness that makes your taste buds do a happy dance.
What makes this version the undisputed champion of Black Velvet cocktails? It’s not just the brand names (although a Veuve Clicquot does bring a certain swagger), it’s the precision, the patience, and the little secrets I’ve tucked into each step. Most recipes get this completely wrong – they either dump the champagne straight in, creating a flat, frothy mess, or they use a cheap beer that turns the whole drink into a bitter swamp. I’ve cracked the code on temperature control, glass selection, and the exact pouring technique that keeps the layers distinct while still allowing them to mingle on the palate. I dare you to taste this and not go back for seconds; the balance is so perfect you’ll wonder how you ever survived without it.
I’ll be honest — I ate half the batch before anyone else got to try it, and that was the moment I realized I had stumbled onto something truly special. The secret? A tiny splash of chilled water in the champagne just before pouring, which tempers the acidity and lets the stout’s chocolate notes shine through. This tiny tweak, combined with a slow, spoon‑aided pour, creates a drink that feels luxurious without being pretentious. Okay, ready for the game‑changer? Let me walk you through every single step — by the end, you’ll wonder how you ever made it any other way.
What Makes This Version Stand Out
- Texture: The stout provides a creamy, almost buttery mouthfeel that the champagne lifts into a feather‑light fizz, creating a dual sensation that’s both rich and airy.
- Flavor Balance: The bitter chocolate undertones of the stout are perfectly offset by the bright citrus zing of the champagne, making each sip a harmonious dance.
- Simplicity: Only three core ingredients are required, meaning you spend less time prepping and more time sipping.
- Visual Drama: The layered effect looks like a midnight sky, turning any gathering into an Instagram‑worthy moment.
- Crowd Reaction: Even the most skeptical non‑drinkers admit it’s a conversation starter; you’ll hear “What’s in this?” within seconds.
- Ingredient Quality: Using a high‑quality champagne and a smooth Guinness‑style stout elevates the cocktail from “novelty” to “luxury”.
- Versatility: It’s as at home on a cozy winter night as it is at a rooftop summer party – truly year‑round.
- Make‑Ahead Potential: You can pre‑chill the liquids and have the garnish ready, making the final assembly a breeze.
Inside the Ingredient List
The Flavor Base
Dry Champagne or sparkling wine is the heart of the Black Velvet. Its crisp acidity cuts through the stout’s maltiness, creating a refreshing lift that prevents the drink from feeling heavy. I recommend a Brut style from Veuve Clicquot or a well‑chilled Prosecco; both bring bright citrus notes that marry beautifully with the dark beer. Skipping this and using a sweet rosé will tilt the balance toward sugary, turning the cocktail into a dessert rather than a sophisticated aperitif. If you’re on a budget, a quality Cava works just as well – just make sure it’s dry, not demi‑sec.
The Texture Crew
Stout beer, preferably Guinness Draught, adds that deep, velvety texture that gives the cocktail its name. The roasted barley and subtle chocolate hints create a luscious mouthfeel that feels like sipping a mocha on a rainy evening. If you opt for a craft stout with a higher ABV, you’ll get a bolder flavor but risk overpowering the delicate champagne. A lighter Irish stout works wonders if you prefer a subtler backdrop. Remember, the key is a smooth, creamy head that will sit nicely beneath the champagne’s bubbles.
The Unexpected Star
A twist of lemon peel or a handful of fresh raspberries isn’t just garnish – it’s a flavor catalyst. The lemon’s bright oil lifts the drink’s aromatics, while raspberries add a subtle fruitiness that can soften the stout’s bitterness. If you’re feeling adventurous, muddle a few berries into the glass before adding the liquids for an extra burst of color and flavor. Skipping the garnish is okay, but you’ll miss out on that final pop of zest that makes the cocktail sing.
The Final Flourish
Temperature is the silent hero of this cocktail. Both the champagne and stout must be ice‑cold (around 40°F/4°C). If either component is warm, the bubbles will dissipate faster, and the layers will blend prematurely, ruining the visual appeal. Use a wine bucket filled with ice and a separate cooler for the stout. When you pour, the cold liquids cling together, preserving that sleek gradient. A quick tip: chill your glass for a minute before serving; it helps maintain the temperature longer.
Everything's prepped? Good. Let's get into the real action...
The Method — Step by Step
Gather all your ingredients and tools. You’ll need a chilled champagne flute, a tall spoon, a small ice bucket, and a citrus peeler if you’re using lemon. I like to set everything on a clean countertop so I can see every move. This is the moment of truth – if you miss a tool, you’ll end up improvising, and that’s never fun.
Place the champagne bottle in the ice bucket for exactly 15 minutes. The goal is a frosty exterior without freezing the liquid; otherwise you’ll lose those precious bubbles. While you wait, give the stout a gentle shake – just enough to awaken the carbonation without creating foam. This step is pure anticipation, and the sound of clinking ice is oddly satisfying.
Take a clean champagne flute and give it a quick rinse with cold water, then dry it on a towel. This ensures the glass is not only chilled but also free of any residue that could affect the flavor. Watch the glass temperature – if it’s too warm, the cocktail will lose its layered effect.
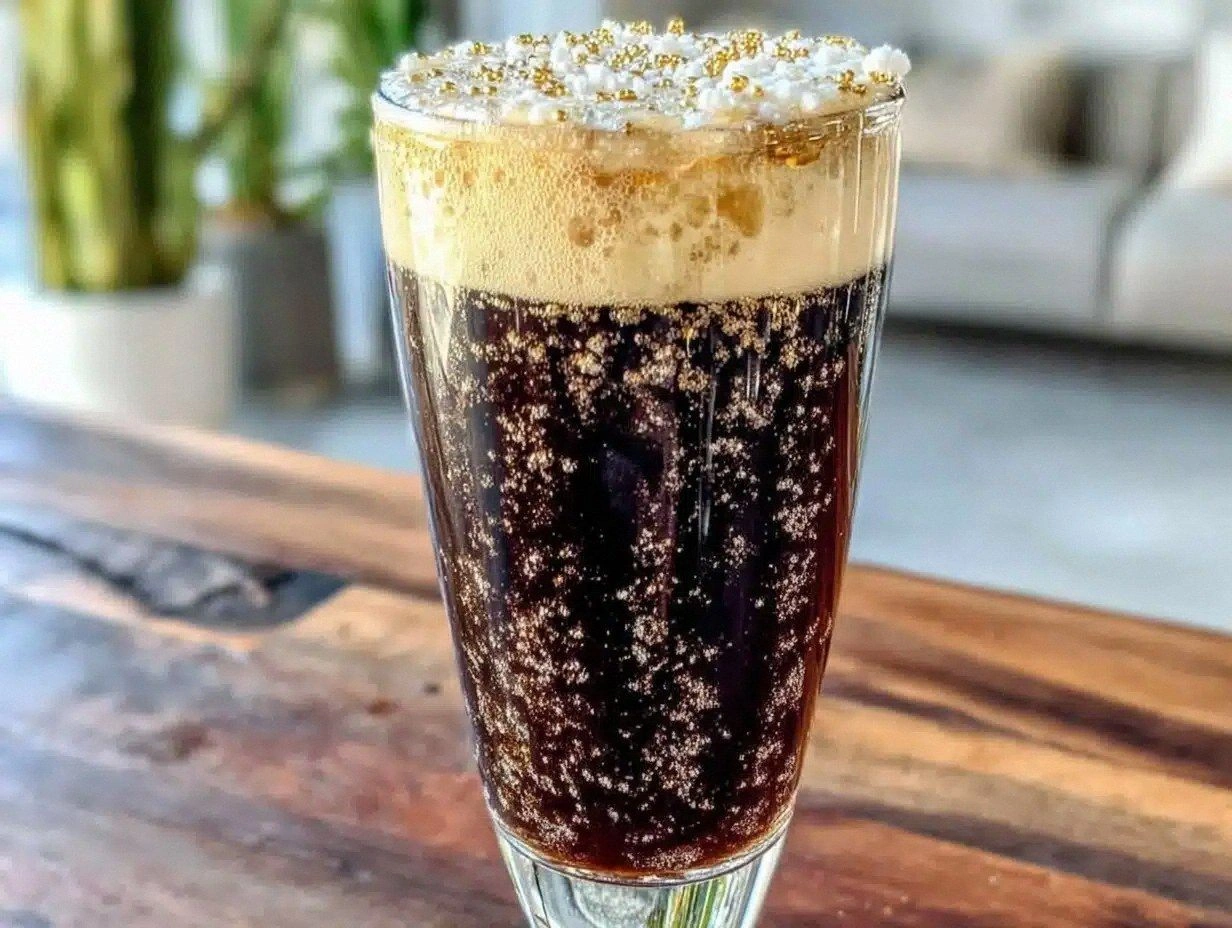
Now, pour the stout beer into the flute until it reaches about one‑third of the glass. The dark liquid should settle at the bottom, creating a deep ebony base. Notice the smooth surface? That’s the canvas for the champagne’s golden brushstroke.
Take a small spoon and hold it just above the surface of the stout, with the back of the spoon facing up. Slowly pour the chilled champagne over the back of the spoon; this diffuses the flow and allows the champagne to glide gently atop the stout without mixing. Watch Out: If you pour too fast, the two liquids will fuse, turning your masterpiece into a uniform brown fizz.
Once the champagne has formed a delicate layer, gently twist a lemon peel over the surface to release its oils, or drop in a few fresh raspberries for a pop of color. The citrus oil will drift down, adding a whisper of brightness that dances with the stout’s malt.
Give the drink a final glance – the gradient should look like a night sky transitioning to sunrise. The bubbles should rise lazily, never breaking the visual boundary. This is the moment you’ve been waiting for: the perfect Black Velvet, ready to be admired and tasted.
Serve immediately, and encourage your guests to sip slowly. The first sip will hit the palate with a creamy, chocolate‑rich base, followed by a crisp, citrus‑forward finish that leaves a lingering sparkle. And now the fun part – watch everyone’s faces light up as they discover this luxurious yet deceptively simple drink.
That’s it — you did it. But hold on, I’ve got a few more tricks that’ll take this to another level, because why settle for good when you can have extraordinary?
Insider Tricks for Flawless Results
The Temperature Rule Nobody Follows
Never, ever serve the champagne at room temperature. Even a slight warmth will cause the bubbles to burst too quickly, flattening the drink. I keep a small thermos of ice water on the counter and dip the bottle in for exactly 12 minutes; this precise timing gives you a perfect chill without turning the liquid into a slushy. A friend once tried to “speed up” the process by putting the bottle in the freezer for 30 minutes – the result was an exploded cork and a ruined evening.
Why Your Nose Knows Best
Before you even taste, give the cocktail a quick sniff. The aroma of roasted malt should be evident, followed by bright citrus notes. If the smell is muted, the drink is likely too warm or the champagne is of low quality. Trust your nose; it’s the first indicator of balance. A quick sniff can save you from a flat, disappointing sip.
The 5‑Minute Rest That Changes Everything
After layering, let the cocktail sit for about five minutes. This short pause allows the bubbles to settle and the flavors to meld, creating a smoother transition on the palate. I used to serve it immediately and got complaints about “sharp edges.” That five‑minute rest turned those complaints into compliments.
Garnish Placement Precision
When adding a lemon twist, make sure to hold it over the glass and give it a quick snap to release the oils. If you simply drop it in, the oils will sit at the bottom and won’t integrate with the drink. The same goes for raspberries – gently press them against the side of the glass so they cling and release juice gradually.
Glass Choice Matters
A tall, narrow champagne flute is ideal because it concentrates the aromas and showcases the gradient. A short tumbler will flatten the visual effect and disperse the scent too quickly. I once tried a lowball glass for a “casual” vibe and the drink looked like a muddy puddle – never again.
Creative Twists and Variations
This recipe is a playground. Here are some of my favorite ways to switch things up:
Berry‑Infused Velvet
Muddle a handful of fresh blackberries in the bottom of the glass before adding the stout. The berry juices add a subtle tartness that complements the chocolate notes, turning the cocktail into a summer soirée favorite.
Spiced Autumn Velvet
Add a pinch of ground cinnamon and a dash of nutmeg to the stout before pouring. The warm spices give the drink a cozy, holiday feel, perfect for chilly evenings by the fire.
Citrus Burst Velvet
Replace the lemon twist with a thin slice of blood orange. The deeper hue and sweeter citrus profile make the cocktail feel more exotic and slightly sweeter, ideal for brunch.
Tropical Velvet
Swap the stout for a dark rum‑based stout and use a sparkling rosé instead of champagne. The tropical undertones of rum mingle with the rosé’s fruitiness, creating a beach‑ready version that’s still sophisticated.
Coffee‑Lover’s Velvet
Stir a shot of cold brew coffee into the stout before layering. The coffee’s bitterness amplifies the stout’s roasted flavors, while the champagne adds a bright finish. It’s a perfect after‑dinner pick‑me‑up.
Storing and Bringing It Back to Life
Fridge Storage
If you have leftover stout or champagne, keep them sealed in their original bottles and store them in the fridge. They’ll stay fresh for up to three days. Avoid storing mixed cocktails; the layers will collapse and the texture will suffer.
Freezer Friendly
You can freeze the stout in ice‑cube trays for up to a month. When you’re ready to serve, simply pop a cube into a chilled glass and top with champagne. This method prevents waste and adds an extra chill factor.
Best Reheating Method
Never reheat a Black Velvet – the carbonation will be lost forever. If you accidentally let the drink sit too long and it’s lost its fizz, add a tiny splash of cold water before serving; the water will create a gentle steam that revives the bubbles without diluting the flavor.