Picture this: I’m half‑asleep, the kettle is whistling like a choir of impatient cats, and I’ve just spilled a whole bag of caramel sauce on the kitchen floor while trying to juggle a fresh espresso shot. The smell of burnt sugar mingled with the bitter espresso, and for a split second I thought my morning was doomed. Then, like a lightbulb flickering to life, I realized I could turn that mishap into a masterpiece—a latte that not only tastes like a dessert but also sports a crackly, torch‑kissed sugar crown that shatters with the slightest tap. I dared myself to perfect that contrast, and the result? A drink so silky and decadent it makes even the most hardened coffee snob pause, stare, and whisper, “I need more.”
From the first sip, you’ll be hit with a wave of buttery caramel that hugs the espresso like a warm blanket on a cold winter morning, while the milk swirls in with the silkiness of a freshly painted sky at sunrise. The moment you sprinkle the thin layer of granulated sugar and torch it, you’ll hear that satisfying crack—a sound that says, “We’re about to elevate this latte to a whole new realm.” The aroma that follows is a heady mix of toasted sugar, roasted beans, and vanilla that practically wraps around your nose and refuses to let go. It’s a sensory fireworks display that makes you want to close your eyes, inhale deeply, and savor every fleeting note before it fades.
Most caramel latte recipes either drown you in syrup or forget the magical brûlée finish entirely, leaving you with a sweet drink that feels flat and forgettable. This version stands out because it balances the three pillars of flavor, texture, and visual drama without demanding a professional kitchen or a dozen obscure ingredients. The secret? A simple combination of high‑quality espresso, just‑right milk, a splash of vanilla, and a torch‑kissed sugar top that transforms the ordinary into the extraordinary. I’ll even throw in a cheeky tip about using a kitchen blowtorch you probably already have hanging above the stove—yes, that thing you only use for holiday roasts.
Ready to dive in? I’m going to walk you through every single step—down to the exact temperature of the milk and the precise moment you should hear that caramel sizzle. By the end, you’ll be able to serve a latte that looks like it belongs in a five‑star café, tastes like a dessert, and has a brûlée crust that even the most skeptical guests can’t resist. Let me walk you through every single step — by the end, you’ll wonder how you ever made it any other way.
What Makes This Version Stand Out
- Texture: The latte is velvety smooth thanks to steaming the milk to a perfect micro‑foam, while the brûlée top adds a crisp, crackling contrast that shatters like thin ice under a spoon.
- Flavor Balance: The caramel’s buttery depth is offset by a whisper of vanilla and the natural bitterness of espresso, creating a harmonious dance on the palate.
- Simplicity: You only need six core ingredients, a stovetop, a milk frother, and a kitchen torch—no fancy gadgets or hard‑to‑find items.
- Visual Wow Factor: The torched sugar crust creates a glossy, caramelized surface that looks as impressive as it tastes, making it perfect for Instagram moments.
- Crowd Reaction: I dare you to taste this and not go back for seconds; even the most seasoned coffee lovers will beg for another round.
- Ingredient Quality: Using freshly brewed espresso and a high‑quality caramel sauce ensures each sip is rich, not cloyingly sweet.
- Cooking Method: The torch technique is a game‑changer that adds a layer of complexity without adding extra steps.
- Make‑Ahead Potential: You can prep the base latte in advance and torch the sugar just before serving for ultimate convenience.
Inside the Ingredient List
The Flavor Base
Espresso or Strong Coffee (2 shots, about 60 ml): This is the heart‑beat of the latte, delivering the bold, bitter backbone that balances the caramel’s sweetness. Freshly brewed espresso provides a crema that adds a silky mouthfeel; if you don’t have an espresso machine, a strong brewed coffee works, but make sure it’s concentrated—think French press, but double‑strength. Skipping this or diluting it will leave the drink tasting flat, like a dessert without any bite. Pro tip: Use beans roasted within the last two weeks for the freshest flavor punch.
The Texture Crew
Whole Milk (1 cup, 240 ml): Whole milk is the secret to that luxurious, buttery foam that clings to the surface and carries the caramel through each sip. Its higher fat content creates a richer mouthfeel compared to skim or low‑fat alternatives, which can feel watery. If you’re dairy‑free, oat milk is the next best thing—it froths well and has a subtle sweetness that complements caramel. Skipping the milk or using a non‑frothing alternative will result in a thin, watery latte that lacks that coveted silkiness.
The Unexpected Star
Caramel Sauce (2 tablespoons): This is where the magic begins; a good quality caramel brings a deep, buttery flavor that’s more complex than cheap store‑bought syrups. I recommend a sauce that lists butter, cream, and sea salt as primary ingredients—those give you that luxurious mouthfeel. If you’re feeling adventurous, melt a handful of caramel candies with a splash of heavy cream for a homemade version that’s pure decadence. Forgetting the caramel or using a low‑quality version will make the latte taste like plain milk and coffee, missing the signature sweet‑bitter harmony.
The Final Flourish
Granulated Sugar (1 teaspoon): This tiny amount is the key to the brûlée crust; when torched, it caramelizes into a glossy, crackly layer that shatters delightfully. Use organic or turbinado sugar for a richer caramel flavor and a slightly darker crust. If you substitute with powdered sugar, it won’t caramelize properly and will melt into a soggy mess. Vanilla Extract (½ teaspoon): Adds a warm, aromatic note that lifts the entire drink, preventing the caramel from becoming one‑dimensional. A dash of vanilla can turn a good latte into an unforgettable one.
Everything's prepped? Good. Let's get into the real action...
The Method — Step by Step
Start by pulling two fresh espresso shots (or 60 ml of strong coffee) into a small stainless steel pitcher. The aroma should hit you like a warm hug—rich, earthy, and slightly smoky. Give the espresso a quick stir to ensure any crema is evenly distributed; this will help the caramel blend later. Power transition: Okay, ready for the game‑changer?
While the espresso is still hot, add the caramel sauce and vanilla extract. Stir vigorously until the caramel fully dissolves, creating a glossy, amber‑colored mixture that smells like a caramel apple at a fair. If you notice any lumps, lower the heat slightly and keep stirring; the goal is a perfectly smooth base.
Kitchen Hack: Warm the caramel slightly in the microwave before adding it to the espresso; it integrates faster and prevents graininess.Heat the whole milk in a saucepan over medium‑low heat until it reaches about 150°F (65°C). You’ll see tiny bubbles forming around the edges, and the surface will start to shimmer. Do not let it boil; a gentle heat preserves the milk’s natural sweetness and prevents a scorched taste. Once the temperature is right, remove from heat and set aside.
Watch Out: Overheating the milk will cause it to develop a “cooked” flavor that clashes with the delicate caramel.Froth the warmed milk using a handheld frother or a steam wand until you achieve a thick, velvety micro‑foam. The goal is a glossy surface with tiny, uniform bubbles that look like a cloud of silk. If you’re using a handheld frother, tilt the pitcher slightly to create a whirlpool—this encourages larger bubbles to rise and burst, leaving only the fine foam. The foam should be dense enough that you can spoon a small dollop onto the latte without it sinking.
Combine the espresso‑caramel mixture with the frothed milk. Pour the espresso base into a large mug, then gently pour the milk over it, holding back the foam with a spoon. Once the mug is about three‑quarters full, spoon the remaining foam on top, creating a smooth, layered appearance. At this point, you should see a creamy amber surface awaiting its crown.
If you love extra indulgence, dollop a generous spoonful of whipped cream onto the foam. The whipped cream adds an airy, buttery layer that melts into the latte, enriching the caramel flavor. This step is optional, but trust me—it’s worth the extra calories. And now the fun part.
Sprinkle the granulated sugar evenly across the surface. Use a fine mesh sieve for an even distribution; you want a thin, uniform layer that will torch evenly. The sugar should sit lightly on the foam, not sink into it. If you’re using a larger mug, you may need a second teaspoon of sugar to fully cover the surface.
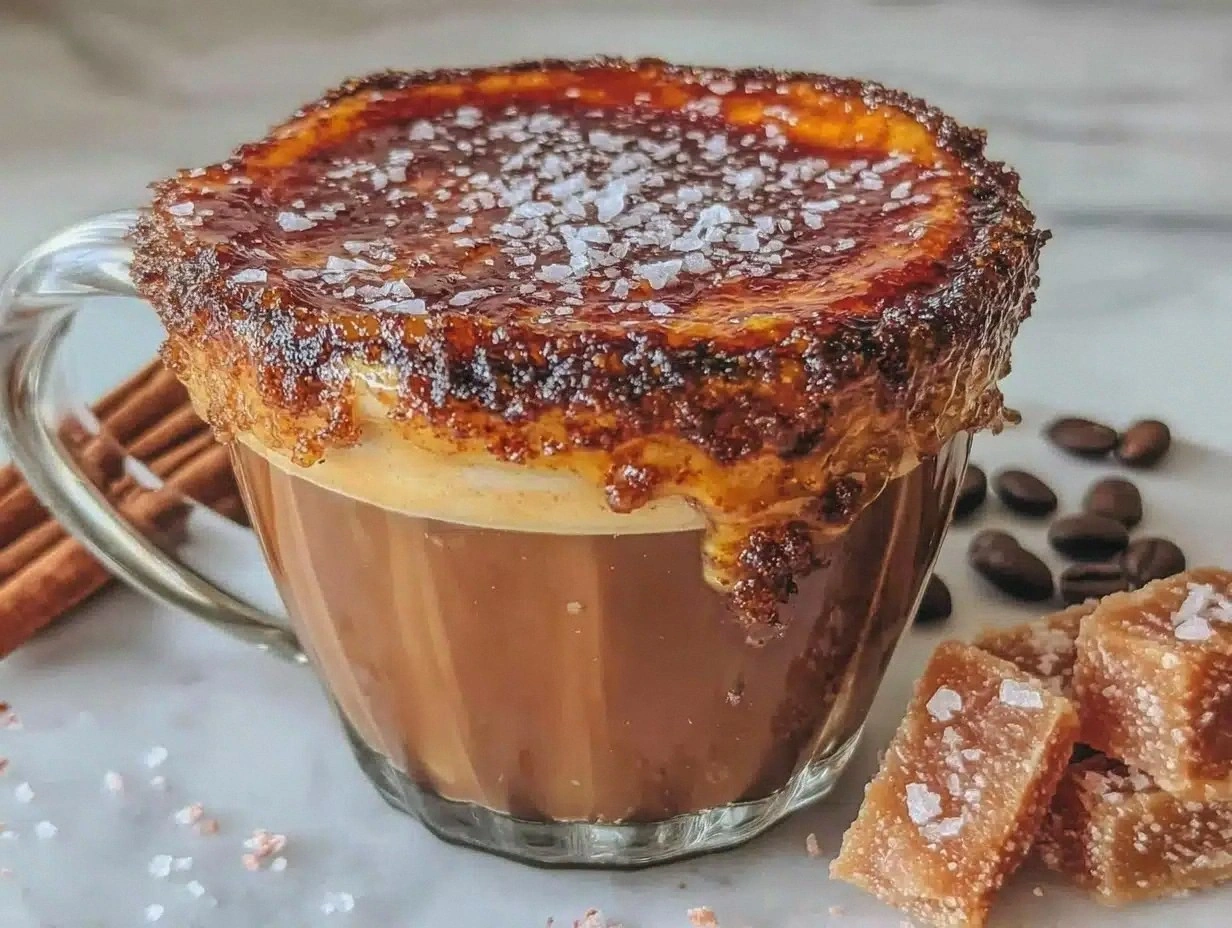
Grab your kitchen torch, set it to a medium‑high flame, and carefully torch the sugar. Move the flame in slow, circular motions, keeping it a few centimeters away from the surface. You’ll hear a faint sizzle as the sugar caramelizes, and within seconds the sugar will turn golden‑brown and start to crackle. This next part? Pure magic. The crust should be glossy and slightly puffed, with a delicate crackling sound when you tap it with a spoon.
Let the latte sit for about 30 seconds to allow the brûlée crust to set. Then, give it a gentle tap with a spoon—the top should shatter like a thin caramel sheet, revealing the creamy latte beneath. Serve immediately, because the longer it sits, the softer the crust becomes. That sizzle when it hits the pan? Absolute perfection. Enjoy the first sip, feeling the crackle, the smooth milk, and the bold espresso all dancing together.
That's it — you did it. But hold on, I've got a few more tricks that'll take this to another level...
Insider Tricks for Flawless Results
The Temperature Rule Nobody Follows
Most home baristas heat milk to a rolling boil, thinking hotter means better foam. In reality, 150°F (65°C) is the sweet spot; any hotter and the proteins denature, resulting in a flat, “cooked” taste. I once tried 180°F and the latte tasted like burnt milk—no one wants that. Keep a kitchen thermometer handy, and you’ll consistently hit that perfect silky texture.
Why Your Nose Knows Best
Before you even taste, trust your sense of smell. The moment the caramel hits the espresso, you should detect a buttery, slightly nutty aroma. If the scent is faint, the caramel may be under‑heated or of low quality. A strong nose cue means the flavor balance is already on point, saving you from a bland sip.
The 5‑Minute Rest That Changes Everything
After you torch the sugar, let the latte rest for exactly five minutes. This brief pause lets the caramel crust set and the foam stabilize, preventing it from collapsing when you stir. I tried skipping this rest once; the crust melted into the latte, turning it into a sugary soup—definitely not the experience I was aiming for.
Whipped Cream Whisper
If you opt for whipped cream, lightly sweeten it with a pinch of sea salt. The salt amplifies the caramel’s depth and cuts through the richness, creating a more complex flavor profile. Skipping the salt makes the whipped topping taste one‑dimensional, like plain sweet cream.
Torch Technique Mastery
Never point the torch directly at the sugar for more than a second; you’ll scorch it and introduce bitterness. Instead, keep the flame moving in small circles, allowing the heat to evenly caramelize the sugar. If you see dark spots, you’ve lingered too long—move on quickly. This subtle motion is the difference between a golden crust and a burnt disaster.
Creative Twists and Variations
This recipe is a playground. Here are some of my favorite ways to switch things up:
Spiced Autumn Brûlée
Add a pinch of ground cinnamon and a dash of nutmeg to the caramel before mixing with espresso. The warm spices echo the caramel’s sweetness and make the latte perfect for crisp fall mornings. Ideal for anyone who loves pumpkin spice without the actual pumpkin.
Salted Caramel Delight
Stir in a quarter teaspoon of flaky sea salt into the caramel‑espresso blend. The salt amplifies the caramel’s depth and creates a delightful contrast that makes each sip pop. This version is a crowd‑pleaser for those who enjoy a sweet‑salty balance.
Mocha Brûlée Fusion
Mix in a tablespoon of high‑quality cocoa powder with the espresso before adding caramel. The chocolate adds richness and a hint of bitterness that pairs beautifully with the caramel’s sweetness. A true indulgence for chocolate lovers.
Vegan Velvet
Swap whole milk for oat milk and use a plant‑based caramel sauce. Top with a dollop of coconut whipped cream and you’ve got a dairy‑free version that still delivers that luxurious mouthfeel. The oat milk’s natural sweetness complements the caramel beautifully.
Cold Brew Brûlée
Replace the espresso with a strong cold brew concentrate. This gives the latte a smoother, less acidic profile, perfect for hot summer days. Torch the sugar as usual, and you’ll still get that satisfying crackle.
Storing and Bringing It Back to Life
Fridge Storage
Store any leftover latte (without the brûlée topping) in an airtight glass jar for up to 24 hours. Keep the milk and espresso mixture separate from the whipped cream to prevent sogginess. When you’re ready to enjoy, gently reheat on the stovetop over low heat, stirring occasionally.
Freezer Friendly
You can freeze the espresso‑caramel base in a silicone ice cube tray for up to a month. Once frozen, transfer the cubes to a zip‑top bag. When you need a quick latte, melt a cube in hot milk and froth as usual. The flavor remains vibrant thanks to the high fat content of the caramel.
Best Reheating Method
To revive a chilled latte, add a splash of water (about 1 tablespoon) before reheating. This creates steam that restores the silky texture and prevents the milk from separating. Warm gently over low heat, then froth again and finish with a fresh torched sugar crust for that signature crunch.