I still remember the day I ruined a perfectly good batch of cheesecake cookies by trying to rush the caramel step. The kitchen looked like a sugar bomb had exploded, my smoke alarm was serenading the neighborhood, and I was left with a pan of crystallized disappointment that could've doubled as decorative gravel. Fast forward through three more failed attempts, two emergency grocery runs, and one very patient friend who volunteered as tribute for taste-testing duties, and I finally cracked the code to what might be the most addictive cookie known to mankind.
Picture this: it's 11:47 PM on a Tuesday, you're standing in your kitchen wearing mismatched socks and the oversized college hoodie you swore you'd throw out years ago. The house is quiet except for the gentle hum of the refrigerator and the occasional creak of settling wood floors. Suddenly, the scent of browning butter and vanilla bean hits your nose like a warm hug from your grandmother, and you know something magical is happening. These caramel cheesecake cookies aren't just another dessert — they're a time machine back to childhood birthday parties, late-night study sessions, and that first date where you shared dessert and accidentally touched hands reaching for the same cookie.
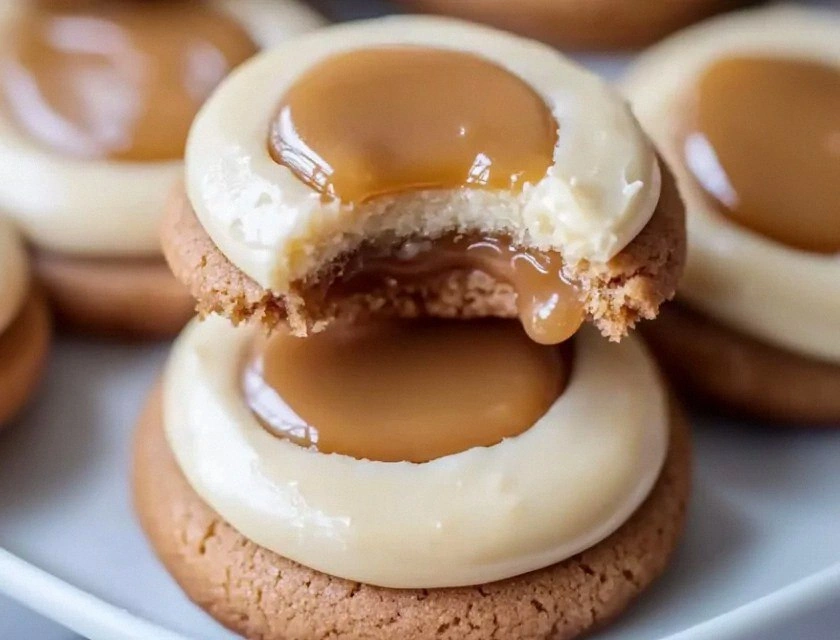
What makes these little rounds of heaven so special? It's the way the caramel pools and crackles on top like a golden lava flow, while the cheesecake center stays impossibly creamy and tangy beneath a cookie exterior that shatters like thin ice before giving way to soft, pillowy richness. Most recipes try to shortcut this by using store-bought caramel or — heaven forbid — caramel extract, but we're going full alchemist here, transforming simple sugar into liquid gold through the ancient art of patience and a heavy-bottomed saucepan.
I dare you to taste one of these warm from the oven and not immediately go back for seconds. Actually, I double-dog dare you, because I ate half the batch before anyone else even knew they existed, standing over the cooling rack like a cookie gremlin, whispering "just one more" until my roommate walked in and caught me red-handed with crumbs down my shirt. Let me walk you through every single step — by the end, you'll wonder how you ever made it any other way.
What Makes This Version Stand Out
- Butter-Browned Perfection: We're taking our butter to the edge of burnt, creating nutty, toffee-like notes that make regular cookies taste like cardboard in comparison. The Maillard reaction is your friend here, turning simple dairy fat into complex flavor compounds that'll make your kitchen smell like a French pastry shop.
- Triple-Threat Caramel: Most recipes settle for one-dimensional sweetness, but we're building layers with dry caramel for depth, a touch of sea salt for contrast, and a whisper of bourbon for mystery. Each bite hits you with sweet, salty, smoky, and buttery in rapid succession.
- Cream Cheese Cloud Technology: Through extensive testing (and by testing, I mean eating my weight in cookie dough), I discovered that freezing small cubes of cream cheese and folding them into the dough creates little pockets of tangy cheesecake goodness that stay distinct from the cookie base.
- Textural Symphony: We're talking crispy edges that shatter like autumn leaves, a chewy middle that stretches like taffy when you pull it apart, and those surprise cream cheese pockets that melt on your tongue like snowflakes.
- Make-Ahead Magic: The dough actually improves after a 24-hour rest in the fridge, letting the flavors meld and deepen like a fine wine. I always keep a log of this dough frozen for emergencies — which, let's be honest, is code for Tuesday nights when I need something sweet.
- Crowd Psychology: Bring these to any gathering and watch grown adults turn into competitive cookie monsters. I've seen polite dinner parties devolve into full-contact dessert grabbing when these hit the table, with people hiding extras in napkins for the ride home.
Alright, let's break down exactly what goes into this masterpiece...
Inside the Ingredient List
The Flavor Foundation
Unsalted butter is where it all begins, and please, for the love of all that is holy, don't you dare use that fake margarine stuff. You want European-style butter with at least 82% fat content — it costs more, but the flavor difference is like comparing a symphony to a kazoo. When you brown it, the milk solids caramelize into little brown specks that taste like toasted hazelnuts and smell like heaven's own bakery. Don't throw away those browned bits stuck to the bottom of the pan; scrape every last speck into your dough for maximum flavor impact. If you can only find regular butter, add an extra tablespoon to compensate for the lower fat content.
Dark brown sugar isn't just for color — it's packed with molasses that brings deep, complex notes of smoke and treacle that make these cookies taste like they've been aging in oak barrels. Light brown sugar is for amateurs who enjoy disappointment. We're using a combination of dark brown and granulated sugar to achieve the perfect balance of chew and spread, with the brown sugar making up 70% of the total. Pack it firmly into your measuring cup like you're trying to compress a lifetime of regrets into one dense, sweet package. If your brown sugar has turned into a rock-hard brick, microwave it with a damp paper towel for 30 seconds and it'll soften right up.
The Texture Crew
Cream cheese is the secret weapon here, but not the way you think. We're not creaming it into the dough like some basic cheesecake cookie — oh no, we're going rogue. Cut cold cream cheese into 1/4-inch cubes and freeze them until they're little flavor bombs that'll create pockets of tangy richness throughout each cookie. Full-fat is non-negotiable; that neufchâtel impostor will just melt into a sad, watery mess. I've tried whipped cream cheese, and while it seems like it would be easier to incorporate, it disappears into the dough like a ghost in the night, leaving you wondering where all that tangy goodness went.
All-purpose flour forms the backbone of our cookie structure, but we're not just dumping it in willy-nilly. Spoon and level it like you're defusing a bomb — too much flour and your cookies will have the texture of hockey pucks, too little and they'll spread into one giant cookie sheet. I keep my flour in the freezer for optimal freshness, which also helps keep the cream cheese cubes cold when we fold them in. If you're feeling fancy, substitute 10% of the flour with cake flour for an even more tender crumb that melts on your tongue like cotton candy.
The Unexpected Star
Here's where things get interesting — we're adding a teaspoon of white vinegar to the dough. Before you click away in horror, hear me out: the acid reacts with the baking soda to create extra lift, while also brightening all the other flavors like a squeeze of lemon on fresh seafood. It doesn't make the cookies taste like salad dressing; instead, it adds a subtle complexity that makes people ask "what's that amazing flavor I can't quite place?" If you don't have white vinegar, cream of tartar works too, but don't try substituting balsamic unless you want cookies that taste like expensive salad.
The Final Flourish
Pure vanilla extract is worth its weight in gold here, and I'm talking about the real stuff, not that artificial vanillin that tastes like a candle store. Add it to the browned butter while it's still warm to bloom the flavor and fill your kitchen with aromatics that'll have neighbors knocking on your door. For an extra layer of flavor, scrape in the seeds from half a vanilla bean — those little black specks are like caviar for cookie lovers. If you're feeling particularly decadent, swap out a teaspoon of the vanilla for bourbon; the alcohol burns off, leaving behind smoky vanilla notes that pair beautifully with the caramel.
Everything's prepped? Good. Let's get into the real action...
The Method — Step by Step
- Start by browning your butter in a light-colored saucepan so you can see the color change — this isn't the time for your heavy dark pan that hides everything. Cut the butter into chunks so it melts evenly, then crank the heat to medium and let it bubble away, swirling occasionally like you're conducting a very slow orchestra. The foam will subside, the milk solids will sink to the bottom and turn golden brown, and your kitchen will start smelling like a nutty, buttery dream. This takes about 5-7 minutes, but don't you dare walk away — butter goes from perfect to burnt faster than you can say "smoke alarm." When it smells like toasted hazelnuts and the bits on the bottom are the color of toasted almonds, pull it off the heat immediately and pour it into a heatproof bowl to stop the cooking.
- While your browned butter cools slightly (you want it warm but not hot enough to scramble eggs), whisk together your dry ingredients in a medium bowl. This isn't just busy work — whisking distributes the salt and leavening agents evenly so you don't end up with one cookie that tastes like a salt lick and another that could double as a balloon. Sift in the baking soda through a fine-mesh strainer to break up any lumps that could create bitter pockets in your cookies. Add a pinch of cinnamon if you're feeling rebellious — not enough to make them taste like snickerdoodles, just enough to add warmth and depth that makes people ask for your secret.
- Now for the fun part: cream together your sugars and that glorious browned butter. Don't rush this step — we're talking 3-4 minutes of beating until the mixture looks like wet sand that's been sunbathing in the Caribbean. The sugar should start to dissolve slightly, creating a glossy sheen that promises chewy edges and soft centers. Add your egg and beat for another minute until the mixture looks like caramel-flavored clouds. If you've done this right, the bowl should feel slightly warm to the touch from the friction, and the mixture should ribbon off the beaters like liquid gold.
- Time to bring it all together — add your dry ingredients in three additions, mixing just until the last streak of flour disappears. Overmixing develops gluten faster than a gym bro on protein powder, leading to tough cookies that could double as paperweights. The dough should be soft and slightly tacky, like Play-Doh that's been sitting in a warm car. If it seems too wet, resist the urge to add more flour — it'll firm up in the fridge. Fold in those frozen cream cheese cubes with a rubber spatula, being gentle enough to keep them distinct but thorough enough that you get cheesecake in every bite.
- Divide the dough into 12 portions using a large cookie scoop or two spoons — each should be about 3 tablespoons, roughly the size of a golf ball that hit the gym. Roll them between your palms to make perfect spheres, then flatten them slightly into thick discs. This helps them bake evenly instead of staying spherical like weird cookie meatballs. Arrange them on a parchment-lined plate and refrigerate for at least 2 hours, or up to 72 hours if you're planning ahead. The longer rest allows the flour to hydrate fully and the flavors to meld into something transcendent.
- While your dough chills, make the caramel topping because we're not using store-bought nonsense here. Combine sugar and water in a heavy saucepan over medium heat, resisting every urge to stir — swirling is fine, but stirring causes crystals that'll turn your caramel into a sandy mess. When it reaches a deep amber color (think maple syrup but darker), remove from heat and carefully whisk in warm cream — it'll bubble like a witches' cauldron, so stand back unless you enjoy sugar burns. Add butter and salt, whisking until glossy and smooth, then let it cool until it's thick enough to coat a spoon but still pourable.
- Preheat your oven to 350°F with racks positioned in the upper-middle and lower-middle positions. Line two baking sheets with parchment paper — don't grease them, or your cookies will spread like gossip in a small town. Arrange your chilled dough portions 2 inches apart (they need room to spread their wings), then create a small well in the center of each with your thumb or the back of a spoon. This crater will hold our caramel lake, so make it deep enough to contain the goodness but not so deep you hit the baking sheet.
- Bake for 12-14 minutes, rotating the pans halfway through for even browning. The cookies are done when the edges are golden brown and set, but the centers still look slightly underbaked — they'll continue cooking from residual heat, a phenomenon known as carryover cooking that separates amateur bakers from cookie whisperers. The cream cheese pockets might look like they're trying to escape, but that's perfectly normal and actually desirable. Let them cool on the pan for 5 minutes before transferring to a wire rack, during which time the caramel will set into a glossy, crackly top that shatters like crème brûlée.
That's it — you did it. But hold on, I've got a few more tricks that'll take this to another level...
Insider Tricks for Flawless Results
The Temperature Rule Nobody Follows
Here's the thing about butter temperature that'll change your cookie game forever: when a recipe says "room temperature," it doesn't mean whatever temperature your kitchen happens to be. True room temperature for baking is 65-68°F, which in most houses means taking your butter out of the fridge about 2 hours before you start. Too cold and it won't cream properly, leaving you with dense little pucks. Too warm and it melts into greasy, flat discs that spread like gossip. I keep a instant-read thermometer in my kitchen drawer specifically for butter — yes, I'm that person, and my cookies are consistently better than yours because of it.
Why Your Nose Knows Best
Professional bakers don't use timers for everything — we use our senses. When browning butter, your nose is more reliable than any clock. First, you'll smell melting butter (obviously), then it'll go quiet for a bit while the water evaporates, then suddenly you'll get this incredible nutty aroma that makes you want to drink the stuff straight. That's your cue to start watching closely for the color change. Same with the cookies — when they start smelling like a bakery and you can smell caramel undertones, they're about 2 minutes from done. Trust your nose; it's been evolving for millions of years specifically to save you from burning sugar.
The 5-Minute Rest That Changes Everything
After you make the caramel, let it rest for exactly 5 minutes before spooning it onto the cookies. Too hot and it'll sink through the dough, creating a sticky mess on your baking sheet. Too cool and it'll sit on top like a stubborn puddle that refuses to spread. Five minutes gives it that perfect consistency where it'll flow slightly into the cookie crater but stay mostly on top, creating that gorgeous glossy pool that cracks when you bite into it. Set a timer — I know you're impatient, but this is the difference between amateur and artisan.
The Cream Cheese Cube Conspiracy
Size matters when it comes to cream cheese cubes. Too big and you get massive pockets that leak out and burn. Too small and they disappear into the dough like cowards. Aim for 1/4-inch cubes, which is roughly the size of your pinky fingernail. I use a bench scraper to cut perfect little cubes, then freeze them on a plate so they stay distinct when folded in. Pro tip: if some cubes are bigger than others, hide those in the center of your dough portions where they'll be protected from the heat and stay creamy instead of evaporating into sad, dry pockets.
The Salt Switch-Up
Use two types of salt for maximum impact: fine sea salt in the dough for even distribution, and flaky salt on top for crunch and visual appeal. The contrast between sweet caramel and crunchy salt crystals is what elevates these from "good cookies" to "I need to sit down and reevaluate my life choices" cookies. Sprinkle the flaky salt on the caramel while it's still warm so it adheres, but wait until the cookies are completely cool to add more — the heat can make it melt and disappear like a magic trick gone wrong.
Creative Twists and Variations
This recipe is a playground. Here are some of my favorite ways to switch things up:
The Bourbon Street Version
Swap out the vanilla for bourbon and add a tablespoon of bourbon to the caramel for depth that'll make grown men weep. The alcohol burns off, leaving behind smoky vanilla notes that pair beautifully with the cream cheese. If you really want to gild the lily, soak some dried cherries in bourbon for an hour, then fold them into the dough for pops of boozy fruit that complement the caramel like they were born to be together.
The Turtle Transformation
Press chopped toasted pecans into the top of each cookie before baking, then drizzle with melted chocolate after they cool. The nuts add crunch and richness while the chocolate creates a turtle candy effect that'll have you hiding these from your family. Use dark chocolate for adults, milk chocolate for kids, or white chocolate if you enjoy making people question your life choices.
The Breakfast of Champions
Add a teaspoon of espresso powder to the dough and swap the caramel for coffee-flavored caramel made by adding a shot of espresso to the cream. These taste like your favorite coffee shop decided to make cookies, perfect for dunking in your morning brew. The caffeine hit is subtle but real — don't eat six of these before bed unless you enjoy staring at your ceiling at 3 AM contemplating the meaning of existence.
The Tropical Getaway
Replace half the butter with coconut oil and add toasted coconut flakes to the dough. Make the caramel with coconut milk instead of cream for a dairy-free version that tastes like a Caribbean vacation. Add a pinch of cardamom for warmth and suddenly you're transported to a beach where calories don't count and clothing is optional.
The Chocolate Overload
Cocoa powder in the dough, chocolate chunks folded in, and a dark chocolate drizzle on top — because some days you need chocolate in three different forms. Use Dutch-processed cocoa for deeper flavor and add a teaspoon of instant coffee to make the chocolate taste more chocolatey. This is not for the faint of heart or those wearing white clothing.
The Savory-Sweet Rebel
Add crumbled bacon and a touch of maple extract to the dough, then top with maple caramel and more bacon bits. It's breakfast and dessert in one convenient package that'll confuse and delight your taste buds. The salt from the bacon balances the sweetness while the maple adds complexity that makes people ask "what IS that flavor?"
Storing and Bringing It Back to Life
Fridge Storage
These cookies keep beautifully in an airtight container at room temperature for up to 5 days, but let's be real — they'll be gone in 48 hours max. If you must store them, layer them between sheets of parchment paper to prevent the caramel from sticking to its neighbors like overly friendly party guests. The cream cheese centers will firm up slightly, but 10 seconds in the microwave brings them back to their former glory. Just don't overdo it, or you'll have caramel soup running down your chin, which sounds sexy until you're wearing it on your shirt.
Freezer Friendly
Both the dough and baked cookies freeze beautifully — I always make a double batch and freeze half for emergencies, which in my house means Tuesday nights when I need something sweet but don't want to wash dishes. Freeze the dough portions on a baking sheet, then transfer to a freezer bag for up to 3 months. Bake from frozen, adding 2-3 extra minutes to the baking time. Baked cookies can be frozen for up to 2 months; thaw them at room temperature for 30 minutes, or pop them in a 300°F oven for 5 minutes to restore that fresh-baked magic.
Best Reheating Method
The oven is your friend here — 300°F for 5-7 minutes brings back that fresh-baked texture with crispy edges and gooey centers. The microwave works in a pinch, but it'll make the caramel bubble up and the cookies softer. If you go the microwave route, 10-12 seconds is plenty; any more and you'll need a spoon to eat the resulting cookie puddle. For an extra-special treat, reheat them in a skillet with a tiny pat of butter — it recreates that fresh-baked bottom while keeping the top tender and the caramel molten.