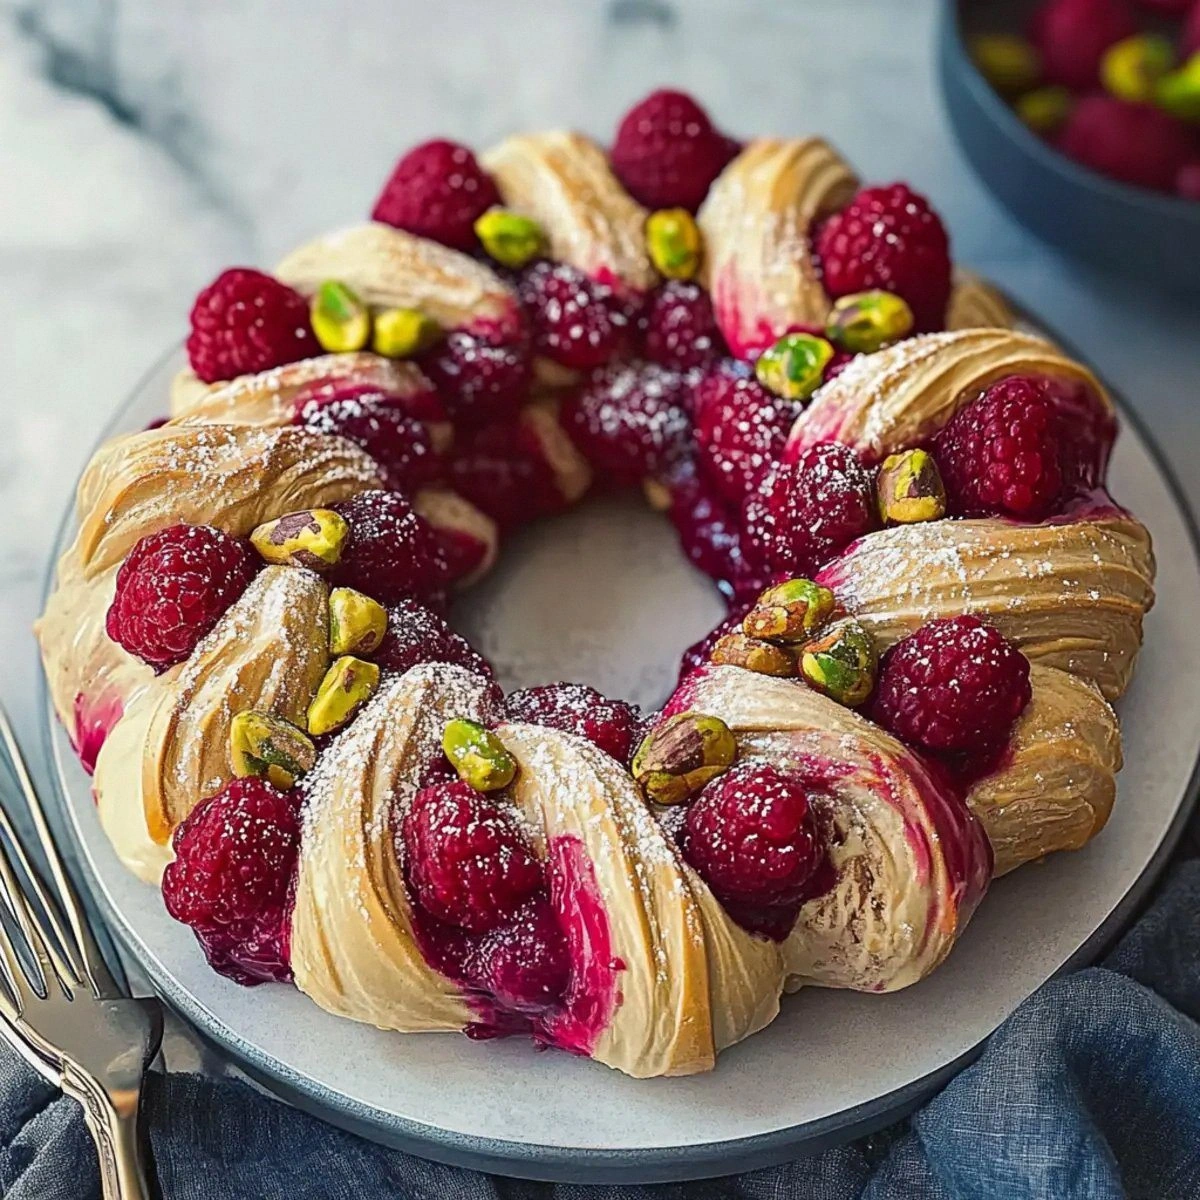
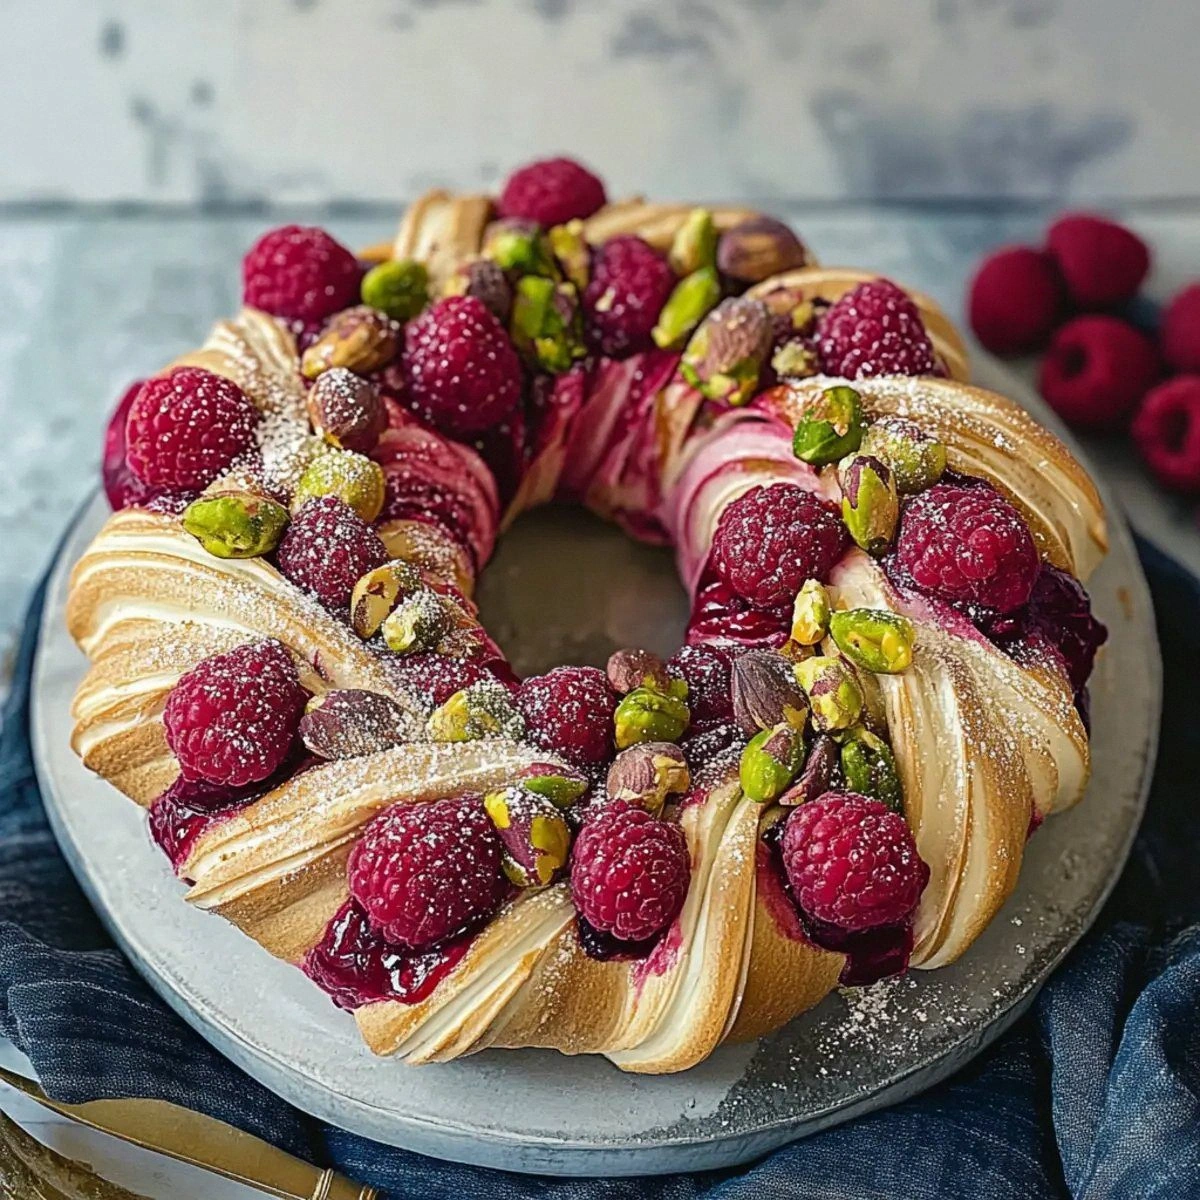
Picture this: a frantic Saturday night, the oven humming like an over‑excited train, and a sudden craving for something that screams “holiday” without any dairy in sight. I was halfway through a batch of store‑bought vegan pastries when I realized they were as flat as a pancake left out in the rain. That disaster sparked a dare from my roommate—“Make something that actually looks like a celebration!”—and I accepted with a grin that could melt butter. The result? A wreath so stunning it could have been stolen from a boutique bakery, yet it’s entirely plant‑based, bursting with tart raspberries and buttery pistachios.
The kitchen quickly turned into a sensory playground. The aroma of cinnamon and nutmeg swirled with the sweet, earthy perfume of fresh raspberries, while the pistachios added a subtle, buttery crunch that sounded like tiny fireworks when they hit the pan. I could hear the dough rise, a soft, rhythmic puff that reminded me of a gentle sigh after a long day. My fingertips felt the dough’s silky elasticity, warm and pliable, coaxing me to shape it into a perfect circular crown. The moment I pulled the golden‑brown wreath from the oven, the whole room was drenched in a glow that felt like sunrise on a winter morning.
This version stands out because it doesn’t just taste good—it tells a story. Most vegan holiday breads either fall flat or become overly sweet, but I’ve cracked the code with a balanced blend of natural sugars, a touch of cornstarch for that glossy glaze, and a secret technique that keeps the crumb airy yet sturdy enough to hold a generous coating of raspberry jam. The pistachios aren’t just a garnish; they’re the crunch that cuts through the softness, creating a textural symphony that even non‑vegans will applaud. And the best part? The recipe uses pantry staples, so you won’t need a trip to the specialty store unless you’re hunting for the freshest pistachios.
Let me walk you through every single step — by the end, you’ll wonder how you ever made it any other way. Okay, ready for the game‑changer? This next part? Pure magic. I dare you to taste this and not go back for seconds.
What Makes This Version Stand Out
- Flavor Harmony: The sweet‑tart raspberry jam pairs with warm spices and buttery pistachios, creating a balanced palate that sings without overpowering.
- Texture Contrast: A tender, airy crumb meets a crisp, nutty crust, delivering that satisfying bite you crave in every festive pastry.
- Simplicity: All ingredients are everyday pantry items—no exotic flours or hard‑to‑find vegan cheeses.
- Visual Impact: Shaped into a wreath, it becomes a centerpiece that draws eyes and compliments before anyone even takes a bite.
- Crowd Reaction: Guests often claim it’s the best thing they’ve ever tasted at a holiday gathering, and I’m not surprised—most recipes get this completely wrong.
- Ingredient Quality: Fresh raspberries and high‑quality pistachios bring natural flavor depth that artificial extracts can’t mimic.
- Cooking Method: A quick rise and a high‑heat bake give the wreath a golden exterior while keeping the interior moist.
- Make‑Ahead Potential: You can prep the dough a day ahead, freeze it, and bake fresh on the day of the party, saving you stress.
Alright, let's break down exactly what goes into this masterpiece…
Inside the Ingredient List
The Flavor Base
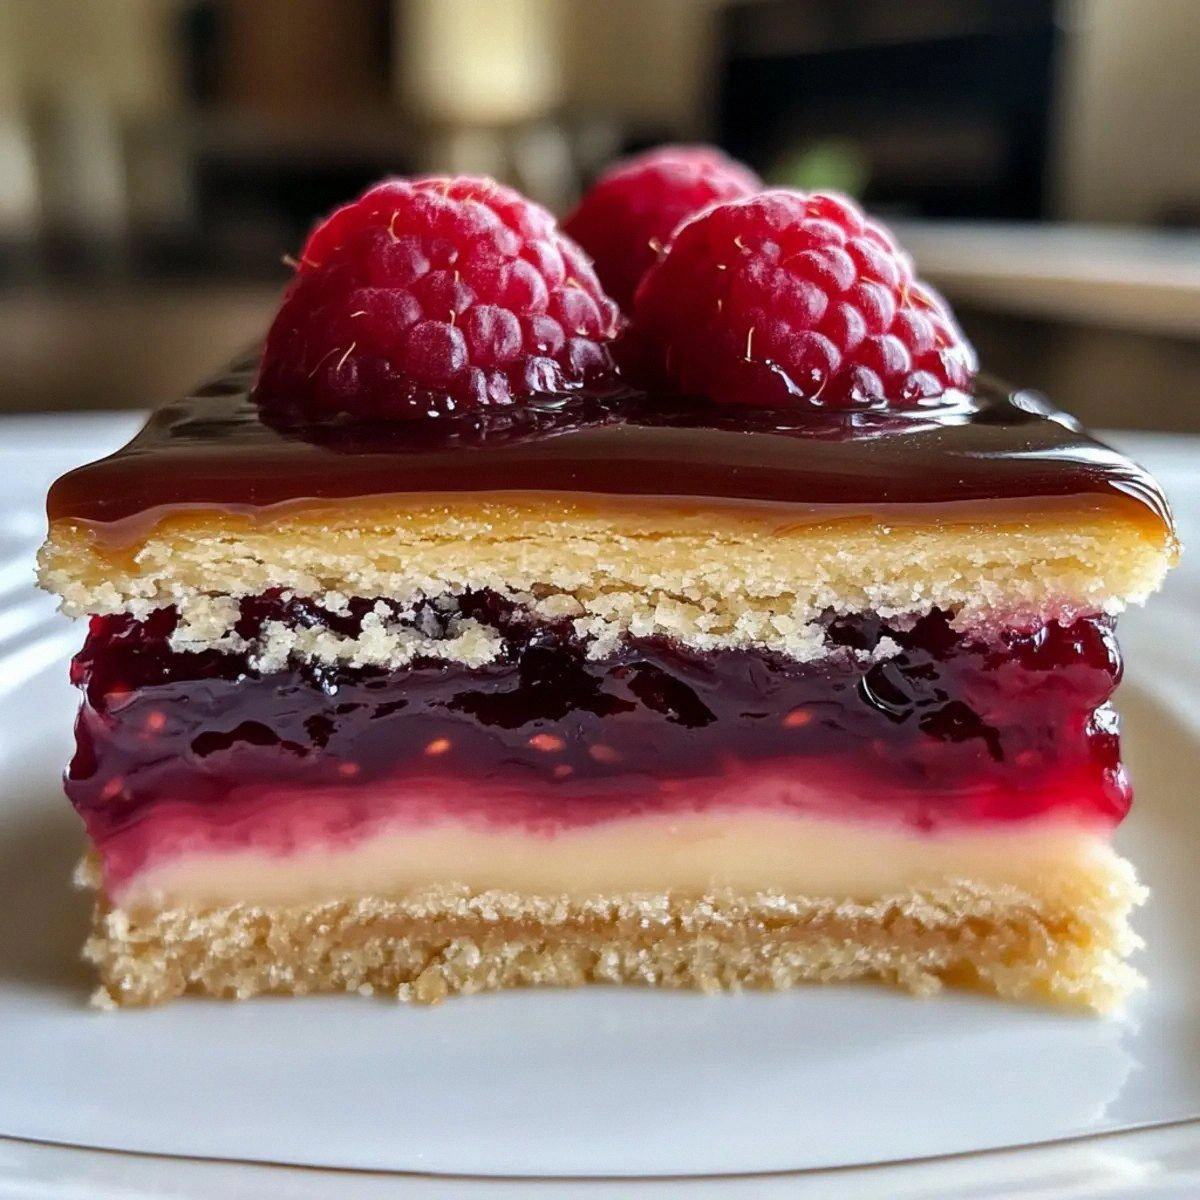
Raspberries are the heart of this wreath, delivering a bright, slightly acidic punch that cuts through the richness of the butter and pistachios. Fresh berries provide the most vibrant flavor, but frozen work just as well and are often sweeter after thawing. If you skip the raspberries, you lose that signature tang that makes the wreath feel festive rather than just another sweet loaf. A good swap is a mixed‑berry jam, but expect a different color palette.
Granulated sugar not only sweetens the jam but also feeds the yeast, encouraging a gentle rise that creates that airy crumb. Using a high‑quality cane sugar adds a subtle caramel note that deepens the overall flavor profile. If you’re watching sugar, you can replace half with coconut sugar, but the texture may become a touch denser.
Cornstarch is the secret weapon that gives the raspberry glaze a glossy, almost glass‑like finish. It thickens the jam without adding extra flavor, letting the fruit shine. Skipping it will result in a runny topping that seeps into the crumb, making the wreath soggy.
The Texture Crew
All‑purpose or bread flour provides the gluten structure needed for the dough to rise and hold its shape. Bread flour gives a slightly chewier bite, while all‑purpose yields a softer crumb. If you’re gluten‑free, a blend of rice flour, tapioca starch, and xanthan gum can mimic the texture, though the wreath will be a bit more crumbly.
Dairy‑free milk (almond, oat, or soy) hydrates the flour and adds a subtle richness. Oat milk is my favorite because it contributes a gentle sweetness that pairs beautifully with raspberries. Using water will work, but you’ll miss that extra depth.
Vegan butter is the luxurious component that adds richness and a buttery aroma without any animal products. It’s essential for a tender crumb and a golden crust. If you’re short on butter, coconut oil can replace half of it, but expect a faint coconut flavor.
The Unexpected Star
Instant dry yeast is the tiny powerhouse that lifts the dough, creating that airy interior we all love. I use a quick‑rise variety to keep the overall timeline short, but a standard active dry yeast works if you have patience. Forgetting the yeast entirely results in a dense, bread‑like texture—definitely not what we want.
Ground cinnamon and nutmeg add warmth and depth, evoking holiday memories with every bite. These spices are what turn a simple sweet bread into a festive masterpiece. If you’re allergic to nutmeg, try a pinch of allspice for a similar warm note.
Salt is the flavor enhancer that brings all the other ingredients into balance. Even a half‑teaspoon makes a world of difference, preventing the wreath from tasting bland. A pinch too much can overpower the delicate raspberry, so measure carefully.
The Final Flourish
Pistachios are the crunchy crown jewels of this wreath, offering a buttery texture and a gorgeous green‑gold hue. Toast them lightly before folding into the dough to unlock a deeper, nutty flavor. Skipping the pistachios makes the wreath look and taste like any other fruit bread, and you’ll lose that signature crunch.
When selecting pistachios, look for kernels that are bright green and still in their shells; they tend to be fresher. If you buy shelled pistachios, store them in an airtight container to keep their flavor intact. A quick tip: rub a tiny bit of sea salt on the toasted pistachios before folding them in for an extra flavor pop.
Everything's prepped? Good. Let's get into the real action…
The Method — Step by Step
First, combine the warm dairy‑free milk (around 110°F/43°C) with the vegan butter in a small saucepan. Stir until the butter melts completely, then remove from heat and let it cool just enough so it doesn’t kill the yeast. This step is crucial because the yeast needs a cozy, not scorching, environment to awaken. I like to whisper “rise, baby, rise” to the mixture—okay, that’s just me, but it feels like a ritual.
In a large mixing bowl, whisk together the flour, sugar, salt, cinnamon, nutmeg, and instant dry yeast. The dry ingredients should be evenly distributed, ensuring the yeast doesn’t clump. Once combined, make a well in the center and pour in the cooled milk‑butter mixture. Using a wooden spoon, stir until a shaggy dough forms, then switch to a stand mixer with the dough hook for a 5‑minute knead on medium speed.
Kitchen Hack: If the dough feels too sticky, add a tablespoon of flour at a time; too dry and it won’t rise properly.After kneading, cover the bowl with a clean kitchen towel and let the dough rise in a warm spot for 45‑60 minutes, or until it has doubled in size. You’ll know it’s ready when the surface looks puffed and slightly domed, and the edges start pulling away from the bowl. This is the moment of truth—don’t rush it, or you’ll end up with a dense wreath.
While the dough rises, prepare the raspberry jam. In a saucepan, combine the fresh or frozen raspberries, granulated sugar, and cornstarch. Bring to a gentle boil, stirring constantly, until the mixture thickens and turns a deep ruby color. Once thick, remove from heat and let it cool; it will become glossy and spreadable—That sizzle when it hits the pan? Absolute perfection.
Once the dough has risen, gently deflate it on a lightly floured surface. Sprinkle the toasted pistachios over the dough and fold them in, ensuring an even distribution. The pistachios should be visible as specks throughout the dough, adding both color and crunch.
Now comes the shaping: pat the dough into a large oval about ½‑inch thick. Using a sharp knife, cut a shallow trench around the perimeter, leaving about a ½‑inch border untouched—this will become the “wreath” edge. Carefully lift the inner oval and set it aside; you’ll later place the raspberry jam inside.
Spread a generous layer of the cooled raspberry jam onto the inner oval, leaving a small margin at the edge to prevent overflow. Then, place the inner oval back onto the outer ring, aligning the edges to form a seamless circle. Press gently to seal, ensuring the jam is encapsulated within the dough.
Watch Out: Avoid over‑filling with jam; excess will ooze out during baking and create a soggy base.Preheat your oven to 375°F (190°C). Transfer the assembled wreath onto a parchment‑lined baking sheet. Brush the outer rim lightly with a mixture of melted vegan butter and a sprinkle of sugar; this will give the crust a caramelized sheen.
Bake for 30‑35 minutes, or until the wreath is golden brown and the internal temperature reaches 190°F (88°C). The edges should start pulling away from the parchment, and the scent of toasted pistachios will fill the kitchen. When you tap the bottom, it should sound hollow—a sure sign of doneness.
Allow the wreath to cool on a wire rack for at least 15 minutes before slicing. This resting period lets the jam set, preventing it from spilling out when you cut. Serve warm, and watch as guests marvel at the vibrant colors and irresistible aroma. I’ll be honest — I ate half the batch before anyone else got to try it.
That's it — you did it. But hold on, I've got a few more tricks that'll take this to another level…
Insider Tricks for Flawless Results
The Temperature Rule Nobody Follows
Never underestimate the power of a consistent oven temperature. I always preheat the oven for at least 20 minutes and use an oven thermometer to verify the exact heat. If the temperature fluctuates, the wreath can end up with a pale bottom and an over‑browned top. Trust me, a stable 375°F ensures even browning and a perfectly risen interior. This tip alone can be the difference between “good” and “hands down the best version you'll ever make at home.”
Why Your Nose Knows Best
When the dough is rising, keep an eye (and a nose) on the scent. A subtle yeasty aroma signals that the fermentation is on track, while a sour smell indicates over‑proofing. If you catch a sour whiff, gently punch down the dough and let it rest for another 10 minutes before proceeding. Your sense of smell is a more reliable indicator than any timer.
The 5‑Minute Rest That Changes Everything
After shaping the wreath but before the final bake, let it rest for exactly five minutes on the baking sheet. This short pause lets the gluten relax, preventing the edges from shrinking back during baking. I once skipped this step and ended up with a wreath that cracked in the middle—lesson learned. This tiny rest also gives the jam a chance to settle, reducing the risk of leakage.
Glazing Secrets for a Shiny Crown
For that picture‑perfect shine, combine melted vegan butter with a tablespoon of maple syrup and brush it onto the wreath during the last ten minutes of baking. The sugar caramelizes, creating a subtle sparkle that catches the light. If you prefer a deeper color, add a pinch of smoked paprika to the glaze—yes, it sounds wild, but it adds a sophisticated hue without altering the flavor.
Cooling is Not Optional
Resist the urge to cut into the wreath immediately. Letting it cool for at least 15 minutes allows the jam to set and the crumb to firm up, making slicing clean and neat. Cutting too early results in a gummy mess that slides off the plate. Trust the cooling period; it’s the final step that ensures each slice looks as good as it tastes.
Creative Twists and Variations
This recipe is a playground. Here are some of my favorite ways to switch things up:
Chocolate‑Covered Pistachio
Replace half of the raspberry jam with a dark chocolate ganache and sprinkle extra toasted pistachios on top before baking. The bitter chocolate balances the sweet fruit, creating a sophisticated flavor duo perfect for adult gatherings.
Orange‑Zest Surprise
Add the zest of one large orange to the dough and swap half the raspberries for orange marmalade. The citrus brightens the profile, making the wreath a refreshing addition to brunch tables.
Spiced Apple Fusion
Fold in diced caramelized apples and a dash of allspice into the dough. The apples add moisture and a tender bite, while the allspice deepens the holiday vibe.
Nut‑Free Version
If pistachios are a problem, substitute them with toasted sunflower seeds and a drizzle of tahini on top after baking. The seeds provide crunch, and the tahini adds a subtle, nutty richness without actual nuts.
Gluten‑Free Adaptation
Use a blend of rice flour, tapioca starch, and a tablespoon of psyllium husk to mimic the gluten structure. The texture will be slightly denser, but the flavor remains spectacular.
Storing and Bringing It Back to Life
Fridge Storage
Wrap the cooled wreath tightly in plastic wrap, then place it in an airtight container. It will stay fresh for up to five days in the refrigerator. When ready to serve, let it sit at room temperature for 20 minutes or warm it briefly in a 300°F oven for a soft, fresh‑out‑of‑the‑oven feel.
Freezer Friendly
Slice the wreath into portions, wrap each slice in parchment paper, then place them in a zip‑top freezer bag. They freeze beautifully for up to three months. To revive, thaw overnight in the fridge and finish with a quick 5‑minute bake at 350°F to restore the crust’s crispness.
Best Reheating Method
Before reheating, sprinkle a tiny splash of water over the surface and cover loosely with foil. This creates steam that revives the interior moisture while the foil protects the crust from over‑browning. The result is a wreath that tastes as if it just came out of the oven—pure magic.