I was standing in my kitchen, staring down at a half‑finished batch of plain old meatballs, when my roommate shouted, “You’ve got to try putting those in biscuit dough!” I laughed, but the idea lodged in my brain like a stubborn seed. The next night, I tossed a handful of ground beef into a skillet, added a splash of garlic, and wrapped the mixture in buttery biscuit dough. The result? A bite‑size explosion that made my taste buds do a backflip. I dare you to taste this and not go back for seconds – it’s that good.
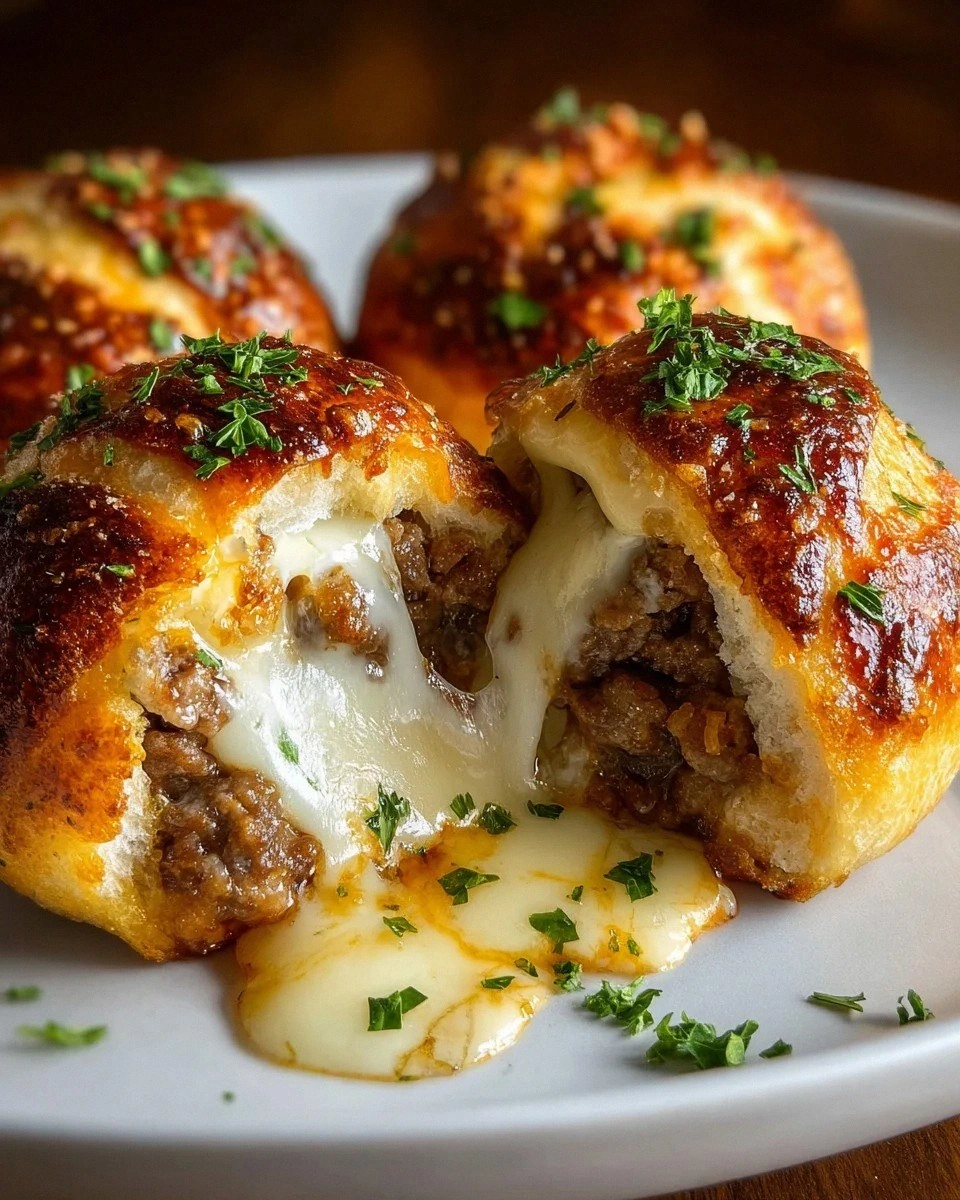
Picture this: the oven door swings open, a wave of buttery, garlicky aroma rolls out, and the golden tops glisten like tiny suns. You hear the faint hiss of the butter coating the bombs as they bake, and the kitchen feels warm, inviting, and a little bit like a bakery crossed with a burger joint. When you bite in, the crust cracks with a satisfying snap, the cheese pulls like a string of melted sunshine, and the beef inside is juicy, seasoned to perfection, and just a whisper of garlic and Parmesan dancing on your palate. It’s a sensory roller‑coaster that makes you forget you ever ate a regular burger.
Most recipes for “cheeseburger bites” either drown the meat in cheese or forget the crucial garlic‑Parmesan punch that makes this dish sing. I’ve tried a dozen versions that left me with soggy dough or bland meat, and each time I thought, “There has to be a better way.” That’s why this version stands out: the biscuit dough is brushed with melted butter before baking, creating a crisp, buttery shell that never gets soggy, while the garlic powder and shredded Parmesan are folded directly into the beef for an even, aromatic flavor that penetrates every bite.
You’ll also notice a secret weapon that most recipes skip: a quick sear of the ground beef before it meets the dough. This step locks in juices, gives the meat a caramelized edge, and adds a depth of flavor that’s impossible to achieve by just mixing raw beef with spices. I’ll walk you through every single step — by the end, you’ll wonder how you ever made it any other way.
Okay, ready for the game‑changer? Let’s dive in and turn simple pantry staples into the ultimate party‑pleasing snack that will have everyone asking for the recipe. Trust me, once you’ve mastered these Garlic Parmesan Cheeseburger Bombs, you’ll never look at a can of biscuit dough the same way again.
What Makes This Version Stand Out
- Flavor Explosion: The combination of garlic powder, onion powder, and Parmesan cheese creates a savory depth that rivals a gourmet burger joint. Each bite delivers a balanced hit of umami, garlic zing, and cheesy goodness that keeps you reaching for more.
- Texture Triumph: A buttery, crisp biscuit exterior gives way to a tender, juicy beef interior, while the mozzarella core melts into gooey rivers of cheese. The contrast between the crunchy shell and the soft, cheesy center is pure culinary poetry.
- Simplicity at Its Best: All ingredients are pantry‑friendly, and the method uses just one pan and a baking sheet. No fancy equipment, no complicated steps – just pure, straightforward deliciousness.
- Unique Twist: Most “cheeseburger bites” skip the pre‑sear, but we give the meat a quick brown‑but‑not‑burnt finish first, locking in juices and adding a caramelized edge that makes the flavor pop.
- Crowd‑Pleaser: These bombs are bite‑size, perfect for parties, game nights, or a comforting snack. They’re easy to pick up, eat, and love – even the kids can’t resist the cheesy pull.
- Ingredient Quality: Using freshly grated Parmesan and real mozzarella ensures a melt that’s smooth, not rubbery, while the butter‑brushed biscuit dough adds a richness you won’t find in store‑bought frozen appetizers.
- Make‑Ahead Magic: You can assemble the bombs ahead of time, freeze them, and pop them in the oven when you need a quick hit of flavor. No compromise on taste or texture.
- Versatile Base: The biscuit dough can be swapped for crescent roll dough, puff pastry, or even a low‑carb almond flour wrapper for those watching carbs, making the recipe adaptable to any diet.
Inside the Ingredient List
The Flavor Base
Ground beef is the heart of these bombs, providing the meaty backbone and a satisfying bite. I recommend 80/20 lean‑to‑fat ratio; the fat keeps the meat juicy and flavorful. If you’re looking for a lighter version, lean ground turkey works, but you’ll lose a touch of richness unless you add a splash of olive oil.
Garlic powder and onion powder are the unsung heroes that bring depth without the fuss of chopping fresh aromatics. They dissolve evenly into the meat, ensuring every bite gets that aromatic punch. Fresh garlic can be used for a brighter flavor, but be careful not to over‑cook it – it can turn bitter.
Shredded Parmesan cheese is the zingy star that elevates the beef from ordinary to extraordinary. Its sharp, nutty notes cut through the richness of the meat and butter, creating a balanced flavor profile. If you skip the Parmesan, you’ll miss that essential umami boost.
The Texture Crew
Refrigerated biscuit dough is the magical wrapper that holds everything together. Its flaky layers become buttery and crisp when brushed with melted butter, giving you that golden‑brown crust that shatters like thin ice. Feel free to experiment with flavored biscuit dough – garlic or herb varieties add an extra layer of taste.
Mozzarella cheese cubes are the gooey surprise inside each bomb. When baked, they melt into stretchy strings that pull away with each bite, delivering that comforting cheese pull we all crave. String cheese can be used for a fun, uniform melt, but regular shredded mozzarella works just as well.
The Unexpected Star
Melted butter isn’t just for flavor; it creates a glossy finish that helps the biscuit dough brown evenly, resulting in that irresistible caramelized crust. Brushing the bombs with butter also adds a layer of richness that makes the whole bite feel indulgent.
A pinch of chopped parsley, while optional, adds a fresh pop of color and a subtle herbaceous note that brightens the overall flavor. It’s the visual cue that tells your guests, “This isn’t just tasty, it’s beautiful too.”
The Final Flourish
Salt and black pepper are the essential seasonings that amplify every other flavor. A generous pinch of salt draws out the juices from the beef, while black pepper adds a subtle heat that rounds out the profile. If you’re watching sodium, use a low‑sodium salt but be sure to taste as you go.
Everything’s prepped? Good. Let’s get into the real action and turn these humble ingredients into bite‑size fireworks.
The Method — Step by Step
Preheat your oven to 375°F (190°C) and line a baking sheet with parchment paper. This temperature is hot enough to give the biscuit dough a golden crust while ensuring the beef inside cooks through without drying out. As the oven warms, you’ll start to smell that buttery promise, a cue that you’re on the right track.
In a large skillet over medium‑high heat, add a splash of olive oil and toss in the ground beef. Break it up with a wooden spoon, letting it sizzle and brown. When the meat starts to release its juices and turn a deep caramel color, sprinkle in the garlic powder, onion powder, salt, and black pepper. Stir well so the spices coat every crumb.
Kitchen Hack: Use a metal spatula to press the meat against the pan for a few seconds; this creates those coveted browned bits that add a rich, nutty flavor.Once the beef is nicely browned (about 5‑7 minutes), stir in the shredded Parmesan cheese and let it melt into the meat. This is the moment of truth – the cheese should dissolve, coating the beef in a glossy, aromatic sheen. If the mixture looks dry, add a tablespoon of water or broth to keep it moist.
Turn off the heat and let the meat mixture cool for a few minutes. This cooling step is crucial because it prevents the biscuit dough from becoming soggy when you wrap it. Watch Out: If you try to wrap the dough while the filling is still hot, the steam will make the dough soft, and you’ll lose that coveted crispness.
While the meat rests, open the can of refrigerated biscuit dough and separate the pieces. Using a rolling pin, gently flatten each biscuit into a 4‑inch circle. The thinner you roll, the crispier the final crust will be. If you’re short on time, you can skip this step, but the texture won’t be as airy.
Watch Out: Over‑rolling can make the dough too thin, causing it to tear when you add the filling. Aim for a balance between thinness and structural integrity.Place a generous spoonful of the cooled beef mixture in the center of each dough circle, then add a cube of mozzarella on top. Fold the edges over the filling, pinching them together to seal the bomb completely. This sealing technique ensures no cheese leaks out during baking.
Melt the butter in a small saucepan or microwave until it’s shimmering gold. Brush each sealed bomb generously on all sides. The butter not only adds flavor but also helps the biscuit dough achieve that beautiful, even browning.
Arrange the butter‑basted bombs on the prepared baking sheet, leaving a little space between each. Sprinkle optional chopped parsley over the tops for a pop of color. Slide the sheet into the preheated oven and bake for 15‑18 minutes, or until the tops are deep golden and the cheese inside is bubbling.
When they’re done, remove the bombs from the oven and let them rest for 2‑3 minutes. This short rest lets the cheese set just enough so the bombs don’t fall apart when you bite into them. Serve them warm, and watch as the mozzarella stretches like a perfect string of molten gold.
That’s it — you did it. But hold on, I’ve got a few more tricks that’ll take this to another level, because once you’ve tasted these, you’ll want to make them a permanent fixture in your snack arsenal.
Insider Tricks for Flawless Results
The Temperature Rule Nobody Follows
Most home cooks bake at 350°F, but cranking the oven up to 375°F gives the biscuit dough that rapid rise and caramelization we love. The higher heat creates steam inside the dough, puffing it up while the butter crisps the exterior. I once baked at 400°F for a minute too long and the tops burned – so keep an eye on the color, not just the timer.
Why Your Nose Knows Best
The moment you smell the garlic‑Parmesan perfume filling the kitchen, you know the bombs are close to perfection. If the scent isn’t strong, the spices may be under‑seasoned – taste the beef mixture before you assemble and adjust with a pinch more salt or garlic. Trust your nose; it’s the best built‑in kitchen thermometer for flavor.
The 5‑Minute Rest That Changes Everything
After searing the beef, let the mixture rest for five minutes before adding cheese. This pause allows the meat’s juices to redistribute, preventing a soggy biscuit crust. I once rushed this step and ended up with a watery filling that made the dough soggy – a simple rest makes all the difference.
Butter Brush Mastery
Don’t just drizzle butter; use a pastry brush to coat every nook and cranny. The brush creates a thin, even layer that promotes uniform browning. For an extra flavor boost, mix a teaspoon of garlic powder into the melted butter before brushing.
Freezer‑Friendly Assembly
If you’re prepping for a party, assemble the bombs, flash‑freeze them on a tray, then transfer to a zip‑top bag. When you’re ready to serve, bake them straight from the freezer, adding a couple of minutes to the baking time. The texture stays crisp, and you’ve saved yourself a frantic last‑minute scramble.
The Secret of the Parmesan Crust
Sprinkle a thin layer of extra Parmesan on the tops before baking. As the cheese melts, it forms a crunchy, savory crust that adds an extra textural surprise. This step is optional but highly recommended for those who love a cheesy crunch.
Creative Twists and Variations
This recipe is a playground. Here are some of my favorite ways to switch things up:
Spicy Jalapeño Kick
Finely dice a jalapeño and mix it into the beef mixture for a subtle heat that wakes up the palate. Top each bomb with a slice of pepper jack cheese instead of mozzarella for an extra punch.
BBQ Bacon Bliss
Stir a tablespoon of BBQ sauce into the cooked beef and crumble crispy bacon into the mixture. The smoky, sweet notes pair beautifully with the Parmesan and create a backyard‑grill vibe.
Mediterranean Delight
Swap mozzarella for feta cheese and add chopped sun‑dried tomatoes to the filling. A sprinkle of oregano on the biscuit tops before baking transports you straight to a Greek tavern.
Low‑Carb Almond Flour Wrap
Use almond flour dough (mix almond flour, egg, and a pinch of baking powder) as the wrapper for a grain‑free version. The texture is slightly denser but still delivers that buttery crunch.
Sweet & Savory Apple
Add a thin slice of crisp apple to the center of each bomb before sealing. The apple caramelizes during baking, offering a surprising sweet contrast to the savory beef and cheese.
Storing and Bringing It Back to Life
Fridge Storage
Place cooled bombs in an airtight container and store them in the refrigerator for up to three days. When ready to eat, reheat in a 350°F oven for 8‑10 minutes, brushing with a little extra butter to revive the crisp crust.
Freezer Friendly
After assembling, flash‑freeze the bombs on a parchment sheet, then transfer to a zip‑lock bag. They’ll keep for up to two months. To bake from frozen, add an extra 5‑7 minutes to the bake time and watch the tops turn golden.
Best Reheating Method
For ultimate crunch, reheat in a preheated oven rather than a microwave. Add a tiny splash of water (about a teaspoon) to the baking sheet before reheating; the steam helps the interior stay moist while the exterior crisps up again.