I still remember the first time I tried to impress a date with crème brûlée. Picture this: twenty-three-year-old me, sweating bullets in a sweltering studio apartment, wielding a flimsy grocery-store torch that hissed like an angry cat. The custard turned out grainy, the sugar crust refused to caramelize evenly, and—grand finale—the glass ramekin cracked under the broiler. We ended up eating soggy cereal and laughing till midnight, but I swore I would conquer this French icon if it killed me. Fast-forward a decade, hundreds of test batches, and one glorious epiphany: crème brûlée is actually forgiving once you understand why each step exists. Gone are the days of over-cooked egg yolks, weeping custard, or blistered sugar that tastes like burnt popcorn. This streamlined five-step method yields silky centers, shattering tops, and the kind of vanilla perfume that drifts through your kitchen like a Parisian daydream.
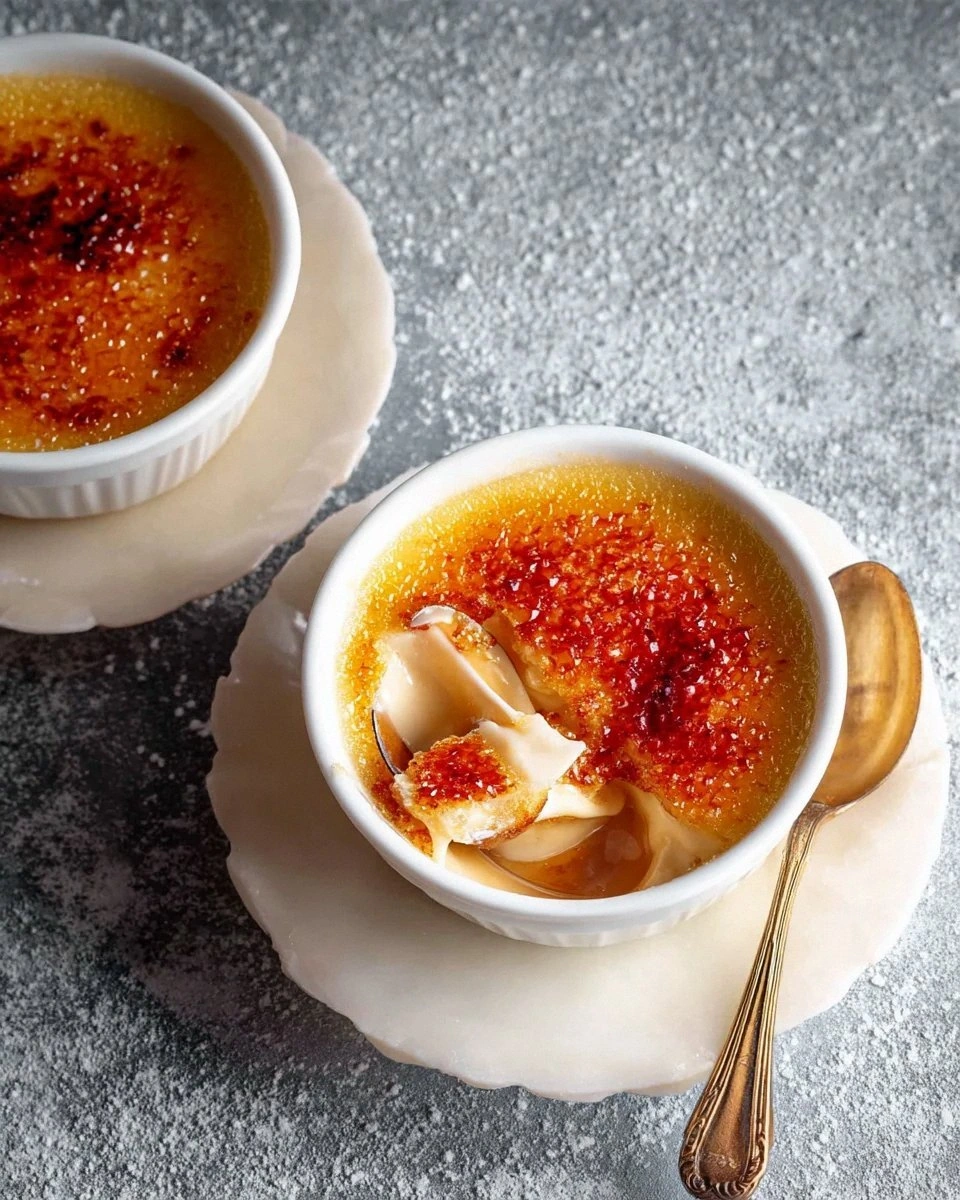
Most recipes drown you in finicky details: scald the cream at precisely 172.4 °F, whisk clockwise seventeen times, pray to the pâtisserie gods, et cetera. I tossed that rule book after discovering the real keys—temperature control, gentle heat, and a no-fear water bath. The custard base comes together in one bowl, bakes low and slow while you binge your favorite show, then chills like a well-behaved guest. When you’re ready to serve, a quick dusting of sugar and thirty seconds under a blistering torch produces that iconic glass-like crust. Crack through it with a spoon and you’ll hear the dainty snap that restaurant chefs brag about. I dare you to taste this version and not go back for seconds, even after you swore you were "too full."
What you’re about to make is restaurant-quality, yet it demands nothing fancier than heavy cream, egg yolks, sugar, vanilla, and a little courage. No specialty extracts, no cornstarch stabilizers, no citrus zests unless you want them. Just elemental ingredients behaving at their peak. The texture rivals what you’d pay fourteen bucks for at a white-tablecloth bistro—smooth as velvet, wobbly like a gentle tide, with the bittersweet crunch of burnt sugar on top. And the flavor? Pure vanilla comfort with a whisper of caramelized dairy that lingers longer than your favorite song. If you’ve ever struggled with rubbery edges, waterlogged bottoms, or sugar that melts into a sad puddle, you’re not alone—and I’ve got the fix.
Today we’re stripping away the mystique and giving crème brûlée the week-night treatment. Grab four ramekins, a deep roasting pan, and that kitchen torch you bought for craft cocktails and never used. In about an hour of actual work (the rest is oven time), you’ll pull out desserts so dazzling your guests will swear you trained in Lyon. Picture yourself pulling these from the oven, the whole kitchen smelling like warm ice cream and toasted sugar, while you casually announce, "Oh, these little things? Just whipped them up." Ready for the game-changer? Stay with me here—this is worth it.
What Makes This Version Stand Out
- Silky Science: We cook the custard at 200 °F, well below the scramble point of egg yolks, so the texture stays as smooth as melted gelato. Most recipes crank the oven higher and pray, but low heat lets proteins set gently without curdling.
- One-Bowl Bliss: Instead of tempering hot cream into yolks in a nervous drizzle, we whisk sugar into the yolks first; this raises their heat tolerance so you can add warm cream without fear of sweet scrambled eggs.
- Vanilla That Punches: We use the entire bean, not just the seeds. After steeping the split pod in hot cream, we rinse, dry, and blitz it with sugar for an impromptu vanilla sugar that perfumes the custard and the brûlée crust.
- No-Fear Water Bath: We slide the ramekins into the roasting pan, set the pan on the oven rack, then pour in boiling water. No juggling sloshing trays across the kitchen; the water comes to the custard, not vice versa.
- Make-Ahead Magic: Custards chill for up to three days, so you can prep before a dinner party and torch à la minute for maximum drama. The flavor actually improves as the vanilla migrates and mellows.
- Torch-Free Option: Lost your kitchen torch at the back of a drawer? We give broiler instructions that actually work—ice-cold custard, white sugar, and a pre-heated upper rack yield even caramel without warm centers.
Alright, let’s break down exactly what goes into this masterpiece...
Inside the Ingredient List
The Flavor Base
Heavy cream forms the silken backbone of crème brûlée; its fat content—usually 36 to 40 percent—coats your tongue and carries vanilla’s volatile aromatics to every taste bud. Skimp with half-and-half and you’ll get a weepy, watery custard that tastes like diet sadness. Seek out cream that is not ultra-pasteurized if possible; the high-heat processing dulls dairy flavor, though it still beats failure. If ultra-pasteurized is your only option, add an extra teaspoon of vanilla to compensate. And please, skip the “whipping cream” blends that contain stabilizers; they can turn gummy under gentle heat.
The Texture Crew
Egg yolks are natural emulsifiers packed with lecithin, binding water from cream and milk into a velvety gel. We use only yolks, no whites, because albumin firms at a lower temperature and can give you a rubbery bounce. The ratio here—one yolk per half-cup of cream—produces a custard tender enough to quiver when you breathe on it. Granulated sugar sweetens and raises the coagulation temperature, buying you insurance against curdling. A pinch of salt sharpens flavors the way a frame makes a painting pop; without it, vanilla tastes flat and one-dimensional.
The Unexpected Star
A single fat vanilla bean carries thousands of tiny seeds bursting with vanillin, but the pod itself is a goldmine of flavor. After simmering in cream, rinse off residual dairy, let it air-dry overnight, then blitz with a quarter-cup of sugar for instant vanilla sugar that perfumes your brûlée crust. If beans feel like a splurge, substitute two teaspoons of pure vanilla paste; avoid imitation extract unless you want a sad, chemical aftertaste that screams “birthday candle.” Future pacing moment: imagine sprinkling homemade vanilla sugar over your next latte—chef’s kiss.
The Final Flourish
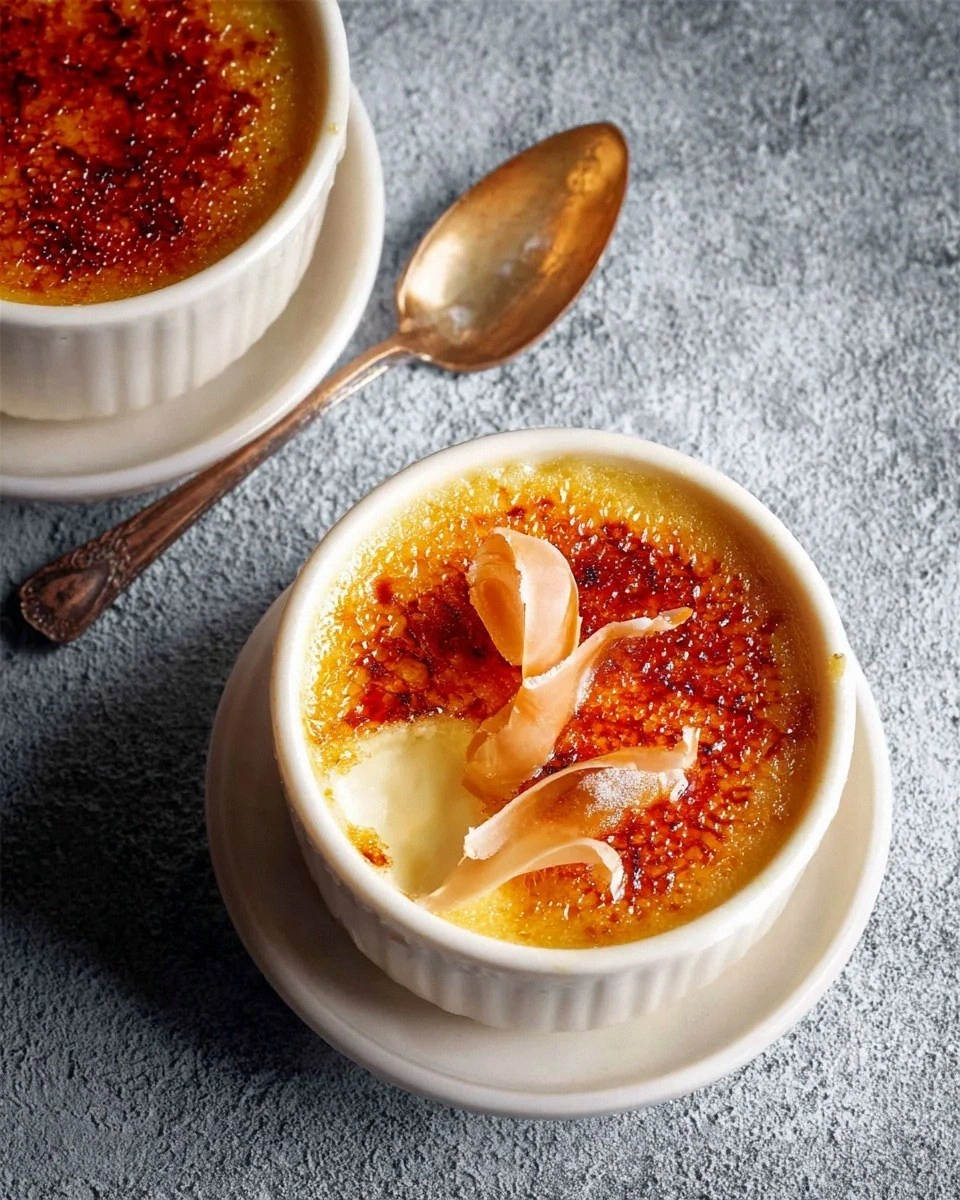
White granulated sugar is the classic brûlée topping because it melts evenly and crystallizes into a thin glass sheet. Brown sugar contains molasses, which burns before it caramelizes, leaving bitter black spots. Demerara or turbinado crystals are larger and create a thicker, crunchier lid—delicious, but you’ll need to torch longer. Whatever you choose, keep it in a sealed jar; humid sugar clumps and refuses to spread uniformly. A fine layer—about a teaspoon per ramekin—goes a long way toward that satisfying crack.
Everything’s prepped? Good. Let's get into the real action...
The Method — Step by Step
- Position a rack in the center of your oven and preheat to 200 °F (93 °C). This low-and-slow approach is the single biggest insurance policy against scrambled custard. Bring a full kettle of water to a boil; you’ll need enough to come halfway up the sides of your ramekins—usually about two quarts. While the oven heats, place four six-ounce ramekins in a deep roasting pan; warming them for two minutes in the oven prevents thermal shock and buys you extra silkiness.
- Pour two cups of heavy cream into a small saucepan. Split a vanilla bean lengthwise, scrape the seeds with the back of a paring knife, and dump both seeds and pod into the cream. Heat over medium until wisps of steam rise and tiny bubbles form along the edge—about 180 °F if you’re thermometer-obsessed. Remove from heat, cover, and let steep five minutes while you prep the yolks. That brief steep coaxes every last fleck of flavor from the pod without reducing the liquid, keeping your custard ratio intact.
- In a medium bowl, whisk together four egg yolks and a third of a cup of sugar until the mixture lightens to a pastel lemon color—about thirty seconds. You’re not trying to aerate, just dissolve grains and raise the yolk’s heat tolerance. Whisk in a pinch of kosher salt; it balances sweetness and sharpens vanilla. Now remove the vanilla pod from the cream (save it for your sugar), and slowly pour the warm cream into the yolk mixture while whisking constantly. Start with a thin stream; as the bowl warms you can accelerate to a confident trickle.
- Strain the custard through a fine-mesh sieve back into your measuring cup or a pitcher with a spout. This step feels fussy but catches rogue chalazae (those ropy egg strands) and any vanilla bean fibers that could wreck the velvet finish. Divide the mixture evenly among the ramekins, filling them about three-quarters full. Slide the roasting pan onto the oven rack, then carefully pour the boiling water into the pan until it reaches halfway up the sides of the ramekins. The water insulates and keeps the custard cooking at a gentle, even pace—think spa treatment, not sauna.
- Bake for 30 to 40 minutes, depending on your ramekin depth. You’re aiming for a gentle jiggle: when you nudge a ramekin, the custard should shimmy like set Jell-O in the center while the edges look firm. Remove the pan from the oven, lift ramekins out with tongs, and cool on a rack for 30 minutes. Refrigerate at least four hours or up to three days, covering with plastic wrap once cold to prevent the custard from absorbing fridge odors. When ready to serve, sprinkle a thin, even layer of white sugar on top, shake off excess, and torch in small circles until amber bubbles form and the sugar turns glassy.
That's it—you did it. But hold on, I've got a few more tricks that'll take this to another level...
Insider Tricks for Flawless Results
The Temperature Rule Nobody Follows
Most home ovens run hot—even fancy ones—so an inexpensive oven thermometer is your insurance policy. If your oven registers 25 °F above the dial, your custards will curdle no matter how lovingly you whisk. Once you hit the target, resist peeking; every open door drops the temperature by up to 50 °F and extends bake time, leading to grainy textures. If you must look, do it in the final five minutes when the custards are mostly set. And here’s a baker’s secret: when you can gently tilt a ramekin and the custard holds a soft mound instead of sloshing, pull them out; residual heat will finish the job as they cool.
Why Your Nose Knows Best
Vanilla’s flavor compounds are volatile, meaning they evaporate faster than water in hot cream. To trap them, cover the saucepan during the steep and let the steam condense back into the liquid. When you finally lift the lid, the aroma should hit you like a warm blanket—if it doesn’t, your bean is stale. Give it a gentle bend; a pliable, oily pod is fresh, while a brittle one lost its mojo. Pro tip: stash used pods in a jar of granulated sugar for two weeks and you’ll have aromatic vanilla sugar ready for your next brûlée—or for sprinkling on buttered toast at midnight when no one’s watching.
The 5-Minute Rest That Changes Everything
After you torch the sugar, let the crème brûlute rest for five minutes before serving. The glassy top hardens fully, and the custard below stays cool, creating the classic temperature contrast. Torching too close to serving can leave the sugar tacky; humidity in the air re-liquefies the surface and you lose that satisfying crack. If you’re serving a crowd, torch them in batches and keep finished ramekins in the fridge uncovered for up to 20 minutes—any longer and condensation dulls the shine. I’ll be honest: I ate half the batch before anyone else got to try it, all in the name of “quality control.”
Creative Twists and Variations
This recipe is a playground. Here are some of my favorite ways to switch things up:
Café-Caramel Crème Brûlée
Dissolve two teaspoons of instant espresso powder in the cream while it heats; the bitter coffee notes play off sweet custard like a jazz duet. Top with demerara sugar for a thicker crunch that mimics café brûlée candy. Coffee lovers will weep—in a good way.
Salted Maple Brûlée
Replace the granulated sugar with pure maple syrup in the custard, reduce cream by two tablespoons, and add an extra pinch of salt. For the crust, use maple sugar if you can find it; torch lightly, as maple burns faster than white sugar. The result tastes like Sunday morning at a Vermont sugar shack.
Coconut-Lime Escape
Swap half the cream with full-fat coconut milk and steep the cream with lime zest instead of vanilla. Garnish with a whisper of toasted coconut flakes after torching. Close your eyes and you’re on a beach in Thailand—minus the jet lag.
Chocolate Orange Dream
Melt two ounces of 70 percent dark chocolate into the warm cream, then proceed as usual. Add a tablespoon of orange zest during steeping; chocolate’s tannins love citrus oils. The final brûlée tastes like those fancy chocolate oranges but silkier and way more impressive.
Boozy Bourbon Brûlée
Whisk a tablespoon of good bourbon into the custard base before baking. Alcohol amplifies vanilla perception while lending a smoky backbone. Serve with a tiny pour of the same bourbon for a pairing that’ll make grown adults swoon.
Savory Cheese & Herb (Chef’s Adventure)
Replace half the cream with half-and-half, drop sugar to two tablespoons, and steep with thyme and cracked pepper. Top with finely grated aged Gouda instead of sugar, then broil until the cheese forms a bronze sheet. It’s weird, it’s wonderful, and it converts skeptics into believers.
Storing and Bringing It Back to Life
Fridge Storage
Once custards are completely chilled, cover each ramekin with plastic wrap pressed lightly onto the surface to prevent a skin from forming. They’ll keep for up to three days, though flavor peaks around day two as vanilla migrates and mellows. Store on an upper shelf where temperature is most stable; door shelves are too warm and can cause weeping.
Freezer Friendly
You can freeze un-torched custards for up to one month. Wrap each ramekin in a double layer of plastic, then foil. Thaw overnight in the refrigerator, unwrap, and let them sit at room temperature for 15 minutes before torching. Texture will be slightly denser, but flavor remains stellar—perfect for holiday prep.
Best Re-Heating Method
Crème brûlée is served chilled, so reheating isn’t the goal—but if you must revive a too-cold custard, let it sit on the counter for 20 minutes. Torch the sugar right before serving; the cool custard against warm crackly top is the signature contrast. Never microwave; you’ll scramble the custard and create a sugar sauna.