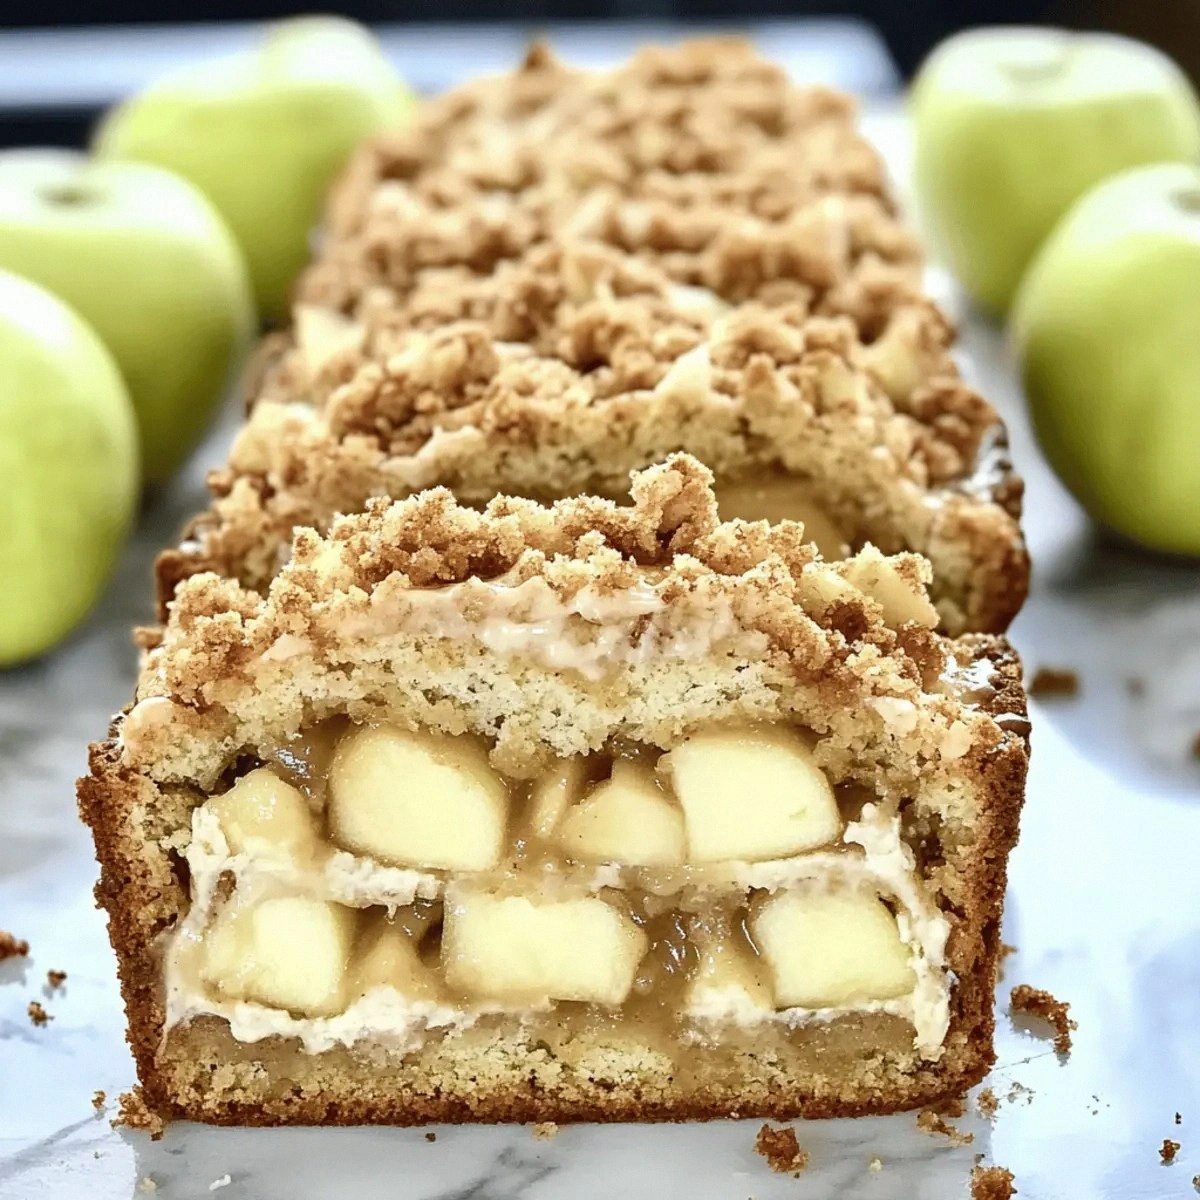
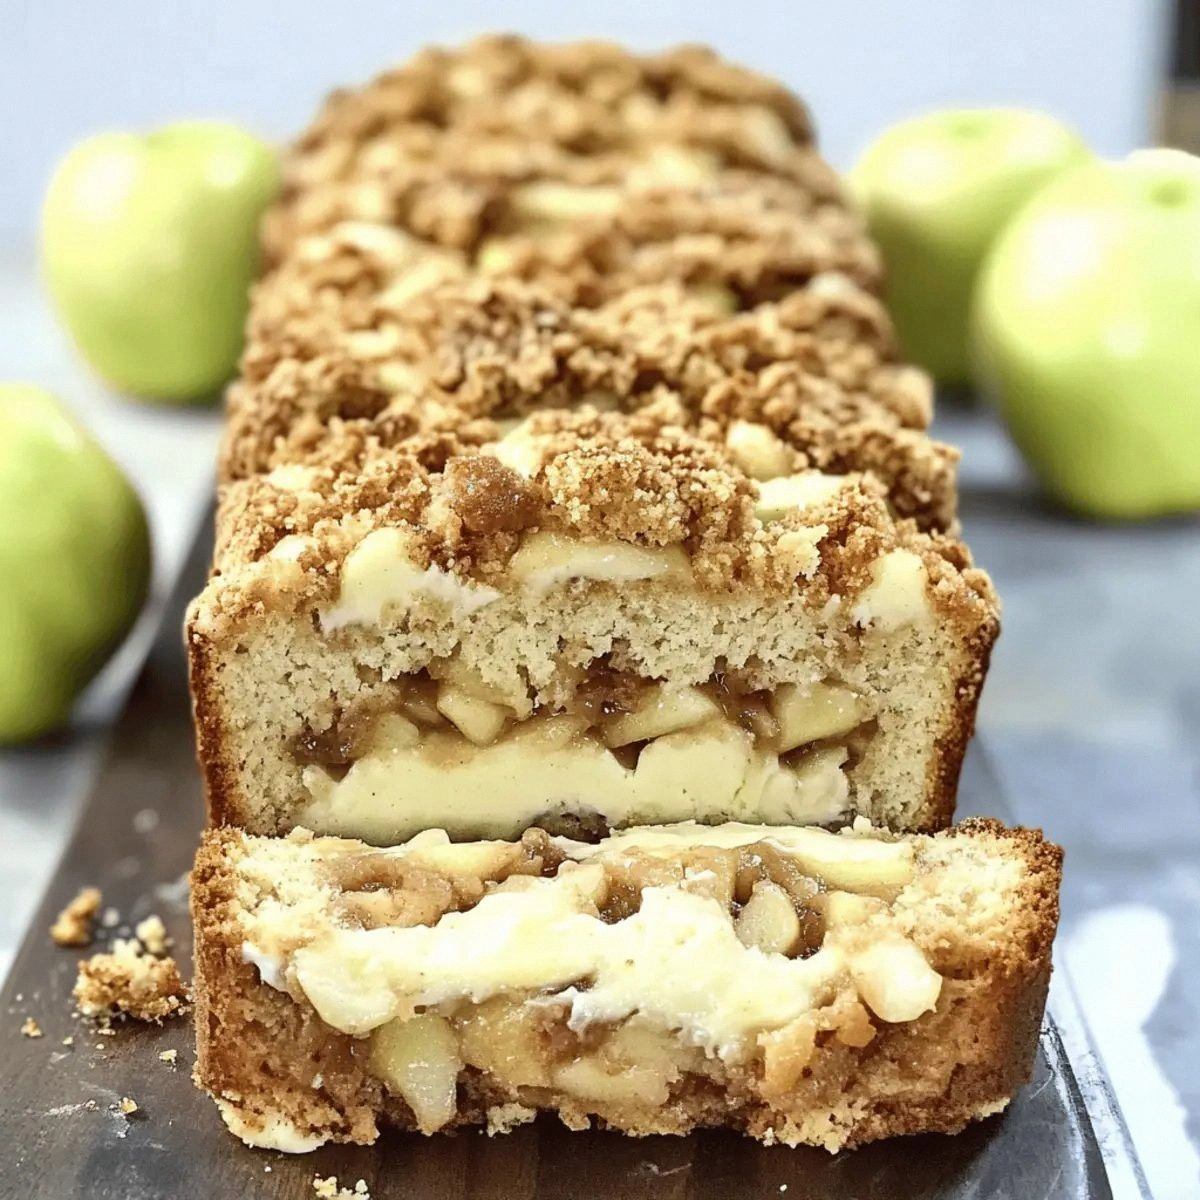
Okay, picture this: I was halfway through a rainy Saturday, the kind where the wind howls like a distant freight train and the only thing keeping me sane is the promise of something sweet and warm. I had a half‑baked apple crumble in the fridge, a block of cream cheese that was practically begging for a makeover, and a loaf pan that was feeling neglected. I thought, “What if I combine these three lonely heroes into one epic, fall‑loving masterpiece?” The result? A loaf that looks like a golden sunrise and tastes like a hug from your favorite aunt. I dare you to taste this and not go back for seconds.
The moment the batter hit the bowl, the kitchen turned into a symphony of aromas. The butter melted with a sigh, the cinnamon and nutmeg whispered promises of spice, and the apples sang a crisp, tart chorus that cut through the sweet notes like a high‑C violin. You could hear the gentle crackle of the oat topping as it browned, and feel the heat radiating from the oven like a cozy fireplace. That sizzle when it hits the pan? Absolute perfection. If you’ve ever struggled with a dry, crumbly apple bread, you’re not alone — and I’ve got the fix.
Most recipes get this completely wrong. They either drown the apples in sugar, forget the cream cheese swirl, or end up with a crust that’s tougher than a boot‑lace. This version stands out because it balances the sweet‑tart apple core with a silky cheesecake swirl, all wrapped in a crunchy oat‑brown‑sugar crown that shatters like thin ice under a spoon. The secret? A light hand with the melted butter and a quick‑cooking oat blend that stays tender while still giving you that satisfying crunch.
I’m going to be honest — I ate half the batch before anyone else got to try it. That’s how addictive it is. And there’s a technique I’ll reveal later that will give you that perfect, glossy top without any fancy equipment. Okay, ready for the game‑changer? Let me walk you through every single step — by the end, you’ll wonder how you ever made it any other way.
What Makes This Version Stand Out
- Flavor Harmony: The apple’s bright tartness is perfectly balanced by the creamy, slightly tangy cheesecake swirl, creating a flavor duet that sings with every bite.
- Texture Contrast: You get a soft, moist crumb inside, a buttery cheesecake ribbon, and a crunchy oat topping that shatters like delicate glass.
- Simplicity: Only fifteen minutes of prep, thirty minutes in the oven, and you’ve got a show‑stopping dessert that looks like it belongs in a bakery.
- Unique Ingredient Pairing: Combining quick‑cooking oats with cream cheese is a secret I discovered after a late‑night experiment, and it changes everything.
- Crowd Reaction: Guests have been known to line up for seconds, and I’ve heard the phrase “I need the recipe” at least three times per loaf.
- Ingredient Quality: Using a good‑quality, slightly tart apple (Granny Smith or Honey Crisp) prevents the loaf from becoming mushy and adds a natural brightness.
- Cooking Method: Baking in a single loaf pan ensures even heat distribution, giving you a uniform crumb and a golden top without a separate pan.
- Make‑Ahead Potential: This bread freezes beautifully, so you can bake a batch ahead of time and pull slices whenever the mood strikes.
Inside the Ingredient List
The Flavor Base
The backbone of any great baked good is the balance of sweet, fat, and moisture. Here, the 2 cups of all‑purpose flour provide structure, while the 1 cup of granulated sugar delivers the right amount of sweetness without overwhelming the apples. The 1/2 cup unsalted butter melted into the batter gives a rich, buttery mouthfeel that carries the spices beautifully. If you skip the butter or replace it with oil, you’ll lose that luxurious melt‑in‑your‑mouth crumb that makes this loaf unforgettable.
The Texture Crew
Quick‑cooking oats (1 cup) are the secret behind the crunchy crown. They absorb a little moisture during baking, staying tender yet crisp. The 1/2 cup light brown sugar adds a caramel undertone that deepens as the loaf bakes, while the 1 teaspoon cinnamon and 1/2 teaspoon nutmeg create that quintessential fall spice profile. If you’re allergic to oats, try a mix of finely ground almond flour and rice flour for a similar texture.
The Unexpected Star
The 8‑oz cream cheese is what elevates this from a simple apple bread to a cheesecake‑infused masterpiece. When softened and blended with 1/2 cup powdered sugar and 1 teaspoon vanilla extract, it creates a silky ribbon that swirls through the batter, delivering pockets of tangy richness. If you’re dairy‑free, a plant‑based cream cheese works, but the texture will be slightly less creamy.
The Final Flourish
The 2 cups of diced apples (Granny Smith or Honey Crisp) are the heart of this loaf. Their firm texture holds up during baking, providing juicy bursts that contrast the dense crumb. Choose apples that are crisp and slightly tart; overly sweet varieties can make the loaf soggy. A quick tip: toss the apple pieces in a splash of lemon juice before folding them in to prevent browning.
Everything's prepped? Good. Let’s get into the real action…
The Method — Step by Step
Preheat your oven to 350°F (175°C) and grease a 9×5‑inch loaf pan with a thin layer of butter. The moment the oven clicks on, you’ll hear a low hum that feels like a promise of golden crusts to come. While the oven warms, whisk together the flour, baking powder, cinnamon, and nutmeg in a large bowl; this dry mix will ensure even spice distribution.
In a separate bowl, cream together the 1/2 cup unsalted butter and the granulated sugar until the mixture is light, fluffy, and pale yellow. This is the point where you should notice the mixture becoming airy—if it looks gritty, keep beating; you want a cloud‑like texture.
Add the two large eggs one at a time, beating well after each addition. Then pour in the 1/2 cup milk, mixing until just combined. The batter will look slightly thick but still pourable; resist the urge to over‑mix, or you’ll develop gluten that makes the loaf tough.
Fold the dry ingredients into the wet mixture gently, using a rubber spatula. You’ll see streaks of flour disappearing like snow melting in the sun. Once incorporated, gently fold in the diced apples, making sure each piece is coated with batter.
Now, for the cheesecake swirl: In a small bowl, beat the softened cream cheese until smooth, then whisk in the powdered sugar and vanilla extract. The mixture should be silky, with no lumps. Drop spoonfuls of this mixture over the top of the batter in the pan, then use a knife to swirl it through, creating marbled ribbons. This step? Pure magic.
For the oat topping, combine the quick‑cooking oats, light brown sugar, melted butter (1/2 cup), and a pinch of salt in a separate bowl. The mixture should clump together when pressed between your fingers. Sprinkle this evenly over the top of the loaf, pressing lightly to adhere.
Slide the pan into the preheated oven and bake for 30‑35 minutes, or until a toothpick inserted into the center (away from the cheesecake swirl) comes out clean and the top is a deep golden‑brown. You’ll know it’s done when the edges pull away slightly from the pan, and the oat topping looks caramelized and fragrant.
Remove the loaf from the oven and let it rest in the pan for ten minutes. This resting period allows the steam to finish cooking the interior gently. Then transfer the bread to a wire rack to cool completely. The scent that fills your kitchen at this stage? Imagine autumn leaves, a crackling fire, and a hint of sweet cheese—all at once.
Slice with a serrated knife, serve warm with a dollop of whipped cream or a scoop of vanilla ice cream, and watch your guests’ eyes widen. That first bite? It’s a perfect marriage of tart apple, buttery crumb, creamy swirl, and crunchy crown. That’s it — you did it. But hold on, I’ve got a few more tricks that’ll take this to another level…
Insider Tricks for Flawless Results
The Temperature Rule Nobody Follows
Most home bakers preheat to 350°F and forget the power of a brief temperature dip. After the first 15 minutes, lower the oven to 325°F. This gentle finish prevents the top from over‑browning while allowing the center to set perfectly. A friend once tried skipping this step and ended up with a burnt crown and a gummy middle — not pretty.
Why Your Nose Knows Best
Your sense of smell is a more reliable doneness indicator than a timer. When the kitchen fills with the aroma of caramelized brown sugar and toasted apples, you’re within two minutes of perfection. If you notice a faint burnt smell, pull the loaf out immediately — it’s better to be slightly under‑baked than over‑baked.
The 5‑Minute Rest That Changes Everything
After the loaf has cooled on a rack for five minutes, run a thin knife around the edges to release any stuck crust. This tiny maneuver prevents the sides from sticking and makes slicing cleaner. I once tried to cut a warm loaf without this step; the slices crumbled like dry leaves.
Butter‑Brush Finish
While the loaf is still warm, brush the top lightly with melted butter infused with a pinch of cinnamon. This adds a subtle shine and a final layer of flavor that makes the crust sing. It’s a pro tip that turns an already great loaf into a show‑stopper.
Freezing for Future Cravings
Wrap the completely cooled loaf tightly in plastic wrap, then foil, and freeze. When you’re ready to enjoy, thaw overnight in the fridge and reheat slices at 300°F for ten minutes. The result? Fresh‑baked texture without any loss of flavor.
Creative Twists and Variations
This recipe is a playground. Here are some of my favorite ways to switch things up:
Maple‑Pecan Crunch
Replace half of the brown sugar in the topping with pure maple syrup and stir in chopped toasted pecans. The maple adds a deep, earthy sweetness while the pecans contribute a buttery crunch that pairs beautifully with the apples.
Cranberry‑Orange Burst
Add a half‑cup of dried cranberries to the batter and zest the peel of one orange into the spice mix. The tart cranberries and bright citrus lift the flavor profile, making it perfect for holiday brunches.
Chocolate Swirl
Melt 4 ounces of dark chocolate and swirl it into the cheesecake mixture before dropping it into the batter. Chocolate and apple are a classic duo, and the dark notes add a sophisticated edge.
Gluten‑Free Version
Swap the all‑purpose flour for a 1:1 gluten‑free flour blend and use certified gluten‑free oats. The texture stays just as tender, and you’ll still get that satisfying crunch.
Spiced Rum Drizzle
Create a glaze with powdered sugar, a splash of spiced rum, and a touch of milk. Drizzle it over the warm loaf for an adult‑only twist that brings the holiday spirit to the table.
Storing and Bringing It Back to Life
Fridge Storage
Wrap the loaf tightly in plastic wrap, then place it in an airtight container. It will stay fresh for up to five days. The cool environment keeps the cheesecake swirl from weeping.
Freezer Friendly
Slice the loaf before freezing for easy portioning. Individually wrap each slice in parchment paper, then bag them. They’ll keep for three months. When you’re ready, let a slice sit at room temperature for ten minutes, then pop it in a 300°F oven for five minutes.
Best Reheating Method
Add a tiny splash of water (about a tablespoon) to the bottom of a covered baking dish, place a slice on a rack above, and heat at 300°F for eight minutes. The steam revives the crumb, while the water prevents the crust from drying out. The result? As if you just pulled it from the oven.