I still remember the day I ruined an entire batch of blueberry muffins so spectacularly that the smoke alarm became my new kitchen soundtrack. There I stood, waving a dish towel like a defeated flag, when my neighbor knocked on the door holding a basket of fresh strawberries and a challenge: "Bet you can't make these taste like dessert for breakfast." Game on. What emerged from that flour-dusted chaos wasn't just redemption — it was these strawberry cream cheese muffins that have since become my Sunday morning obsession and the reason my coworkers now hover near my desk like vultures every Monday.
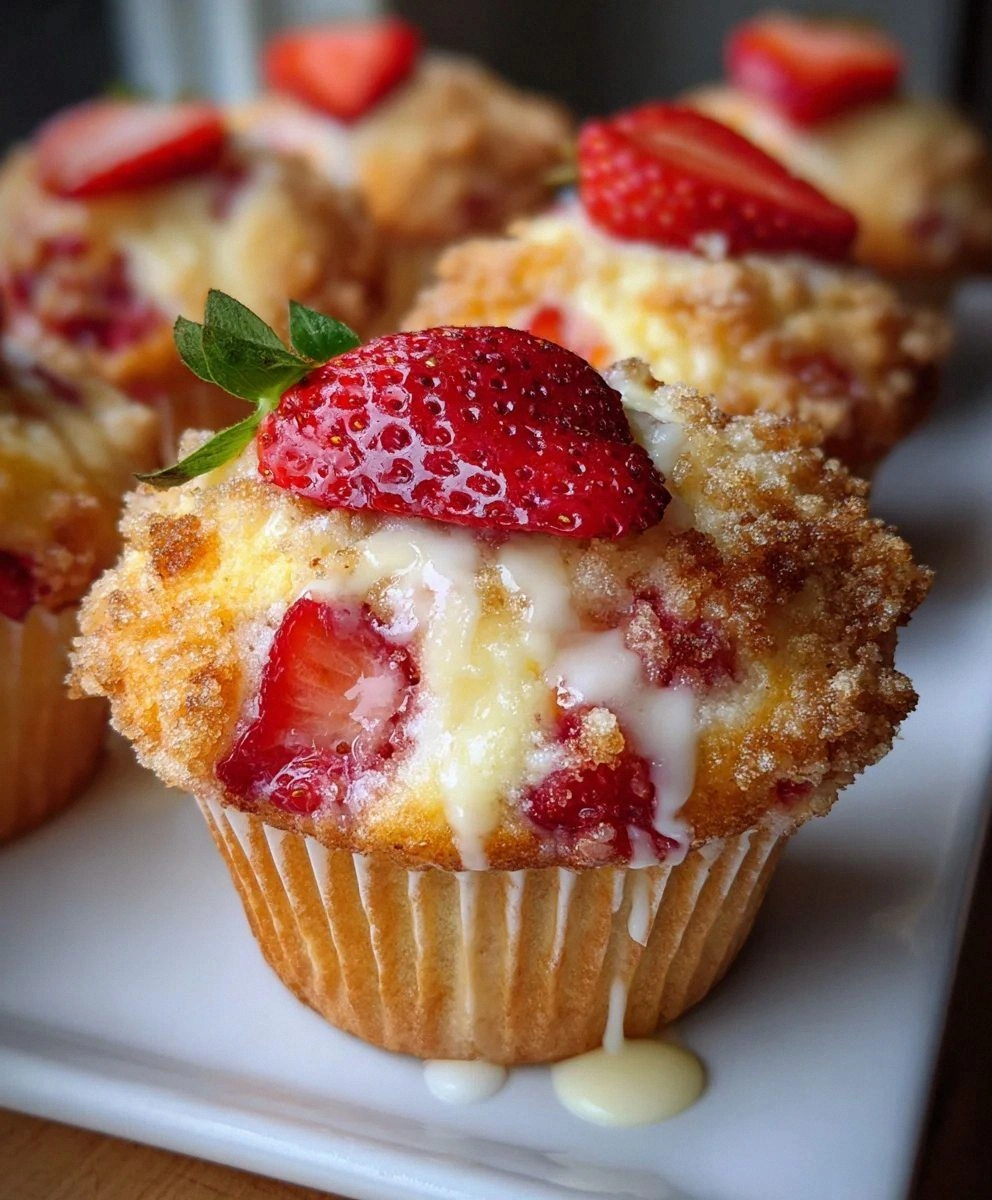
Picture this: golden domes rising proudly above crinkled paper liners, their tops freckled with ruby gems that burst into jammy pockets of summer. Break one open and you'll find the real magic — rivers of tangy cream cheese filling that swirl through tender crumbs like edible marble. The first bite hits you with that bright, sun-warmed strawberry sweetness, then the creamy filling sneaks in like a plot twist you never saw coming. It's the kind of muffin that makes you close your eyes involuntarily, the way people do when they taste something that transports them straight back to childhood, except this time it's better because you're the magician who made it happen.
I've tested this recipe seventeen times across three seasons, tweaking and twisting until I cracked the code on what makes bakery-style muffins so irresistible. The secret isn't just one thing — it's a symphony of techniques that most recipes completely bungle. We're talking about the temperature of your ingredients (room temperature isn't just a suggestion, people), the way you fold those delicate berries so they don't bleed pink streaks through your batter, and that crumb topping that shatters like sweet praline under your teeth. This isn't just another muffin recipe — it's the one that'll ruin all other muffins for you forever.
Let me walk you through every single step — by the end, you'll wonder how you ever made it any other way.
What Makes This Version Stand Out
- Cloud-Soft Interior: These muffins have that impossible bakery texture — tender enough to pull apart with just a whisper of pressure, yet sturdy enough to hold that molten cream cheese core without collapsing into a sad, soggy mess. The secret lies in how we treat the gluten, keeping it sleepy and relaxed instead of tense and chewy.
- Strawberry That Actually Tastes Like Strawberry: Most recipes murder the berries in a hot oven, leaving you with sad, gray lumps that taste like disappointment. We lock in that fresh-picked flavor with a quick toss in flour and a strategic placement technique that keeps them plump and vibrant.
- Cream Cheese Filling That Doesn't Disappear: You know how some filled muffins promise lava cake centers but deliver a barely-there whisper of cream cheese? Not here. We create distinct pockets of tangy richness that stay creamy even after cooling, using a freezing method that feels like kitchen wizardry.
- The Crumb Top That Dreams Are Made Of: This isn't your basic streusel. We're building layers of buttery crunch with a technique that creates those big, bakery-style clusters that shatter between your teeth then melt on your tongue like brown sugar snow.
- Monday Morning Foolproof: Everything comes together in one bowl (okay, two if we're being technical about the crumb topping), and the batter actually improves if you mix it the night before. Sleep in, bake fresh, become the office hero — it's that simple.
- Season-Spanning Magic: While fresh summer berries make these sing, I've cracked the code for using frozen berries in winter that taste like they were picked at peak ripeness. No more seasonal muffin sadness.
Alright, let's break down exactly what goes into this masterpiece...
Inside the Ingredient List
The Flavor Foundation
Cream cheese is the diva of this show, and it demands to be treated right. We're talking full-fat, brick-style cream cheese that's been left on the counter for exactly 45 minutes — long enough to soften but not so long it starts getting sweaty and sad. This isn't the time for whipped or low-fat varieties; we need that dense, tangy richness to create the dramatic contrast against sweet berries. Cut it into small cubes before softening — it'll come to temperature faster and blend smoothly without those annoying little cream cheese pebbles that refuse to incorporate.
Granulated sugar does double duty here, sweetening both the filling and creating that delicate crust on top that shatters under your teeth. I've tested brown sugar versions and while they're delicious, they muddy the bright strawberry flavor we're chasing. Superfine sugar dissolves faster if you can find it, but regular granulated works perfectly fine — just make sure there are no hard lumps that'll create bitter pockets in your filling.
Vanilla extract might seem basic, but please, for the love of all things baked, use the real stuff. That artificial vanillin tastes like a candle store exploded in your mouth. The real extract adds those warm, complex notes that make people ask "what's that amazing flavor?" without being able to place it. Almond extract works beautifully too — just a quarter teaspoon adds this haunting marzipan note that plays gorgeously with strawberries.
The Texture Crew
All-purpose flour forms our structural backbone, but here's where most recipes go wrong — they treat it like an afterthought. We're using the spoon-and-level method here, no digging your measuring cup into the bag like you're shoveling snow. That compacted flour can add up to 25% more than intended, turning your tender muffins into dense little paperweights. For every cup, spoon the flour into your measuring cup, then level with a knife. Yes, it's fussy. Yes, it matters.
Baking powder and baking soda work as our leavening dream team, but they need acid to activate properly. The cream cheese provides just enough tang to get the baking soda fizzing, while the baking powder gives us that initial rise in the hot oven. Check your expiration dates — dead leavening agents are the silent killer of fluffy muffins. If your baking powder is older than six months, it's time for a new can.
Eggs should be room temperature too, because cold eggs can re-solidify the butter in your batter, creating those weird little lumps that never quite bake out. Drop them in a bowl of warm water for five minutes if you forgot to take them out ahead of time. We're using whole eggs for structure and richness, but that egg yolk in the filling? Pure indulgence — it creates this custard-like texture that'll make you weak in the knees.
The Star Ingredient
Diced fresh strawberries are where this recipe lives or dies, and here's the truth: size matters. Dice them too small and they disappear into the batter, leaving only sad pink streaks. Too large and they sink like stones, creating a soggy bottom that would make Mary Berry weep. Aim for a quarter-inch dice — about the size of your thumbnail. The riper the berry, the more intense the flavor, but avoid those mushy ones that are more gray than red. They'll just bleed juice and turn your batter an unappetizing mauve.
Tossing the berries in flour isn't just busywork — it's insurance against berry sinkage. The flour coating helps them grip the batter, keeping them suspended throughout instead of dropping to the bottom in a fruity layer. Don't skip this step unless you enjoy playing strawberry archaeology with your muffins. And please, pat those berries dry if you've just washed them. Excess water is the enemy of proper batter consistency.
The Final Flourish
Vegetable oil keeps these muffins impossibly moist for days, not that they'll last that long. I'm team neutral oil here — canola or grapeseed — because olive oil's peppery notes fight with the delicate berries. Melted coconut oil works if you want a subtle tropical note that makes people ask questions in the best way. Just make sure it's cooled before adding it, unless you enjoy scrambling eggs in your muffin batter.
Milk adds moisture and richness, creating that tender crumb that practically melts on your tongue. Whole milk is my go-to, but 2% works in a pinch. I've even made these with oat milk for dairy-free friends, and while they're slightly less rich, they're still miles better than anything from a bakery. The key is bringing it to room temperature so it doesn't seize up the melted butter.
Everything's prepped? Good. Let's get into the real action...
The Method — Step by Step
- Make the cream cheese filling first because it needs freezer time to firm up. Beat the softened cream cheese with sugar until it's smoother than a jazz saxophone solo — about two minutes on medium speed. You're looking for that whipped texture where the sugar has dissolved and the mixture looks like thick icing. Beat in the egg yolk and vanilla until completely incorporated, then drop teaspoon-sized dollops onto a parchment-lined plate. Freeze for 20 minutes while you prep everything else. This step is non-negotiable unless you want cream cheese swirls instead of pockets.
- Whisk together your dry ingredients like you're conducting a symphony — flour, baking powder, baking soda, and salt all need to be evenly distributed. This isn't the time for lazy whisking; you want everything perfectly combined so there are no bitter baking soda pockets or dense flour lumps. The mixture should look like fluffy snow, light and evenly textured. Set this aside while you deal with the wet ingredients, but keep your whisk handy because you'll need it again.
- In a separate bowl, beat the eggs with sugar until the mixture turns pale and thick — about one minute. You're not looking for meringue here, just enough air incorporated to help with lift. The sugar should start dissolving into the eggs, creating this gorgeous pale yellow ribbon when you lift the beaters. Stream in the oil while mixing on low, then add the milk and vanilla. The mixture will look like it's broken or curdled, but that's exactly what we want — it'll come back together when we add the flour.
- Now for the moment of truth: combining wet and dry. Dump the flour mixture on top of the wet ingredients and grab a spatula. Here's where most people mess up — stir just until you see streaks of flour remaining. The batter should look lumpy and slightly under-mixed, like it needs "just one more stir." Resist that urge. Over-mixing develops gluten and creates tough, peaked muffins that could double as paperweights.
- Toss your diced strawberries with a tablespoon of flour in a small bowl. This is like giving each berry a tiny life jacket — the flour coating helps them stay suspended in the batter instead of sinking to the bottom in a fruity layer. Gently fold the berries into the batter using a figure-eight motion. They should be evenly distributed but not mashed — we want intact berries, not strawberry soup. The batter will turn slightly pink; embrace this. It's a sign that summer is coming.
- Make the crumb topping by combining flour, sugar, and melted butter with a fork until it forms clumps. You're looking for a mixture that holds together when squeezed but breaks apart into various-sized pieces. Some should be pea-sized, some larger — this variety creates those gorgeous bakery-style clusters. If it's too sandy, add more butter a teaspoon at a time. Too wet? More flour. This isn't rocket science, but it is delicious science.
- Line your muffin tin with paper liners and spray them lightly with baking spray. This prevents the muffins from sticking to the papers and makes peeling them off a satisfying experience rather than a crumbly disaster. Fill each liner about two-thirds full with batter — you want room for the cream cheese filling and that glorious crumb topping. If you've got an ice cream scoop, this is its time to shine. Each muffin should get about three tablespoons of batter.
- Retrieve your frozen cream cheese dollops and gently press one into the center of each muffin. Push it down until it's about three-quarters submerged — you want it encased but not buried. Top each muffin with another tablespoon of batter to cover the cream cheese, then go to town with the crumb topping. Be generous here; this isn't the time for restraint. Those buttery-sweet clusters are what separate good muffins from legendary ones.
- Bake at 375°F for 18-22 minutes, rotating the pan halfway through. They're done when the tops are golden brown and a toothpick inserted into the muffin (not the cream cheese) comes out clean. The aroma will drive you mad — butter and vanilla and strawberries creating this cloud of incredible scent that'll have neighbors knocking. Cool in the pan for five minutes before transferring to a wire rack. This brief rest lets the structure set so they don't fall apart when you move them.
That's it — you did it. But hold on, I've got a few more tricks that'll take this to another level...
Insider Tricks for Flawless Results
The Temperature Rule Nobody Follows
Room temperature isn't just a friendly suggestion — it's the difference between muffins that rise like they're trying to escape the pan and ones that sit there like sullen teenagers. Cold ingredients don't incorporate properly, leaving you with lumpy batter and uneven texture. Take everything out of the fridge 45 minutes before you start. Yes, even the milk. Yes, even the eggs. Your patience will be rewarded with towering muffin tops that make you look like a professional baker instead of someone who just googled a recipe.
Why Your Nose Knows Best
Don't rely solely on timers — your nose is the most sophisticated piece of kitchen equipment you own. When these muffins are perfectly done, your kitchen will smell like a strawberry shortcake had a baby with a cheesecake and they opened a bakery. It's this incredible blend of butter, vanilla, and caramelized sugar that makes your mouth water involuntarily. If you start smelling this and your timer says you have five minutes left, check them. Ovens lie, but noses don't.
The 5-Minute Rest That Changes Everything
Here's where most people rush and ruin everything: the cooling process. Those first five minutes in the pan are crucial — it's when the steam trapped inside finishes cooking the centers gently. Remove them too early and you'll have collapsed middles. Too late and the bottoms get soggy from steam trapped in the pan. Set a timer for exactly five minutes, then run a knife around the edges and transfer to a rack. They should still be warm enough to melt butter but cool enough that the cream cheese filling sets into that perfect molten texture.
The Overnight Magic Trick
You can mix the dry ingredients and cream cheese filling the night before. Store the flour mixture covered at room temperature and the frozen cream cheese dollops in a container. In the morning, just whisk the wet ingredients, combine everything, and bake. The flavors actually meld and develop overnight, creating deeper, more complex muffins. Plus, nothing beats the smell of fresh muffins on a Monday morning when you barely had to lift a finger.
The Freezer Gold Mine
These muffins freeze beautifully for up to three months. Wrap them individually in plastic wrap, then foil, and pop them into a freezer bag. When you're ready to eat, unwrap and microwave for 30-45 seconds. They'll taste like they just came out of the oven, complete with that molten cream cheese center. I always make a double batch because my future self deserves treats, and so does yours.
Creative Twists and Variations
This recipe is a playground. Here are some of my favorite ways to switch things up:
The Raspberry Lemon Revolution
Swap strawberries for raspberries and add a teaspoon of lemon zest to both the batter and cream cheese filling. The tart berries against the bright citrus creates this incredible flavor explosion that tastes like summer in the French countryside. Dust with powdered sugar instead of crumb topping for a more refined version that would impress even the snottiest Parisian patisserie owner.
The Chocolate Strawberry Seduction
Add two tablespoons of cocoa powder to the flour mixture and replace half the strawberries with mini chocolate chips. The combination creates this sophisticated flavor that tastes like chocolate-covered strawberries got a PhD in deliciousness. Use dark chocolate chips if you want to feel fancy, milk chocolate if you want to feel like a kid in a candy store.
The Tropical Getaway
Replace half the milk with coconut milk, add shredded coconut to the crumb topping, and swap strawberries for diced mango. One bite and you're on a beach somewhere, even if you're actually sitting in your kitchen wearing mismatched socks. The coconut adds this tropical note that makes people ask if you've been secretly taking baking classes in Hawaii.
The Autumn Comfort Version
Use diced apples sautéed in butter and cinnamon instead of strawberries, add a pinch of nutmeg to the batter, and use brown sugar in the crumb topping. It tastes like apple pie and cheesecake had a beautiful baby. Perfect for those crisp fall mornings when you want to feel cozy and indulged without putting on real pants to go to an actual bakery.
The Breakfast of Champions
Add a quarter cup of ground almonds to the flour mixture and top with sliced almonds before baking. The nuts toast in the oven, creating this incredible depth of flavor and adding protein that makes eating three muffins feel almost virtuous. Almost. Add a drizzle of honey after cooling for that extra something that makes people beg for the recipe.
The Midnight Snacker
Make mini muffins instead of regular ones — just reduce baking time to 12-15 minutes. They're dangerously poppable and the perfect size for sneaking into the kitchen at midnight. Keep a container hidden in the freezer for emergencies, which in my life means Tuesday.
Storing and Bringing It Back to Life
Fridge Storage
Store completely cooled muffins in an airtight container in the refrigerator for up to five days. Line the container with paper towels to absorb excess moisture — nobody likes a soggy muffin bottom. Place another paper towel on top before sealing. They'll stay fresh and the cream cheese filling will remain safe. Let them come to room temperature before serving, or warm them slightly for that fresh-baked experience.
Freezer Friendly
These muffins are freezer superstars. Wrap each cooled muffin individually in plastic wrap, then aluminum foil, and store in a freezer bag for up to three months. Label with the date because future you will thank present you for being so organized. To thaw, unwrap and let sit at room temperature for an hour, or microwave for 30-45 seconds if you're impatient (and honestly, who isn't when muffins are involved?).
Best Reheating Method
For that fresh-from-the-oven experience, split muffins in half and toast them cut-side down in a dry skillet over medium heat for 2-3 minutes. This recreates the crispy edges and warms the cream cheese filling to that perfect molten consistency. Add a tiny splash of water to the pan and cover for 30 seconds to create steam that refreshes the crumb. It's like having a personal baker who works for free and never judges you for eating three muffins in one sitting.