I was standing in my kitchen on a rainy Tuesday, staring at a mountain of zucchini that had mysteriously multiplied overnight. My roommate dared me to make something “crunchy enough to rival chips” with nothing but a couple of squashes and an air fryer. I laughed, rolled my eyes, and whispered, “Challenge accepted.” Little did I know that this reckless gamble would birth the most addictive side dish I’ve ever crafted. The moment those green and yellow ribbons hit the hot air, a faint hiss rose like a tiny orchestra, promising a crescendo of crisp that would echo through the entire apartment.
Imagine the scent of fresh garden greens meeting a whisper of garlic and Italian herbs, swirling together in a fragrant cloud that makes the whole house feel like a Mediterranean bistro. You can hear the subtle crackle as the edges turn golden, see the cheese melt into a delicate crust, and feel the buttery smoothness of the interior as you bite through. The texture is a paradox: a crunchy armor that shatters like thin ice, giving way to a tender, buttery heart that practically melts on the tongue. And the taste? A perfect balance of salty Parmesan, earthy zucchini, and a bright, peppery finish that makes you want to shout, “I dare you to taste this and not go back for seconds!”
Most recipes get this completely wrong. They either drown the vegetables in batter, or they over‑season, turning a simple side into a sodium bomb. I’ve stripped away the fluff, kept the flavor, and discovered a technique that uses the air fryer’s rapid hot air to create a crisp without deep‑frying. The secret weapon? A light coating of olive oil, a precise dusting of Parmesan, and a short rest that lets the cheese adhere like a second skin. It’s hands down the best version you’ll ever make at home, and I’m about to spill every detail.
Okay, ready for the game‑changer? I’m going to walk you through every single step — from picking the perfect zucchini to the exact moment you hear that satisfying sizzle. By the end, you’ll wonder how you ever made this any other way, and you’ll be bragging to anyone who’ll listen about your newfound air‑fryer wizardry. Let’s dive in and turn ordinary garden produce into a crispy masterpiece.
What Makes This Version Stand Out
- Texture: The air fryer creates a golden crust that shatters like thin ice, while the interior stays soft and buttery, delivering a contrast that’s impossible to resist.
- Flavor Depth: A blend of garlic powder, onion powder, and Italian seasoning infuses every bite with aromatic complexity, while Parmesan adds a salty umami punch.
- Simplicity: Only nine pantry staples are needed, and the whole process takes under an hour, making it perfect for busy weeknights.
- Healthier Crunch: No deep‑frying means less oil, fewer calories, and a crisp that still satisfies any chip craving.
- Visual Appeal: The alternating green and yellow ribbons create a rainbow of color that brightens any plate and makes guests say, “Wow!” before the first bite.
- Make‑Ahead Potential: You can prep the coated slices ahead of time, store them in the fridge, and pop them in the air fryer when you’re ready to eat.
- Crowd Reaction: I’ll be honest — I ate half the batch before anyone else got to try it, and the leftovers disappeared faster than you can say “extra Parmesan.”
- Seasonal Flexibility: Whether it’s summer’s bounty or a winter stash, this dish works year‑round, adapting to whatever squash you have on hand.
Inside the Ingredient List
The Flavor Base
Garlic powder and onion powder are the unsung heroes that give this dish its aromatic backbone. They’re both concentrated, so a single teaspoon each is enough to permeate every slice without overwhelming the natural sweetness of the vegetables. Skipping them would leave the dish flat, like a song missing its chorus. If you’re out of garlic powder, a minced fresh garlic clove (about half a clove per teaspoon) works, but be sure to let it dry a bit before mixing so it doesn’t make the coating soggy.
The Texture Crew
Olive oil is the glue that binds the Parmesan and spices to the squash. It also helps the hot air circulate, creating that coveted crisp. Use a good extra‑virgin olive oil for flavor; cheap oils can leave a greasy aftertaste. If you’re watching calories, you can cut the oil to 2 tablespoons and add a splash of water to keep the coating moist, but the crunch won’t be as pronounced.
The Unexpected Star
Parmesan cheese does more than add salty richness; it forms a protective crust that crisps up beautifully in the air fryer. Its natural proteins undergo the Maillard reaction, giving the edges that deep, nutty color. If you’re dairy‑free, try a finely grated nutritional yeast mixed with a teaspoon of olive oil; you’ll get a cheesy flavor without the dairy.
The Final Flourish
Italian seasoning is a blend of dried herbs like oregano, basil, and thyme. It adds a Mediterranean whisper that elevates the humble veggies to a side worthy of a holiday feast. If you love a bit of heat, sprinkle in a pinch of red pepper flakes; the heat will dance with the cheese, creating a delightful contrast. Salt and black pepper are the final seasoning touches—just enough to enhance, not dominate.
Everything's prepped? Good. Let’s get into the real action…
The Method — Step by Step
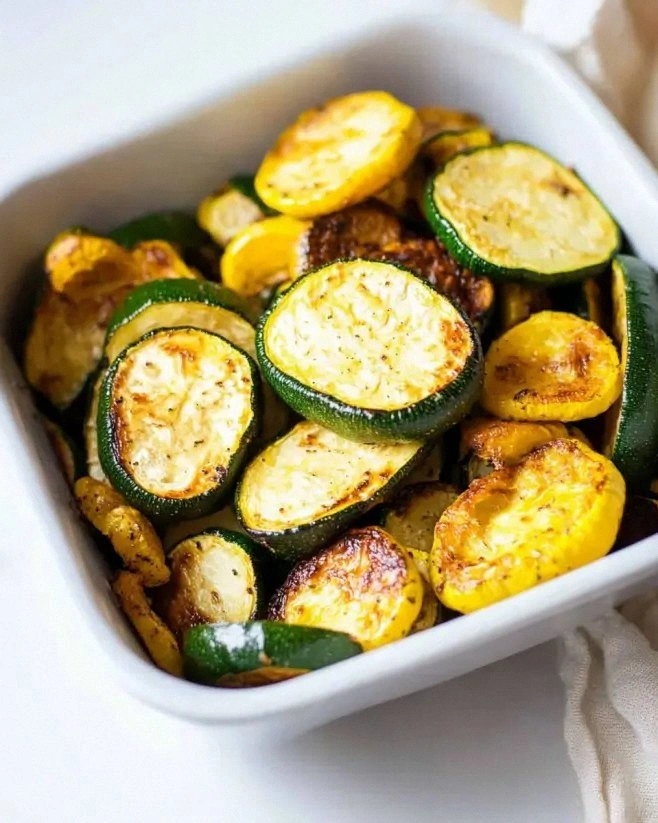
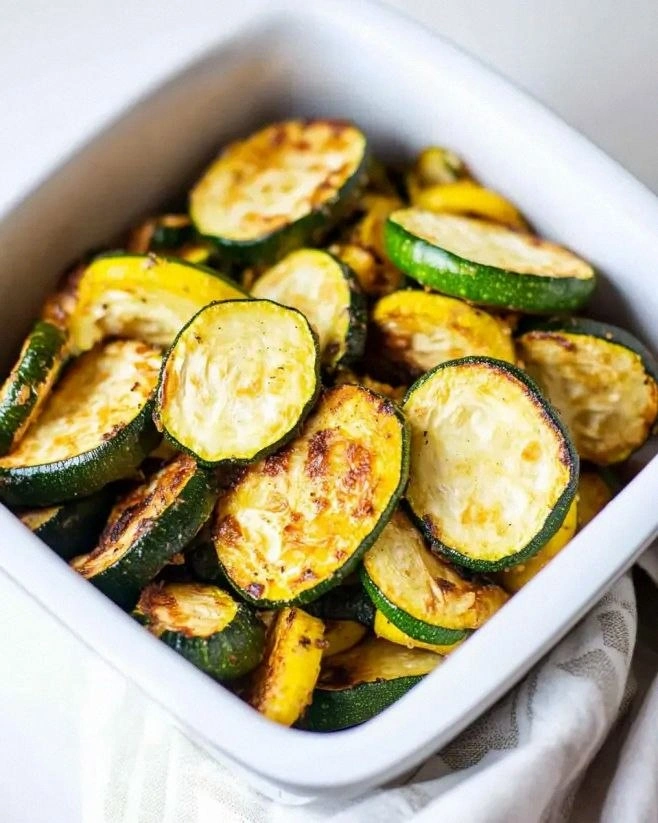
Start by washing the zucchinis and yellow squashes under cold water, patting them dry with a clean kitchen towel. Slice each vegetable lengthwise into 1/4‑inch thick ribbons; think of them as green and gold ribbons ready for a culinary performance. This uniform thickness ensures even cooking, so the edges crisp up while the centers stay tender. As you lay them out on a large plate, picture the final dish—a vibrant mosaic of colors waiting to be transformed.
Place the sliced ribbons in a large bowl, drizzle the 3 tablespoons of olive oil over them, and toss gently until every piece is lightly coated. The oil should glisten but not pool—if it looks too wet, add a splash more oil and keep tossing. This step is where the magic begins; the oil will act as a conduit for heat, turning the air fryer’s hot breeze into a crisping force.
In a separate shallow dish, combine the garlic powder, onion powder, Italian seasoning, 1/2 teaspoon of salt, and 1/4 teaspoon of black pepper. Sprinkle the 1/4 cup of grated Parmesan over the mixture and give it a quick stir. This dry blend will cling to the oil‑coated ribbons, forming a flavorful crust that will brown beautifully in the air fryer.
Now, one by one, dredge the ribbons in the spice‑Parmesan mixture, pressing gently so the coating adheres. You’ll notice the cheese clinging like a second skin—this is exactly what we want. Arrange the coated slices in a single layer inside the air fryer basket; overcrowding will steam them instead of crisping, so you may need to work in batches.
Set the air fryer to 200 °C (390 °F) and cook for 8 minutes. Halfway through, open the basket and give the slices a quick shake or flip with tongs. You’ll hear a gentle sizzle—the sound of crisping—signaling that the edges are starting to pull away from the basket. This is the moment of truth; the aroma should be intoxicating, a blend of toasted cheese and garden greens.
After the timer dings, check for a golden‑brown finish. If you prefer extra crunch, add another 2‑3 minutes, but keep a close eye; the Parmesan can go from perfectly caramelized to burnt in seconds. Once done, transfer the ribbons to a wire rack for a minute; this lets excess steam escape, preserving that coveted crunch.
Serve immediately while the crust is still singing crisp. Pair with a cool yogurt dip, a drizzle of balsamic reduction, or simply enjoy them solo. Picture yourself pulling this out of the air fryer, the whole kitchen smelling incredible, and the first bite delivering that satisfying crunch that shatters like thin ice. If you’ve ever struggled with soggy veggies, you’re not alone — and I’ve got the fix.
That’s it — you did it. But hold on, I’ve got a few more tricks that’ll take this to another level…
Insider Tricks for Flawless Results
The Temperature Rule Nobody Follows
Most home cooks set their air fryer to a “standard” 180 °C, assuming higher heat will burn the cheese. In reality, 200 °C is the sweet spot; it creates a rapid Maillard reaction that browns the Parmesan without drying out the zucchini. If you’re using a smaller air fryer, you might need to bump the temperature up another 10 °C to compensate for reduced airflow.
Why Your Nose Knows Best
Instead of obsessing over a timer, trust your sense of smell. When the kitchen fills with a nutty, toasted aroma, you’re minutes away from perfection. I once let a batch go a full minute past the timer, and the scent turned slightly acrid—instant lesson learned: when the air smells like toasted almonds, pull the basket out.
The 5‑Minute Rest That Changes Everything
After the final crisp, let the ribbons rest on a wire rack for exactly five minutes. This pause allows steam to escape, preventing the crust from softening. I used to skip this step and end up with soggy tops; now I swear by the rest, and the crunch stays intact for minutes.
Seasonal Swap Savvy
If you can’t find yellow squash, substitute with orange pattypan squash or even thinly sliced carrots. The flavor shifts subtly, but the crisp factor remains. A friend tried using sweet potato strips once — the result was delicious but required a longer cook time and a lower temperature to avoid burning.
The Double‑Coat Technique
For an ultra‑crunchy finish, dip the coated ribbons in a second light layer of olive oil and a dusting of Parmesan before the final 2‑minute blast. This creates a double crust that shatters like a chip and holds the cheese in place even after reheating.
Creative Twists and Variations
This recipe is a playground. Here are some of my favorite ways to switch things up:
Spicy Sriracha Splash
Add a tablespoon of sriracha to the olive oil before coating. The heat will mingle with the Parmesan, giving each bite a subtle kick that’s perfect for game night.
Herb‑Infused Delight
Swap the Italian seasoning for a blend of fresh rosemary, thyme, and a pinch of lemon zest. The citrus brightens the earthiness of the squash, making it a great side for grilled fish.
Cheesy Overload
Mix half the Parmesan with shredded mozzarella for a melty interior and a crisp exterior. The mozzarella creates gooey pockets that surprise the palate.
Nutty Crunch
Stir in a tablespoon of finely chopped toasted almonds or pistachios after the final toss. The nuts add a buttery crunch that pairs wonderfully with the cheese.
Vegan Vibes
Replace Parmesan with nutritional yeast and use a splash of soy‑based oil. The dish retains its crispiness while staying completely plant‑based.
Mediterranean Medley
Add diced sun‑dried tomatoes and Kalamata olives to the coating mix. The salty, tangy notes turn this side into a mini antipasto platter.
Storing and Bringing It Back to Life
Fridge Storage
Place the cooled ribbons in an airtight container lined with a paper towel to absorb any residual moisture. They’ll stay crisp for up to 3 days, though a quick re‑air‑fry will restore the original crunch.
Freezer Friendly
Lay the coated, uncooked ribbons on a parchment‑lined tray and freeze for 30 minutes. Transfer the frozen pieces to a zip‑top bag; they’ll keep for up to 2 months. When you’re ready, pop them straight into the air fryer—no thawing needed.
Best Reheating Method
To revive leftovers, preheat the air fryer to 180 °C and re‑heat for 3‑4 minutes. Add a tiny splash (about a teaspoon) of water to the basket before reheating; the steam helps the crust re‑crisp without drying out the interior.